This guide covers command function, parameter structure, and how they are used in typical workflows.
Commands in this description are organized by the type of device they control (for example a switcher or audio mixer) with examples illustrating their common usage scenarios.
For users familiar with the existing desktop Template Editor, a separate section, Transitioning from the old Template Editor, highlights key differences in behavior and compatibility.
As the Template Editor evolves, more command types will be added.
Video Switcher Commands
Command Structure
For video switcher (vision mixer) commands that assign a source, such as Switch Main, Switch Region, or Set Source, Template Editor uses a hierarchical structure that precisely defines source destination, in the form:
Region → Layer → Channel → Source.
This hierarchical model supports a wide range of production systems, from traditional hardware switchers to modern software-based mixers. While it is essential for source-mapping commands, not all vision mixer commands necessarily use this structure.
Here’s a breakdown of each element:
Region
The top-level destination for the source. This could be:
Program/Preview (PP): The main switcher output
Mix/Effect (ME1, ME2, etc.): For complex layer compositions
Auxiliary (AUX): For independent outputs
In some systems, this is called either a scene (Panasonic Kairos), or a graphic scene (see Viz Engine as a Switcher).
Layer
Identifies a compositing layer (for example, Background, Layer 1, Layer 2, Layer 3) where the source should be placed.
The Background (also referred to as Main) layer represents the base layer of the visual composition, the foundation onto which all other visual elements (graphics, overlays, picture-in-picture, etc.) are added.
This layer may support A/B transitions (Preview + Program). In traditional switchers, this corresponds to the background video source of any M/E bank, not just the Program output.
Each M/E has a base input (the Background), which can have keys and effects stacked above it. In modern, layer-based switchers like Panasonic Kairos, it serves as a virtual construct to simulate this foundation. The web-based Template Editor uses this concept to unify how the base layer is addressed across both traditional and fully composited switcher architectures.
Note: This layer is not available when region Auxiliary is selected.Layer 1, Layer 2, Layer 3, and so on, are used to place content on top of the main background layer. Each of these layers currently has just one video bus (called A) and currently does not support transitions between two sources like traditional A/B transitions.
Examples are:Panasonic Kairos supports multiple layers in both single and dual-bus modes.
TriCaster M/Es allow multi-row compositions (A, B, C, D).
Viz Engine treats superchannels as layers with A/B buses.
The Layer may be fixed based on command type (for example, Switch Main does not expose a layer setting, this is set by default to Background and cannot be changed).
Channel
This is the final destination where the source is assigned. In a dual‐bus background layer, this might be A (program) or B (preview). Single-bus layers typically only use channel A.
Source
The actual input, such as a camera, live feed, graphics input etc., referenced by its name (crosspoint) configured on the Viz Mosart server in AV Automation in the menu
Devices > A/V Setup > Video Config. (for example, CAM1, LIVE1).
Switch Main
The Switch Main command sets the source on the main output (Program/Preview) of the switcher. This can be a direct source like a camera, graphic, or video feed (for example, CAM1), or a secondary region (for example, ME1) that is being composed elsewhere.
Properties
Region: Program/Preview (the main output). This can not be changed.
Source: The desired source (e.g., CAM1). Default: the first source in the list.
Trigger: Specifies where the command is executed. This can not be changed. The command transitions the selected source on the main output from Preview (B) to Program (A) when the template is taken on air. In the Properties on the command on TAKE is visualized, but in the Timeline view, both the commands on CUE and on TAKE are visualized.
Offset: Optional delay in frames. Ignored when Mix Delay is enabled; instead, the Mix Delay applies a unified offset to this and other commands. Default: 0 frames.
Transition style: CUT, MIX, WIPE or EFFECT. CUT is in fact a MIX with transition rate 0 frames. Default: CUT
Transition rate: MIX and WIPE support optional transition rate (in frames). Default: 0 frames.
Switch Region
Switches a source to the background of another mixer region (for example, ME1, ME2) different from the main output (PP). This allows for switching sources in parallel with the main output - typically used in compositions, picture-in-picture, or secondary outputs.
Command properties
Region: ME1, ME2, etc.
Layer: Background. Like Switch Main, Switch Region does not expose a layer setting. It always switches the background layer of the selected region.
Source: The desired source (for example, CAM1). Default: The first source in the list.
Trigger: Specifies where the command is executed. This cannot be changed. The command transitions the selected source on the mixer region from Preview (B) to Program (A) when the template is taken on air.
In the command Properties view only the TAKE command is shown, but in the Timeline view, both the commands on CUE and on TAKE are visualized.Offset: Optional delay in frames. Ignored when Mix Delay is enabled; instead, the Mix Delay applies a unified offset to this and other commands. Default: 0 frames.
Transition style: CUT, MIX, WIPE or EFFECT. CUT is in fact a MIX with transition rate 0 frames. Default: CUT.
Transition rate: MIX and WIPE support optional transition rate (in frames). Default: 0 frames.
Info: Limitations with current version
A maximum of two switch commands are supported in a single template execution
one for PP (main) and
one for a secondary region (for example, ME1).
Only one non-main region (ME1, ME2, etc.) can be used for Switch Region.
Shared transition and offset: Both Switch Main and Switch Region commands in a template will use the same transition type and same offset.
Set Source
The Set Source command is used to assign a specific source to a single-bus layer, typically used for keyers, picture-in-picture, video walls, auxiliaries or other compositional elements within a production scene.
Unlike Switch Main or Switch Region, which operate on background layers and typically trigger a transition (for example, Mix, Cut), Set Source is a direct source assignment. One case is an exception: when the Region is not Auxiliary, the Layer is not Background, the Channel is A or empty and the Trigger is TAKE, the command also carries Transition style and Transition rate, with the same choices as Switch Main and CUT as the default. Commands created in the desktop Template Editor never show them.
Command properties
Region: Specifies the mixer region where the source should be applied. For example, Program/Preview (PP), ME1, ME2, Auxiliary, etc.
Layer: Indicates the layer within the selected region. Can be Background (except when Region is set to Auxiliary) or a numbered layer (for example, Layer 1, Layer 2, etc.).
Channel: Defines the channel to assign the source to, A or B. This is only applicable when the Layer is set to Background.
Source: The source to be assigned (for example, CAM1, LIVE1). If left empty, the first available source in the drop-down list is used by default.
Trigger: Specifies when the command should be executed, on CUE, TAKE, or OUT. Only a single OUT command per template is supported in this version, and an information line below the Trigger field says so. If you duplicate or paste a command whose trigger is OUT into a template that already has one, the copy is moved to TAKE.
Offset: An optional delay (in frames) before the command is executed. It can be set when the Trigger is CUE, and also when the Trigger is TAKE and the Layer is not Background, provided the command was not created in the desktop Template Editor. In every other case the field is disabled and a hint explains why.
Info: The Mix Delay setting (defined at the template level) applies to the Set Source command only if:
the Layer is set to Background, and
the Trigger is set to TAKE.
Examples
Assigning keyers for a 2Box composition.
This template uses two Set Source commands to assign video sources to different keyer layers on the ME1 region.The first command maps CAM1 to Layer 1, used as the left video box.
The second command maps LIVE2 to Layer 2, used as the right video box.
This setup is commonly used in 2Box or split screen layouts, where two speakers or feeds need to be shown side by side, with the ME handling the composition.
Taking multiple sources simultaneously
This template prepares and takes multiple sources simultaneously: It sets LIVE1 to preview (channel B) of ME2 on cue, then switches LIVE1 to program (channel A) of ME2 and routes Aux1 to an auxiliary layer when the template is taken.
Macro Recall
The Macro Recall command recalls a switcher macro on one bus, chosen by the trigger. A CUE command recalls on the preview bus when the template is cued; a TAKE command recalls on the program bus when the template is taken.
Command properties
Recall preview (shown when Trigger is CUE) or Recall program (shown when Trigger is TAKE): the macro to recall. With a TriCaster configured this is a picker driven by the TriCaster macro folder; otherwise it is a free-text field.
Function: what the switcher does with the macro. Recall, Take, Recall and Take, or Load project.
Trigger: CUE or TAKE. Only one Macro Recall command can own each bus, so once a template already holds the other one, this becomes read-only. Deleting that command frees the trigger again.
On-air protection: see below.
Test action recalls the macro immediately, so you can check it while building the template.
On-air protection
On-air protection sits in the command's EXECUTION CONTROL group, directly under Trigger. While the template holding the macro is on air, it stops macros belonging to other templates from firing when those templates are cued, so the on-air look is not disturbed.
Value | What it blocks |
|---|---|
Off | Nothing. This is the default. |
All templates | Every other template. |
Same template type | Only other protected templates of the same type, for example another DVE. |
Taking a template to program always runs that template's own macro, so the next look still goes on air. Protection holds back the macros of templates that are merely being cued behind it.
Info: The value belongs to the template's macro recall as a whole, not to one bus. If a template holds both a CUE and a TAKE Macro Recall command, changing On-air protection on either one changes it on both.
Audio Mixer Commands
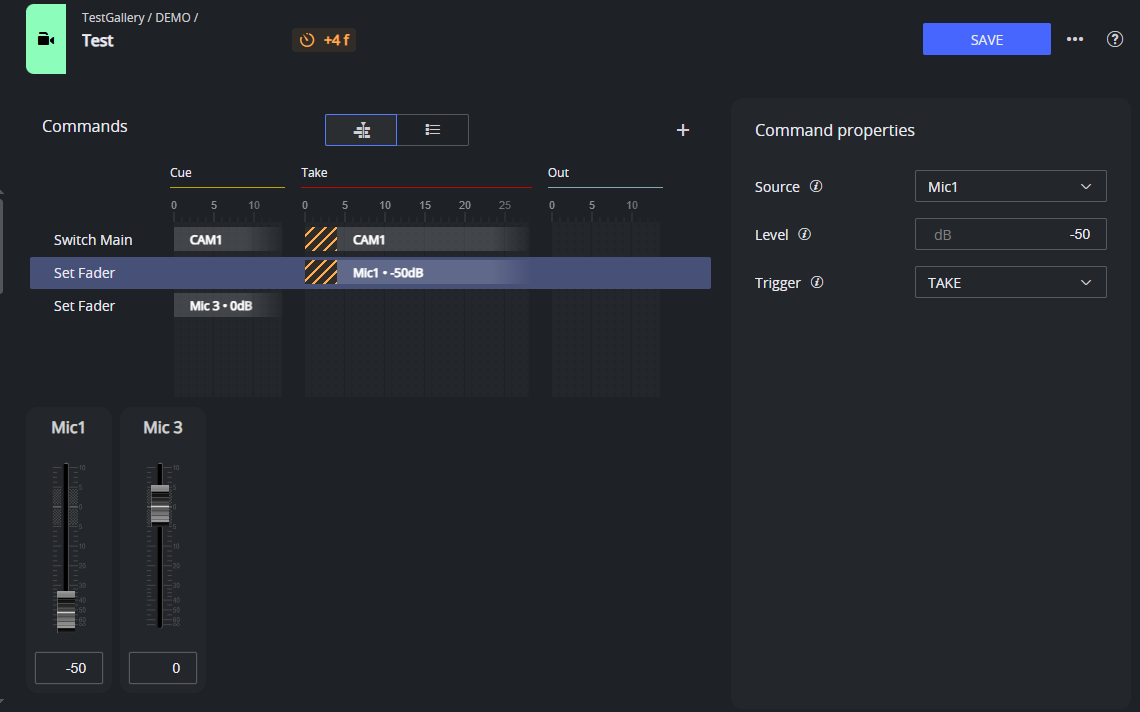
Set Fader
The Set Fader command is used to adjust the audio level of a specific source at a defined point in the template timeline.
Command properties
Source: The audio input to be controlled (e.g., Mic1, Mic2, etc.) as configured on the Viz Mosart server in AV Automation in the menu
Devices > A/V Setup > Audio Config.Level: The target audio level in decibels (dB). The fader scale runs from +10 dB at the top down to -90 dB at the bottom, where the level reads as minus infinity. A newly added Set Fader command starts at 0 dB.
Trigger: Defines when the fader level should be applied: on CUE or TAKE.
Info: The Mix Delay setting (defined at the template level) applies to the Set Fader command only if the command is executed on TAKE.
Robotic Camera Commands
Camera Shot
The Camera Shot command recalls a stored shot (a framing) on a robotic camera head. On CUE, the head pre-positions while the template is cued, normally before its camera is on air. On TAKE, it moves as the template is taken, and the move is visible on air.
Pages and presets are the numbers, or names, already stored in the camera controller. The Template Editor saves them as typed and does not check them against the controller.
Command properties
The properties are grouped in up to four sections in the panel.
CAMERA
Cameras: One camera aims the shot at a single camera number. All cameras sends it to every camera that is not in standby.
Camera number: which camera the shot is routed to, as configured on the Viz Mosart server in AV Automation under Devices > Properties > Camera Robotics. Shown for One camera.
SHOT
Shot name: a free-text label for this shot. Playout never reads it, so it is there to make the template readable.
Page: what this addresses depends on the camera system. On NDI PTZ and similar it is the camera itself; on the others it is a preset page, show or matrix.
Preset: the stored framing to recall, a number on some camera systems and a name on others. Free text, stored exactly as typed.
Move time: how long the move takes. The unit depends on the camera system: seconds on Telemetrics, where 0 means cut straight to the framing, and a speed fraction between 0 and 1 on NDI PTZ.
EXECUTION CONTROL
Trigger: CUE or TAKE, as described above.
Offset: frames to wait after the take before the move starts. Only NDI PTZ and Vinten honor it (on Vinten, every shot waits for the Offset of the last shot that fires), and a shot that fires on CUE has no delay.
Protect on-air camera: a video switcher crosspoint, for example
CAM1. If that crosspoint is on air when the recall fires, the shot is skipped and the head stays where it is. Leave it empty for no protection.
WATCH CAMERA
Device and Video source: an optional live picture to watch while you set the shot, from the TriCaster inputs (listed as Switcher) or from a machine sending NDI directly. Video source appears when the device has more than one. Sources whose stream cannot be received are not listed, and the section is hidden when none is found.
Note: A shot with no Preset is saved, and the editor flags it: No preset set. Set a preset before the template goes on air: a Preset you clear here is saved empty, and Telemetrics then recalls preset 0.
Note: Use one shot per camera per trigger. Two shots aimed at the same camera on the same trigger fire in list order without waiting for each other, so the last recall wins. The editor warns when a template does this.
Light Commands
Light Control
The Light Control command sends a command and a value to the light desk, for example Go with the value 22 to run cue 22. The editor does not check either field. Which commands work depends on the light controller set up in AV Automation: MIDI Show Control takes commands such as Go, and ETC Eos OSC and grandMA3 OSC accept only Custom, with an OSC message as the value.
Command properties
Command: the command to send, for example Go or Custom, spelled as the light controller expects.
Value: the value sent with the command, for example a cue number.
Trigger: CUE sends the command while the template is cued, TAKE when it is taken.
Info: A template holds one light command per trigger, so at most two: one on CUE and one on TAKE. A second light command goes to the free trigger, and Trigger then becomes read-only. Deleting one of them frees its trigger again.
Info: There is no Offset on a light command. The light desk gets the command at the trigger itself, and the field is shown disabled with a hint saying so.
Note: Fill in both Command and Value, otherwise nothing is sent. The editor flags a command with no Value (No value set), and that command is gone the next time you open the template.
GPI/O Commands
GPI/O Control
The GPI/O Control command lets a template switch something outside the automation chain, for example an on-air lamp. It fires an output port on the WebIO boxes: it pulses the port, or sets it high or low and leaves it there.
Command properties
Port: the output port, 0 to 47. Ports 0 to 11 are on the first WebIO box, 12 to 23 on the second, and so on across four boxes of twelve. A typed value outside that range is accepted but flagged.
Action: what the port does when the command fires. Pulse closes the contact and releases it again. Set high closes it and leaves it closed, Set low opens it. Use high and low as a pair, for example a lamp switched on by one story and off by another.
Trigger: CUE fires the port while the template is cued, TAKE when it is taken.
Info: A template can hold any number of GPI/O commands, and all of them fire on their trigger, in list order. Add one command per port: if two commands share a port and trigger, both are sent and the last one in the list decides the port's final state. Two pulses become two requests back to back, and Set high followed by Set low leaves the port low.
Info: There is no Offset on a GPI/O command. The port fires at the trigger itself, and the field is shown disabled with a hint saying so.
Note: A port outside 0 to 47 fires nothing, and the editor flags it in the command list, on the timeline and in the properties panel (Port is outside 0 to 47). A port above 47 is saved, and AV Automation logs an addressing error at the trigger. A negative port is not kept: it is gone the next time you open the template.
Fine-tuning On-Air Action Timings
In the Template Editor, you can control when certain actions are executed relative to the moment a template is taken on-air. This is done using either:
A global Mix Delay, defined in the template properties.
An individual Offset, defined per command.
Some commands support both, depending on their configuration.
Mix Delay introduces a shared delay (in frames) applied to eligible commands when the template is taken on-air. It's useful when you want multiple commands delayed together, in a coordinated way.
In addition to a template’s Mix Delay, some commands also support their own Offset property, an individual delay in frames.
Delay mechanism summary
Command Type | Mix Delay applies if | Offset applies if |
|---|---|---|
Switch Main | Trigger is TAKE | Mix Delay is not set |
Switch Region | Trigger is TAKE | Mix Delay is not set |
Set Source | Layer is Background and Trigger is TAKE | Trigger is CUE, or Trigger is TAKE with a Layer other than Background, unless the command was created in the desktop Template Editor |
Set Fader | Trigger is TAKE | Not supported |
Macro Recall | Never | Not supported |
Camera Shot | Never | Trigger is TAKE, on NDI PTZ and Vinten only |
Light Control | Never | Not supported |
GPI/O Control | Never | Not supported |
Template Terms and Definitions
Some common terminology used in template and show design:
Directtakes: A special template set, where templates in this set are intended to be manually executed in an ad-hoc fashion.
Empty template: An undefined, non-operative template. An empty template does nothing when executed. Note that empty templates are not displayed in the Viz Mosart client.
Gallery: Corresponds to a Viz Mosart installation. Typically a gallery has a dedicated Viz Mosart server, with configured utilities and a Viz Mosart client.
Show design: The background task of creating a set of templates, in a logical and programmatically valid order, for controlling a scheduled, rundown-driven, studio transmission.
Template description: The template properties common for all Viz Mosart installations in a shared template set. This description uniquely identifies and describes the template.
Template implementation: Contains the behavior or device control aspects of the template. The template implementation is related to the Viz Mosart installation.
Template set: Viz Mosart templates are always contained in a template set. There may exist multiple versions of the same template but in different template sets.
A template is uniquely defined by its type and variant name within its corresponding template set.Template type: Template type or category. Viz Mosart has a predefined set of template types. Each are displayed with a distinct visual appearance.
Examples of template types are CAMERA, PACKAGE, VOICEOVER, LIVE, GRAPHIC and DVE.Template variant: Unique identifier of a template for given template type within a template set.
For example, camera1 and camera2 are two variants of a Camera template.