There are three playlist modes available in Viz Trio:
Viz Trio show playlists are created using the Create Playlist button and exists only as part of the show.
Viz Pilot Playlists are requested by the Viz Trio operator and modified when integrated with a Viz Pilot system.
Note: A Viz Pilot playlist element cannot be edited, only the structure of the playlist. The Viz Pilot playlist elements can be added to a Viz Trio show playlist, but not a page list.
Newsroom Playlists are requested by the Viz Trio operator, but not modified by default (see General user interface settings). Edits to any element in the newsroom playlist is by default discarded as soon as it is updated by the newsroom system. In most cases, Viz Trio is therefore only used to read and play out elements when monitoring newsroom playlists.
For the playout of newsroom playlists to work, the Media Sequencer must establish a connection to Viz Gateway (see MOS integration).
All shows and playlists are stored in the Media Sequencer for playout, and all Show Playlists can be monitored, stopped and started from the Active Tasks window.
This section covers the following topics:
Activate or Deactivate a Playlist
Create Playlist or open Playlists.
Select Active or Inactive in the menu bar for the currently selected playlist to activate or deactivate the playlist. Activating a playlist makes the Media Sequencers actively monitor the content of the playlist, and start the transfer of video clips to Viz Engine. The duration column shows the duration of the elements. The duration column shows the actual duration of a video clip, or the default duration of the animation for graphic elements. The duration is used when the playlist is played out as a carousel. Then the duration is how long the element stays in the Viz Engine before the next element is taken.
Take Pages On-Air in a Carousel from a Show Playlist
Add pages to the playlist.
Optional: Enable looping.
Optional: Set the concept for the playlist or for each element.
Optional: Set the variant for each element.
Optional: Set the duration for each element or keep the default duration.
Click the Play button to start the carousel.
Click the Pause or Stop button to pause or stop the playlist.
IMPORTANT! Scenes with stop-points and out-animations are being cut as they are not automatically continued when used in a carousel playlist.
Show or Hide Columns in the Playlist
Right-click the playlist header and select columns to display or hide from the menu.
The Auto width option enables automatic resize of columns within the MOS Playlist area.
Disable the Auto width option to manually resize the columns.
Playlist
The control bar is used to set the concept, search, set filters, manage filters, run, pause, stop and loop the playlist. Available concepts are the same as for the show. However, a concept set for the show does not override the playlist’s concept, nor vice versa.
Playlist Context Menu
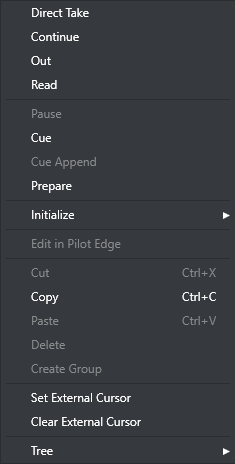
The Playlist context menu provides options to manage pages and data elements in the playlist.
Note: On composite groups containing video, only the following operations can be performed: Direct Take, Read, and Out. On standalone videos, all commands can be performed (Cue, Pause, Prepare, and so on).
Direct Take: Performs a direct take on the selected data element.
Continue: Continues the playout of an element.
Out: Takes the element out (hard cut).
Read: Reads the element, opening it in the page editor and local preview.
Pause: Pauses the element.
Cue: Prepares the clip for playout so the first frame is ready in the player.
Cue Append: Prepares the clip for playout. The clip starts automatically when the current clip ends.
Prepare: Prepares the clip in the pending player without affecting the current clip, so it is ready to be played out. The clip does not start automatically after the current clip. Requires Viz Engine 3.3 or above.
Initialize: Initializes the selected playlist or element (loads graphics) on the external output channels. Sub menu items for Initialize:
Playlist: initializes the playlist.
Element: initializes the currently selected element.
Edit in Pilot Edge: Open the selected playlist element in Viz Pilot Edge.
Cut: Cuts an element to the pasteboard (shortcut: Ctrl+x).
Copy: Copies an element to the pasteboard (shortcut: Ctrl+c).
Paste: Pastes in the current pasteboard element (shortcut: Ctrl+v).
Delete: Deletes the current selected element.
Create Group: Creates a group in the playlist. Groups can be nested.
Set External Cursor: Sets the global cursor (normally related to GPI or Automation system setups) to the selected data element. This requires that the Show External Cursor (GPI) option has been enabled in the User Interface configuration dialog, see the Page List/Playlist and Cursor sections for further details.
Clear External Cursor: Clears the current global cursor.
Tree: The Tree option contains sub-menus for selecting, expanding, collapsing, and moving data elements in the playlist.
Select All: Selects all data elements in the playlist.
Select None: Removes all selections.
Expand All: Expands all nodes in the tree, revealing the grouped data elements.
Collapse All: Collapses all nodes in the tree, hiding the grouped data elements.
Hide Empty Groups: Hides empty groups. This setting only affects the current playlist. In order to make this setting global for all playlists, enable the Store as Default option in the playlist column context menu.
Wrap Text: Wraps all text properties of the element, adjusting the row height accordingly.
Font...: Opens the Font Chooser to set a different font for the playlist.
Show Row Lines: Switch. Select to show Row Lines.
Show Alternating Row Colors: Switch to show alternating row colors.
Playlist Columns
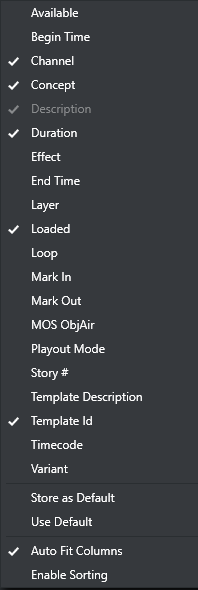
Right-Click on the playlist columns-bar to select values to display:
Available: Displays the status of external resources needed by the Viz Engine (e.g. transferred video, and if it is available on the video playout engines). Errors are shown as tooltips. This column was previously named Progress.
Begin Time: Shows the activation start time for a group (format hh:mm:ss).
Channel: Shows which output channel an element should be sent to. Various elements can be sent to different output channels. The output channels can be set directly in the column. By default the main [PROGRAM] output channel is selected, but this can be overruled by only setting an alternative channel for this element or in a template (that all data elements made from it have). By creating a group and placing elements within it, all elements in the group are organized by having the same channel. The Channel column is presented by default. See the Channel referencing underlying element section for more information about using channels with playlist elements.
Concept: Shows which concept(s) the data element is associated with.
Description: Shows the description of the element. By default, this shows the path of the scene (or the element name of a stand-alone media file). May be edited inline in the playlist.
Duration: Shows the length of the element. The duration is often set by Viz Pilot or a newsroom system. However, the individual elements duration can be set in Viz Trio by editing the Duration column directly. The total duration of the elements in the playlist are shown in the heading for the playlist. The duration of an element is the time before the next element in the list is taken.
Effect: Opens the Choose Effect dialog, which makes it possible to select a transition effect between two pages.
End Time: Shows the activation end time for a group (format hh:mm:ss).
Layer: Allows loading of graphics in separate layers on Viz Engine (front, middle, back). For example, a lower third can be shown in front of a virtual studio set or any other background, or a bug can be shown in the front layer while a lower third is shown in the middle layer. This column is presented by default.
Loaded: Shows the loaded status (in memory) of the scene and images used for a data element of that scene. Errors are shown as tooltips.
Loop: Displays a loop information column. Only a playlist or videos can be looped, not groups or individual elements in a playlist.
Mark In: Sets mark in times for video clips.
Mark Out: Sets mark out times for video clips.
Story #: Shows the story number for stories in MOS playlists. This is only supported from the ENPS newsroom system.
Template Description: Shows the template description (e.g. name).
Template Id: Shows the template ID.
Timecode: The timecode is an offset time on format hh:mm:ss:ff. It indicates that an element should be played out relative to the parent group or video. This is used for instance in composite groups with a video and overlay graphics that is played out on a timeline.
Variant: Select a concept’s variant from the drop-list (see the Concept column).
Store as Default: Stores the layout as the default.
Use Default: Reverts to the default layout.
Auto Fit Columns: Automatically fits all displayed columns to the given width of the playlist.
Enable Sorting: Enable sorting when clicking the column headers.
Channel Referencing Underlying Element
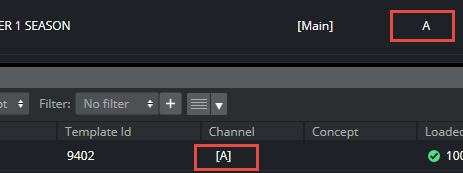
Square brackets in the channel column denote two different scenarios. [PROGRAM] refers to the program channel that is defined in the profile. However, an element with a channel in square brackets in a playlist, for example [A], refers to its underlying element in the pagelist.
Square brackets in a playlist therefore denote a link back to the element in the pagelist. If a channel contains square brackets in a playlist, and the channel is changed in the pagelist, the changed channel in the pagelist is automatically reflected in the playlist. When a channel designated to a playlist element does not have square brackets, it plays out on that channel regardless of the channel designated to the underlying element.
In this scenario, changing the channel in the pagelist (the top panel), it automatically reflects in the channel column in the playlist:
Playing Out an Element from a Playlist and Pagelist
It is possible to designate the channel that an element plays out on either from the pagelist or playlist. Furthermore, it is possible to play out both the underlying element in a pagelist and a playlist element on different channels. You can manage these operations in the channel column.
To play out a playlist element on the same channel as a pagelist element, ensure that the same channel is selected for the pagelist and the playlist. For example, channel B in the pagelist is channel [B] in the playlist. Once a channel appears with square brackets in the playlist it always syncs with the channel in the pagelist. This means that a channel changed in a pagelist is always automatically reflected in the corresponding item in the playlist.
Alternatively, select different channels for the element in the playlist and its underlying element in the pagelist to play them out on different channels. If a channel is changed in the playlist and not in the pagelist, the channel selection isn't updated in the pagelist.
Note: The [PROGRAM] channel is designated with the same square brackets that are used to show a reference to an underlying element. Do not confuse the [PROGRAM] channel with the square brackets for an element in the playlist that refers to its underlying element in the pagelist.
Playlist Filters
You can add a filter to the playlist to narrow down the list of items displayed.
Note: Filtering is for display purposes only and has no effect on carousel playout behavior.
Create a Playlist Filter
Click the Plus button on the toolbar.
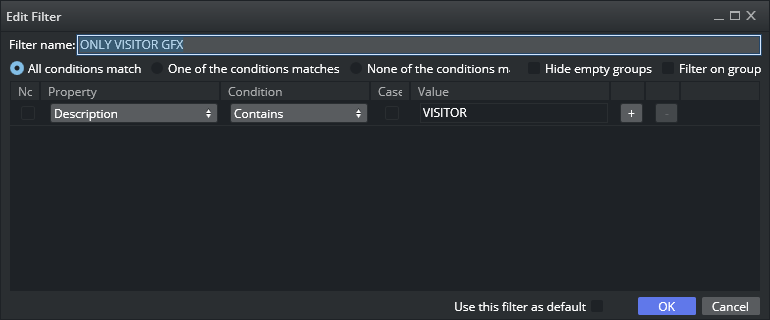
In the Edit filter window that opens, type a descriptive name for the filter.
Fill in the filter values, for example properties and conditions.
Click the OK button.
The filter then becomes available in the Playlist filter list.
Note: Starting with Viz Trio 3, composite videos behave like regular videos when filtering on a playlist.
Add a Playlist Filter for Viz Pilot Integration
Viz Trio can access playlists based on Viz Pilot templates as well as playlists from Newsroom systems via Viz Gateway.
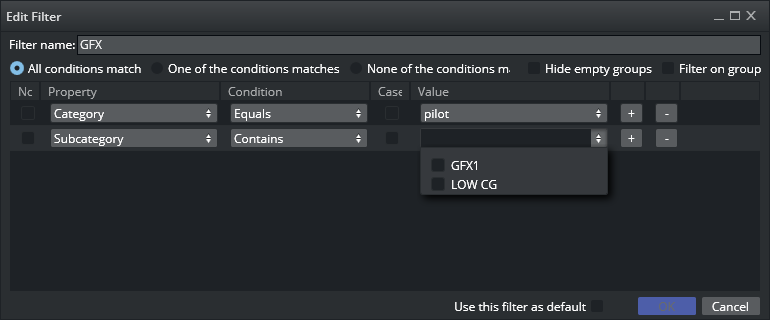
The designer of the Viz Pilot templates can categorize templates by logically dividing them into Categories and Channels. You can use the Viz Trio filters option to filter playlist views based on these categories created by the Viz Pilot template designer as illustrated in the screenshot below. In this example the playlist can be filtered as GFX or LOW CG.
To use Viz Pilot template categories as filters:
Create a new filter or edit an existing filter for a playlist.
In the add/edit filter panel set the column Property to Subcategory and the Value column is populated with the Categories defined by the Viz Pilot template designer. You can now select values for filtering and save the filter. The playlist filtered according to the values selected.
Add a Default Playlist Filter
Create a playlist filter, see To create a playlist filter.
Select the Use this filter as default check box in the Edit filter window.
Click the OK button.
When enabling the default filter option, all playlists of the specified Viz Trio client always use the selected filter. The default filter affects only one Viz Trio client. The default filter is saved and continues to be activated when restarting the Viz Trio client.
These filters are not deleted even if you delete the corresponding page view. However, they can be deleted manually in the filter drop down. If you create two page views with the same filter properties, they share the same filter.


