
Viz Pilot User Guide
Version 8.3 | Published November 30, 2018 ©
Management Options
This section describes the different database management options available in the Pilot DBA User Interface:
-
Install Schema
-
Upgrade Schema
-
Show Schema Status
-
Create Complete DB Solution
-
Backup Schema
-
Restore Backup of Schema
-
Full Export of Database
-
Import All Schemas in Dump
-
Extended Information
-
Database Test
See Also
Install Schema
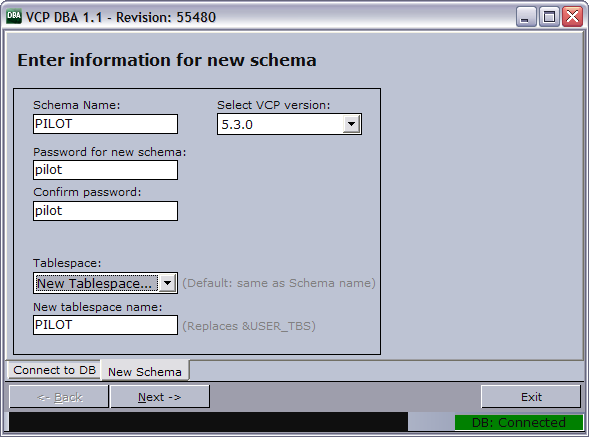
Install New Schema enables the user to install a new schema, set a schema name, username and password, and a tablespace name.
If the user level is set to R&D mode (see Advanced Configuration) it is possible to install an unstable version of the database schema. This is typically the latest version in development, and is only recommended for testing.
To install a new schema
-
Click the Install New Schema button.
-
In the New Schema window, select the Viz Pilot version to be installed.
-
Optional: Enter the schema name and password
-
Optional: Enter the tablespace name. Setting a different tablespace name requires this option to be selected (see Advanced Configuration).
-
Click Next twice to start the installation.
-
Click Next when finished.
Note: If errors occur, see Database Error Logs.
Upgrade Schema
The Upgrade Schema option enables the user to upgrade the schema from the current version to new versions.
If the user level is set to R&D mode (see Advanced Configuration) it is possible to upgrade to an unstable version of the database schema. This is typically the latest version in development, and is only recommended for testing.
To upgrade to a new schema
-
Click the Upgrade Schema button.
-
In the Select Schema window, select the schema that should be upgraded, and click Next.
-
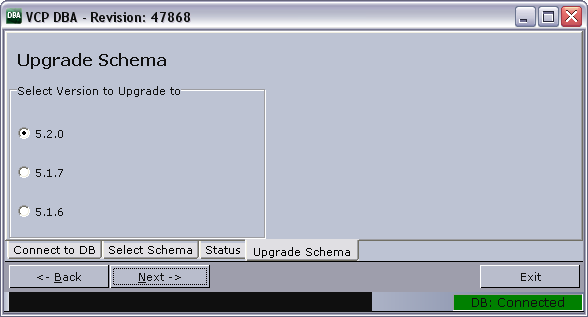
When Pilot DBA has checked the status of the current schema, the Upgrade Schema window will list the available upgrade options.
-
-
Select the schema version, and click Next to see the script that will be executed.
-
When ready to upgrade, click Next to run the scripts.
-
Click Next when finished.
Note: If errors occur, see Database Error Logs .
See Also
Show Schema Status
Schema status shows the status of the selected database schema. The list gives status information on the following:
-
The version of the currently installed schema.
-
Text encoding of the database.
-
Status of AQ.
-
Whether the schema complies with a reference of the currently installed version.
If more than one schema is installed on the same database, a selection dialog is displayed before the status information window is shown.
The available options depend on the configured user level, see Advanced Configuration. Note that most features will be blocked if the database text encoding is not UTF-8.
Caution: With the exception of “View Extended Info”, the “Advanced” options may stop the schema from working if an error occurs while running the scripts.
To see the schema status
-
Click the Show Schema Status button.
-
Select the schema and enter the schema password.
-
Click Next.
Create Complete DB Solution
Creating a complete database solution using Pilot DBA ensures that the database is setup and configured according to our recommendations. It also installs the latest version of the PILOT schema.
The Oracle Standalone Server is a setup with a single server and no form of automated backup.
The Oracle Standby Server is a setup with two standard Oracle servers where one is working as the failover server in case the main server goes down.
The standby server’s failover mechanism is manual, and the backup server is inactive for users when in standby mode. The standby server setup also requires that the main server is started before the backup server.
IMPORTANT! There is no instant synchronization between the servers.
The standby setup is meant to be used with new installations of standby servers. It is created to work with C: drive as the program disk and D: drive as the data disk.
To create a complete stand alone server
-
Click Advanced Configuration and select the support or R&D user level.
-
Click the Create complete db solution button.
-
Select the Stand Alone Server (Windows) option.
-
Select the drives for the software and the data files.
-
Enter the hostname if the hostname was not detected.
-
Click Next.
-
Clicking Next will launch the Oracle Universal Installer, and a separate command schell. The Oracle Universal Installer will install the database.
-
After the installation the Oracle Universal Installer will start to execute the configuration assistants (e.g. Oracle Net Configuration Assistant and so on).
-
-
In the separate command shell window click any key to continue after receiving the message "The installation of Oracle Database 11g was successful." from the Oracle Universal Installer.
-
Pilot DBA will now log itself on to the database and install the PILOT schema.
-
Check that the host information in listener.ora and tnsnames.ora use hostnames and not IP-addresses.
Example: C:\oracle\product\10.2.0\db_1\NETWORK\ADMIN\
To create a complete standby server
-
It is not recommended to perform this setup option without consulting your local Vizrt representative or support person.
Backup Schema
The database backup feature exports a database dump of the schema. If the backup does not produce an output, it is important to check that the Pilot DBA install folder does not contain spaces, and that the Oracle Administrator client is used.
Restore Backup of Schema
Restore a backup imports a database dump of a schema. If the schema name imported to is not the same as the schema name that was exported, it is possible to choose to import to a new schema, however, this also requires that the version of the schema that was dumped is known. The application will do a complete install of that schema version, truncate the tables and import the dump.
Setting the user level to Support will enable the option to select the Viz Pilot version Support only. This version allows a raw import of a database schema which in turn can be used for debugging. A schema imported this way will not have AQ, triggers or constraints enabled, and will therefore not be a schema one can use with the Viz Pilot system applications.
Full Export of Database
Full Export of Database does an export of the entire database, including all schemas in the database. This is mainly used for Customer Support Requests.
The database dump file is saved in the Pilot DBA installation folder, eg. exp_complete.dmp.
Import All Schemas in Dump
Import All Schemas in Dump analyses a dump file to find all tablespaces and users before creating them and importing data from the dump file. Oracle default users and tablespaces are excluded from the imports.
This option is only available to Support and R&D users.
Extended Information
Extended information can be viewed if the option Enable advanced options in extended info is enabled.
Caution: The different actions in these views could potentially stop the schema from working if an error occurs while running the scripts.
Information Tabs
All information tabs have the option to refresh the database information result by clicking the Refresh button.
The following information and options are available:
-
List all tables with counts: Lists all tables in the schema and the number of rows in each.
-
AQ Subscribers: Shows a list of the message queue (AQ) Subscribers currently registered.
-
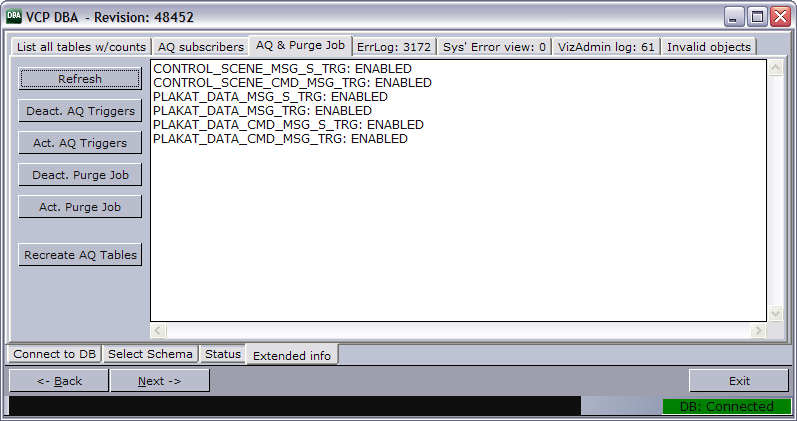
AQ & Purge Job: Lists the status of and allows the user to activate/deactivate the AQ Triggers and the Purge Job. This view also has an option to recreate the AQ tables, which is done by deleting and recreating the tables.
-
Deact. and Act. AQ Triggers: Disables and enables the AQ system if this is working properly.
-
Deact. and Act. Purge Job: Disables and enables a scheduled job on the database that purges old messages from the AQ system to avoid these tables clogging the database with obsolete data. (see, Purge Expired Messages ).
-
Recreate AQ Tables: Deletes all AQ tables and all data in them, and then creates new tables and register these with Oracle’s AQ system. This option will delete all messages not received in the AQ tables, and if any errors occur the AQ system will not work afterwards. This option should therefore not be used by users that do not know how to read to error logs and that are not able to fix AQ issues manually.
-
-
Errlog: (# items in the errlog): Lists the last 100 entries in the errlog. It also gives the option to delete all entries older than 3 months.
-
Sys’ Error view: Lists all errors with the current schema as owner, in the sys’ all_errors view.
-
VizAdmin log: Shows the last 100 entries of the VizAdmin log table.
-
Invalid objects: Shows all invalid objects in the database.
Purge Expired Messages
When a journalist creates a new element of a template, a MOS message is sent from the database to Viz Gateway. All MOS messages are stored on the database which again takes up space on the database server. It is therefore convenient to purge expired messages from the Viz Pilot system’s message queue. As expired messages are transferred to the exception queue, they need to be explicitly removed. This can be done by running a job at regular intervals (every day). By default this is done every day.
To see extended information
-
Click__Show Schema Status.
-
Select schema, enter schema user password, and click Next.
-
Select View Extended Info (Advanced), and click Next.
-
Select one of the tabs to view the extended information.
Database Test
Try connecting to Viz Pilot’s database to test if the database is successfully installed and running.
Start a command-line tool, and then type the following:
-
sqlplus userid/password@tnsname, or
-
sqlplus userid/password@hostname/SID
SQLPlus connection:
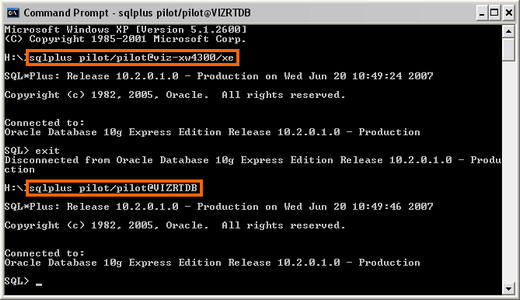
Check that the output is something like the example output below:
C:>sqlplus pilot/pilot@viz-xw4300/xe SQL*Plus: Release 10.2.0.1.0 - Production on Wed Jun 20 12:17:19 2007 Copyright (c) 1982, 2005, Oracle. All rights reserved. Connected to: Oracle Database 10g Express Edition Release 10.2.0.1.0 - Production SQL>The example output above shows that the database is placed on a remote machine, named viz-xw4300, thus the connection string @viz-xw4300/xe is needed (hostname/SID) or just the TNS name.
C:>sqlplus pilot/pilot@VIZRTDBNote: The above screenshot and output example use the SID XE. This is the default SID for Oracle 10g XE, which is an Oracle ‘test database’.