Viz Mosart connects to a variety of audio devices, from various manufacturers.
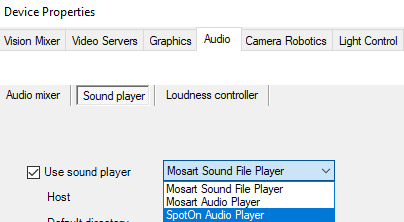
Select the required audio device from AV Automation > Devices > Preferences > Audio.
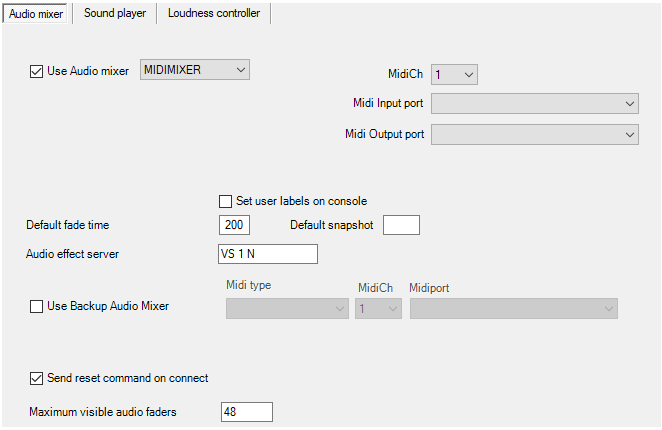
Audio Mixer
This tab enables setting-up of the main mixer and optionally, a backup.
Use Audio mixer: Enables the audio mixer functionality.
Audio Mixer Types
Audio mixer | Protocol | Supported hardware / Comments | Interface |
|---|---|---|---|
Ardour / Harrison Mixbus VBM | OSC | Harrison Mixbus VBM
Note: Harrison MixBus 32C is not supported. | UDP |
CALREC | RAP | RS-422, TCP/IP (Artemis) | |
DHD | DHD RM4200-D v2.02 | TCP/IP | |
EUPHONIX | RAP | COM | |
LAWO RMNOPL | RemoteMNOPL | Lawo mc² | TCP/IP |
LAWO ZIRKON | RAS, Lawo Zirkon subset | RS-422 or TCP/IP | |
LAWO EMBER+ | Ember+ | Lawo audio mixers with A__UHD Core. This requires that the Lawo audio mixer has correct firmware and settings to allow Ember+ control (contact Lawo for details about which specific audio mixer models support this functionality). | TCP/IP |
MIDIMIXER | Sanford.Multimedia | MIDI | |
SSL | Light Broadcast Automation protocol, SSL Broadcast Automation Control Specification – v1.0 | RS-422 or TCP/IP | |
STAGETEC | Stagetec Diamond RAS protocol, Monitora RAS | COM | |
STUDER_3000 | Monitora + Ember, Ember 1.0 | Studer OnAir 3000 | RS-232 or TCP/IP |
STUDER_VISTA | Ember | Studer Vista | TCP/IP |
VIZENGINE | n/a | Viz Opus only | TCP/IP |
WHEATSTONE | Wheatstone Mixer Automation Protocol v.1.4 | TCP/IP | |
YAMAHA_O2 | MIDI | Yamaha 01V96, DM1000, DM2000, DME64N, O2V96, LS9, CL5 | MIDI |
vizrt-ips | NewTek | Vizrt Group/NewTek IPseries mixers. TriCaster, VMC, Viz Verdi, Viz Vectar | TCP/IP |
Serial (Calrec, Lawo, Studer, etc.): Serial port connected to the audio mixer, when Serial radio button is selected.
TCP/IP: Hostname or IP address and port to communicate with the audio mixer, when TCP/IP radio button is selected. Note that for Calrec it is possible to configure a main and backup audio mixer by specifying two comma separated hostname values and port values.
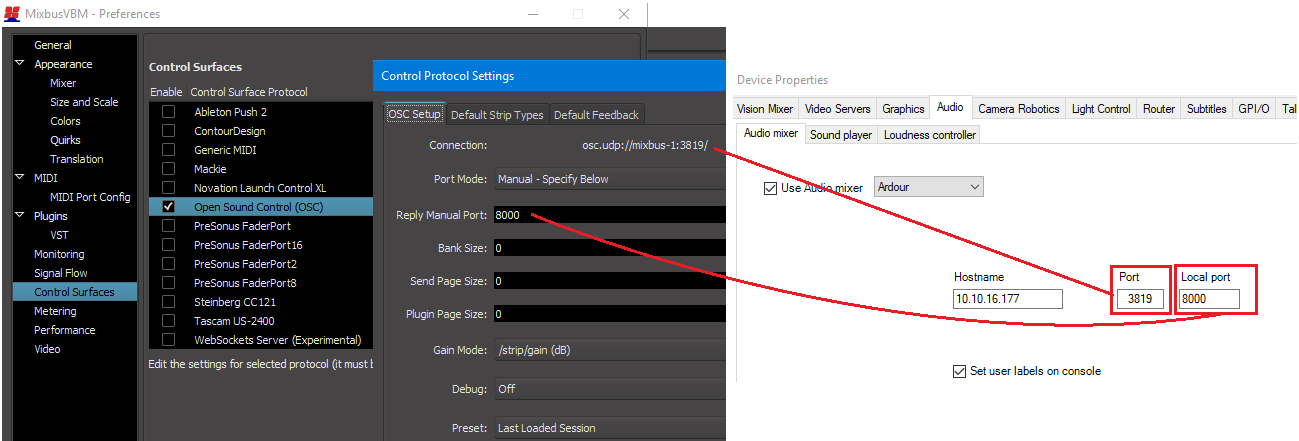
Hostname: Hostname or IP address of the audio mixer.
Port: Port on the audio mixer.
Local port: (Ardour only) The mixer will send messages to this port on the Mosart server. Use 8000 unless there is a good reason for choosing another port.
Backup hostname and port (LAWO RMNOPL): Hostname (or IP address) and port to the backup audio mixer console.
Set user labels on console: When selected, user labels on the (non-EMBER+) Lawo or Vista console are overwritten.
MidiCh (MIDIMIXER and YAMAHA_O2): MIDI channel assigned to the audio mixer. Depending on mixer model, this setting may have to correspond to settings on the mixer.
Midi Input port (MIDIMIXER and YAMAHA_O2): System MIDI input port to communicate with the audio mixer.
Midi Output port (MIDIMIXER and YAMAHA_O2): System MIDI output port to communicate with the audio mixer.
Default fade time: Time in frames for fading open faders with the manual fade function (CTRL+F).
Default snapshot: Snapshot to recall when starting the automation (MIDI parameter change).
Audio effect server: Name for the Audio effect fader. This fader will open if effect transitions are used.
Send reset command on connect: Used for STUDER3000 SW 2.2, or lower. Recalls a default setup for the Mixer panel.
Visible audio faders: Maximum visible faders in AV Automation.
AV Automation Audio Mixer Availability Table
Serial | TCP/IP | MidiCh | Midiport | Hostname | Port | Backup | Backup | Faderinput | Useember | Comport | |
|---|---|---|---|---|---|---|---|---|---|---|---|
Ardour | X | X | |||||||||
CALREC | x | x | x | x | x | ||||||
DHD | x | x | x | ||||||||
EUPHONIX | x | x | |||||||||
LAWO | x | x | x | x | x | ||||||
LAWO | x | x | x | x | x | ||||||
LAWO EMBER+ | x | x | |||||||||
MIDI | x | x | |||||||||
SSL | x | x | x | ||||||||
STAGETEC | x | x | x | x | x | ||||||
STUDER | x | x | x | x | x | x | |||||
STUDER | x | x | x | ||||||||
VIZ | x | x | x | ||||||||
WHEAT | x | x | x | ||||||||
YAMAHA | x | x | |||||||||
Vizrt | x | x | x |
Audio Players
Default Viz Mosart Audio Player
Requirements
Refer to general section Prerequisites (section Viz Mosart Audio Player).
Supported File Formats
The standard Viz Mosart audio player supports formats: mp3, wav, wma, aac, m4a, mp4, aiff, avi.
To set up the default Viz Mosart audio player
On the machine that will be used for the audio player, open the Viz Mosart installation folder and locate the Audio Player installer file, named something like
VizMosartAudioPlayer-5.8.2.32554.msiInstall Audio Player, then start it.
On the Viz Mosart server, open AV Automation.
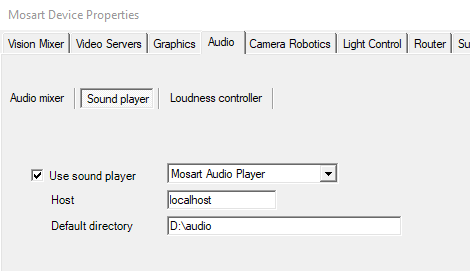
Go to Devices > Preferences > Audio > Sound player.
Check Use sound player and choose from the players in the drop-down list.
Under Host write the IP address of the computer where the audio player is running (the one selected in step 1. above).
Note: See also the section Audio Player Port Number for alternative port usage.
Under Default directory, write the folder path where the audio files are stored. This is specified by the setting Audio Directory in the Audio Player.
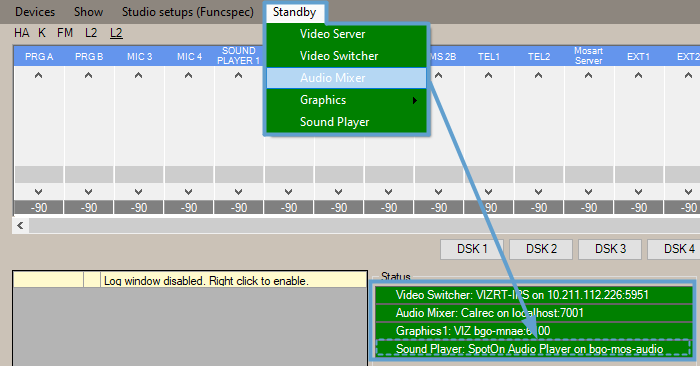
Restart AV Automation and check that the connection is green.
Working with the Mosart Audio Player
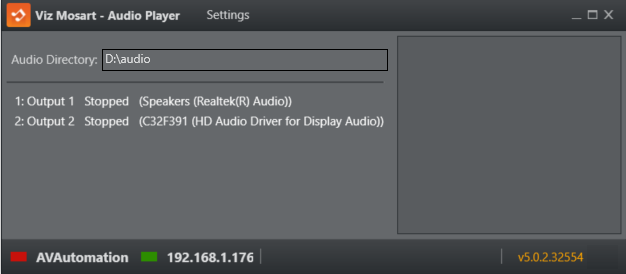
When the default Viz Mosart Audio Player is configured, the user opens the UI from a desktop shortcut
or file location C:\Program Files (x86)\Mosart Medialab\Mosart Audio Player\Mosart Audio Player.exe.
Note: User actions are described in section Playing Audio of the Viz Mosart User Guide.
Viz Mosart Audio Player UI
The Settings menu
UI Element | Description |
|---|---|
Settings | Open the Settings window for configuring the Audio Player. |
Audio Directory | Folder path to where your audio files are. All files in this folder are ready to be played |
Numbered Output list | A list of all available devices. The numbered entity under Name is the number you use in AV Automation or the NRCS to specify the audio file playout (for example, in the screenshot above, Output 1). |
Log panel (right hand panel) | All log messages that the audio player creates. |
AVAutomation status | Green: AV Automation is connected |
IP Address | IP address of the computer Audio Player is running on. |
Version | Version number of the Audio Player. |
Audio Player Port Number
The port number used by the Audio Player is by default 8084.
If this port number conflicts with some other services, it can be changed by editing the Audio Player Configuration file Mosart Audio Player.exe.config located at
%ProgramFiles(x86)%\Mosart Medialab\Mosart Audio Player\.
Change the baseAddress attribute to use another port, for example 8087.
<add baseAddress="http://localhost:8087/LiveSoundService.svc/"/>If the port number is changed in this way, the AV Automation settings for the Audio Player must also be modified to use this port number.
This is done by specifying the port number in the Host field in AV Automation's Audio Player properties to this format: Server=localhost;Port=8087;To verify that the Audio Player actually uses the new port, you can test if the URL (for example, "http://localhost:8087/LiveSoundService.svc/") is responding in a web browser.
Operating the Audio Player
Refer to section Playing Audio in the Viz Mosart User Guide.
TriCaster Audio Player
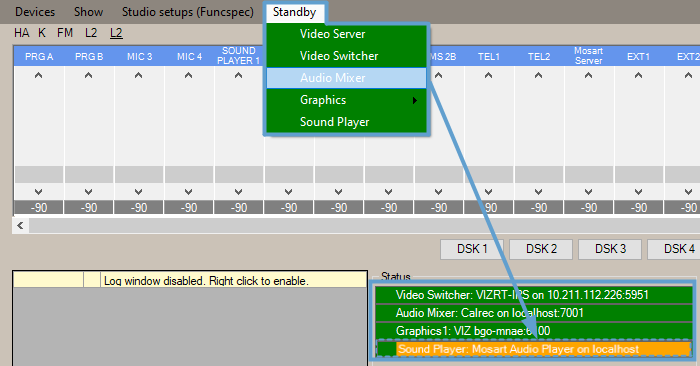
By selecting TriCaster from the list of available audio player devices, you can control (access and play audio clips) the TriCaster onboard sound player from a Viz Mosart template.
To set up a TriCaster audio player
Start the TriCaster on a host machine available to the Viz Mosart server.
In AV Automation, navigate to Devices > Device Properties > Audio (tab) > Sound player (tab).
From the drop-down menu to the right of Use sound player, select TriCaster (previously called vizrt-ips).
In the Host field, enter the hostname or IP address of the TriCaster host.
In Default directory, enter the sound clips directory on the TriCaster machine (for example, C:\ProgramData\vizrt\Media\Sound and Music\Sample\www.SoundTraxxMusic.com).
Note: The current implementation enables playing of files from only a single folder.
Click Save & Close.
Restart AV Automation and make sure you have a green connection (as in the SpotOn audio player example below).
In AV Automation, navigate to Template Editor > Template > Select or Template Editor > Template > New.
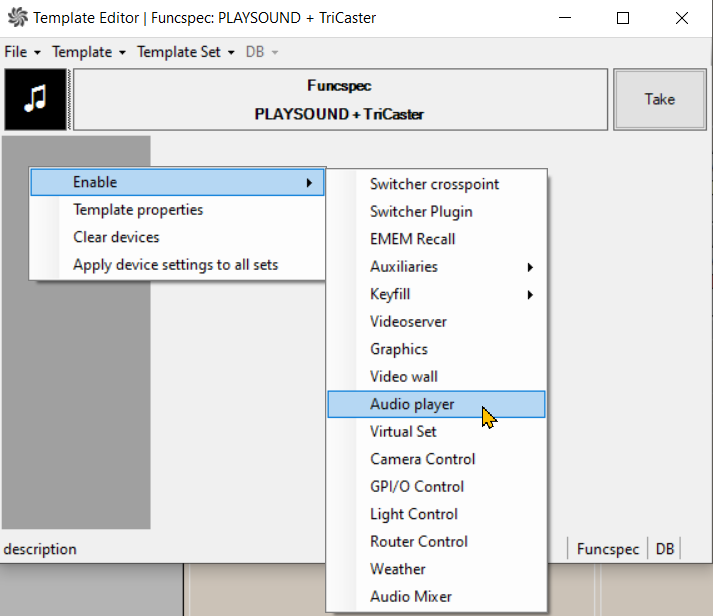
Choose or create an appropriate template, right-click in the dark grey area to the left and select Enable > Audio player.
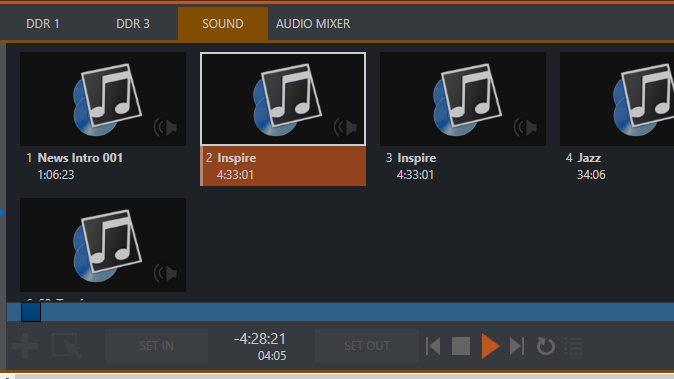
In AUDIO FILE, enter an existing file name.
These can be browsed in the SOUND tab on the TriCaster (in this example, Inspire.mp3).
Note: The OUTPUT field is ignored, as the TriCaster has a single output.
On the Soundplayer device, click OK.
Third Party Audio Players
ENCO DAD Audio Player
By selecting ENCO DAD Audio Player from the list of available devices, you can control (access and play audio clips) the ENCO DAD sound player from a Viz Mosart template.
To set up an ENCO DAD audio player
Start the ENCO DAD on a host machine available to the Viz Mosart server.
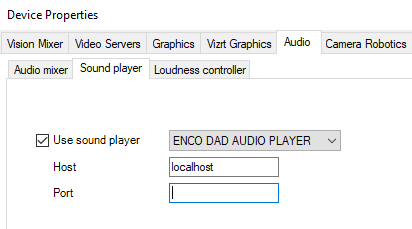
In AV Automation, navigate to Devices > Device Properties > Audio (tab) > Sound player (tab).
Check Use sound player.
From the drop-down menu to the right of Use sound player, select “ENCO DAD AUDIO PLAYER“.
In the Host field, enter the hostname or IP address of the ENCO DAD host.
In the Port field, enter the ENCO DAD monitors port. At clean installation, this value is initially preset as 2002, but if left empty, clears to 0.
Click Save & Close.
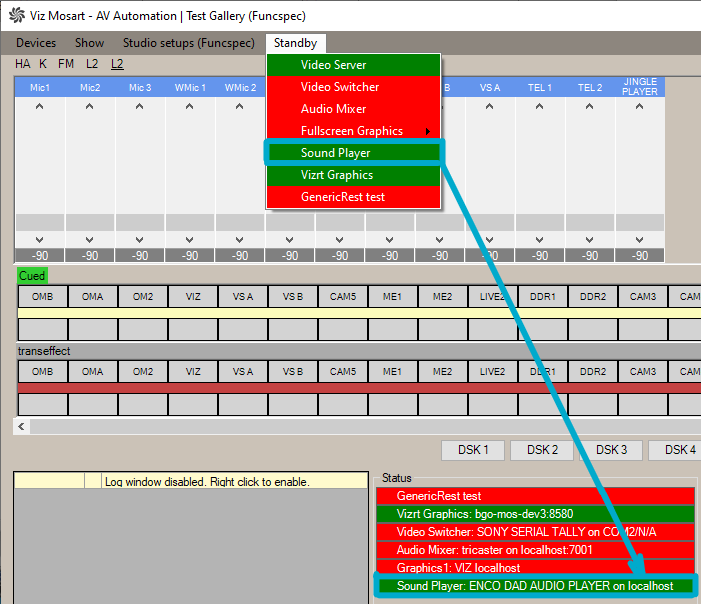
Restart AV Automation and make sure you have a green connection.
In AV Automation, navigate to Template Editor > Template.
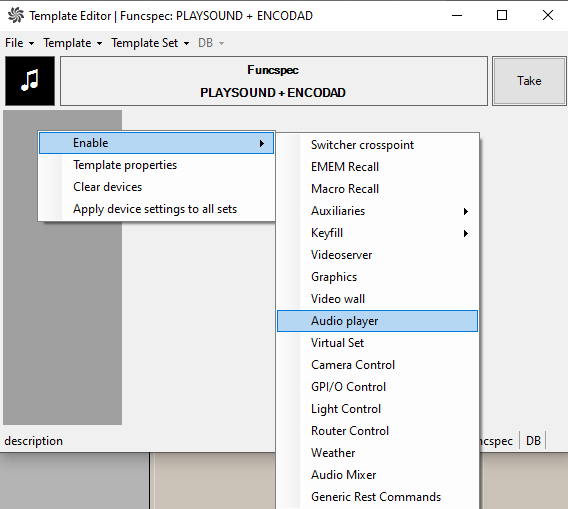
Choose an appropriate template, right-click in the dark grey area to the left and select Enable > Audio player.
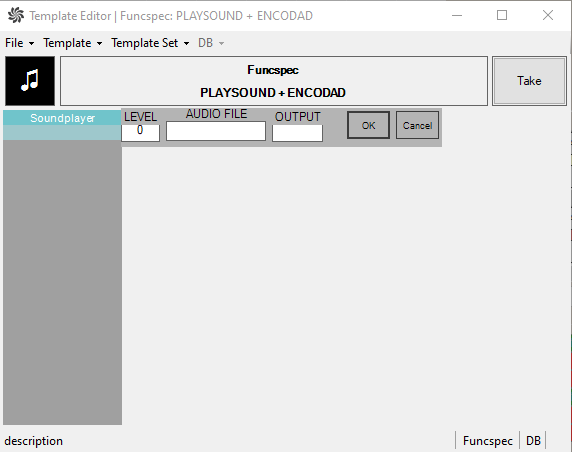
In AUDIO FILE, enter the name of a file in the ENCO DAD library.
In OUTPUT, enter a valid machine number (in ENCO DAD).
On the Soundplayer device, click OK.
SpotOn Audio Player
To set up a SpotOn audio player
Download, install and start the device software to a host machine available to the Viz Mosart server.
In AV Automation, go to Devices > Preferences > Audio > Sound player.
Check Use sound player.
Choose SpotOn Audio Player from the players in the drop-down list.
Under Host write the IP address to the machine where the SpotOn player is running.
Click Save & Close.
Restart AV Automation and check that the connection is green
Working with the SpotOn Audio Player
Addressing an audio file that is stored in a SpotOn client is similar to the default player method above, but the file identifier is different.
LEVEL: This value does not affect the audio fader that is taken to Program. Instead a special command option is offered. Set LEVEL to -90 to send a STOP (playing audio) command. All other values are ignored.
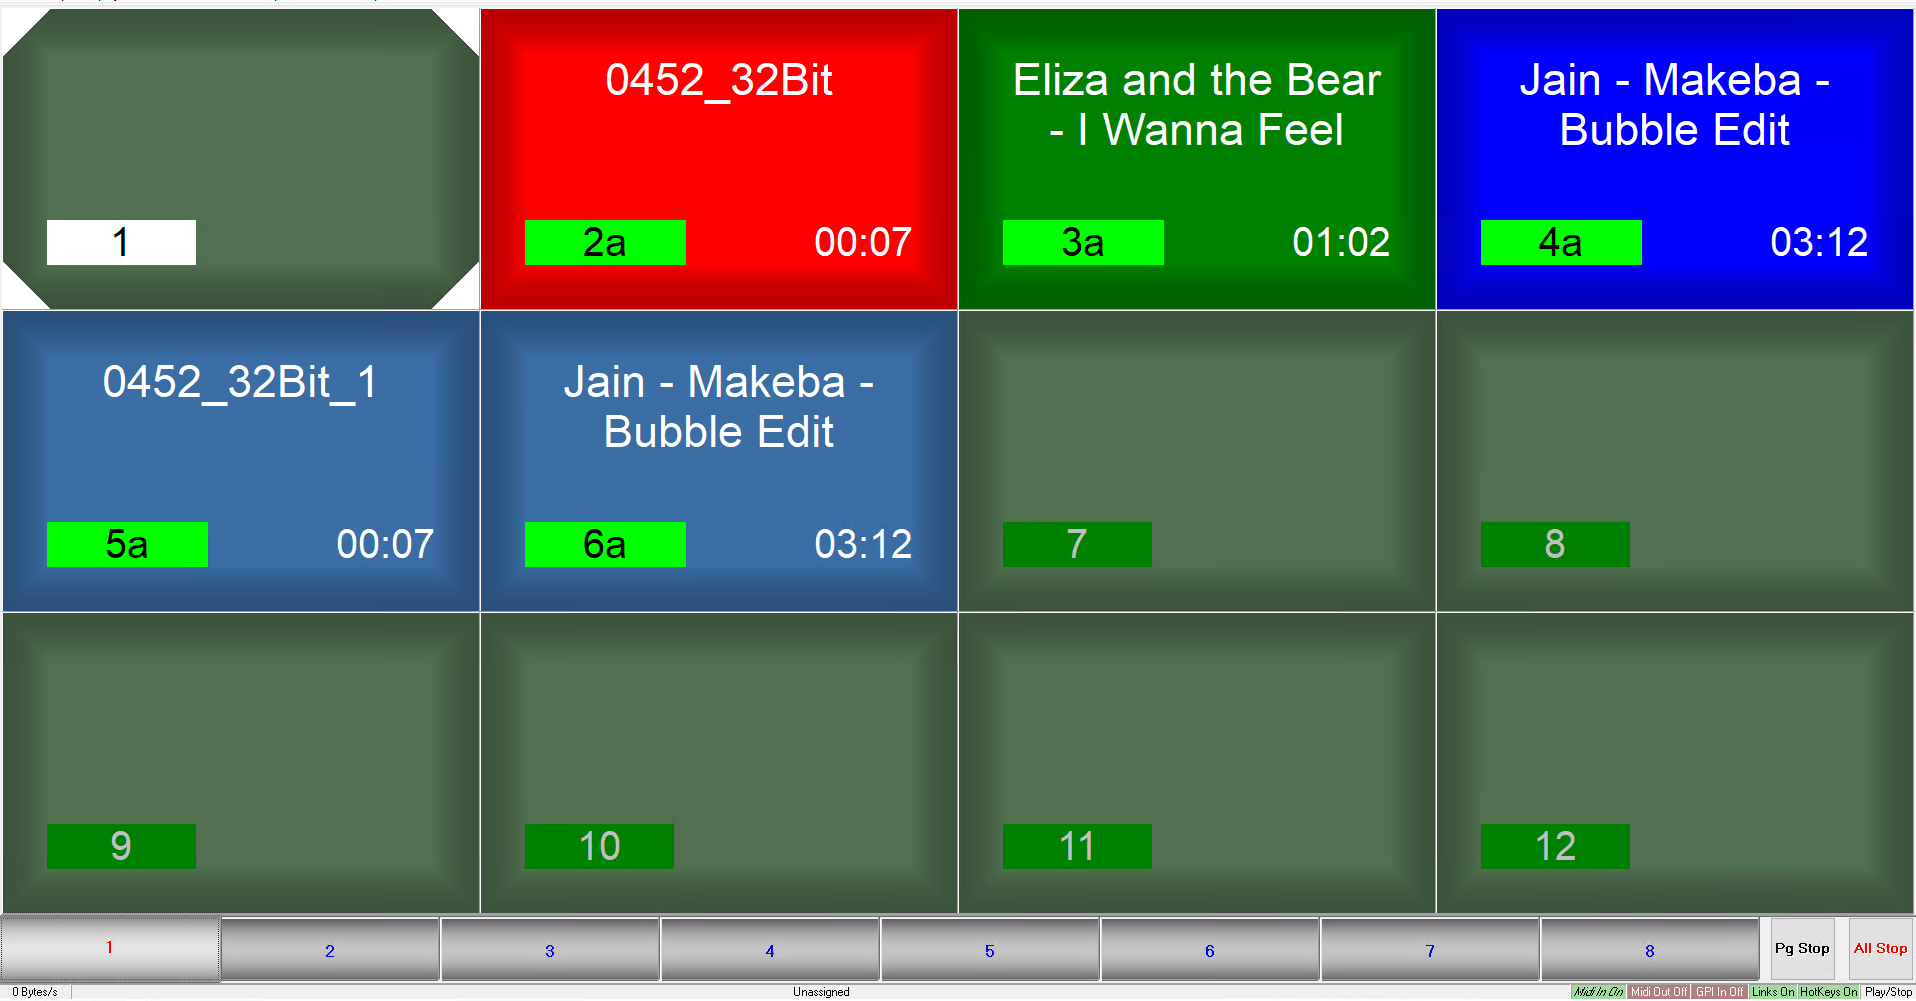
OUTPUT: Enter the panel button number to identify the associated sound file (in this sample screenshot below, 2a).
Tip: Use the button number (mapped to OUTPUT) as reference (instead of the audio file name). You can then replace the audio file assigned to a button (for example, when a show is rebranded and new music selected) and still keep the same template information.
This avoids having to change the file name.
AUDIO FILE: Enter the panel button name here (in this example 0452_32Bit).
Note:
Newsroom tag available. If a newsroom tag is added, and a value is provided by the NRCS, that value for the file name (with either AUDIO FIE or OUTPUT) is used.
When both panel button number and panel button name. are used as file identifier, the value of panel button number takes precedence.
Loudness Control
A loudness control from Junger.
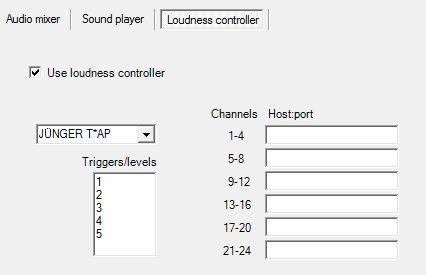
Use loudness controller: Check the box to enable loudness control.
Loudness controller type: JUNGER T*AP.
Triggers/levels: Name of triggers or loudness levels, one for each line. These will appear in a tool-tip menu in the Template editor, and must correspond to the configuration in the loudness controller(s).
Channels: Fixed values. For Junger T*AP there are four stereo channels per host. Connections to the audio faders are configured in A/V Setup/Edit/Audio config/Loudness channel.
Host:port: Hostname or IP address and optional port number for each controller.
Note: If the root node name is different than T*AP the name must be set in the AVA configuration property JungerRoot .
See Also
