
Viz Multiplay User Guide
Version 3.2 | Published March 07, 2024 ©
Video Wall Setup
This section covers how to get started setting up a video wall without using an external video wall display controller. If you use one or more display controllers, for instance Datapath Fx4.
This section covers the following topics:
Note: As with most changes that effect the Profile, adding, removing or editing a Video Wall should be performed on an inactive Profile. If you edit an active Profile, a deactivation and activation may be required afterwards.
Dynamic Channels and Superchannels
Viz Multiplay supports two video wall mechanisms:
-
The Dynamic Channels solution based on a global Viz Multiplay specific Viz Artist scene containing GFX channels.
-
The Superchannels solution based on Superchannels where each video wall is represented in a user-designed Viz Artist scene (for Viz Multiplay 3.0 and above). See the release notes for the required version of Viz Engine.
Should I Use Dynamic Channels or Superchannels?
New Installations
Select the Superchannels mechanism. This will allow:
-
Better performance
-
Arm and fire (or A/B) workflow with content transitions
-
Custom transitions between presets (layouts)
Existing Installations
If you need to support an existing workflow or if you need quick, offline creation of presets in the video wall designer, stay with the Dynamic Channels solution.
Set up a Profile and Video Wall
To get started, you will need a profile. A profile is a collection of playout resources. One profile may contain references to one or more physical video walls.
-
Click Settings > Profiles.
-
Create a profile by clicking the Add (+) button in the bottom of the Profiles list.
-
Enter a name for the new profile.
-
Select whether you want to create a Dynamic Channels wall or a Superchannels wall and click the Add (+) in the bottom of the list.
-
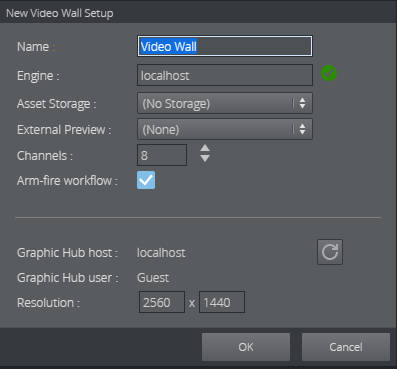
Enter a name for the video wall, and hostname of the Viz Engine driving the video wall (The Viz Engine must be in On Air mode and reachable through the network when creating a new video wall) how many virtual channels (video wall areas) you need to use.
-
If Viz One is configured, select the publishing point to where Viz One will transfer clips when dragged into a playlist in Viz Multiplay. The publishing point is the clip root of Viz Engine, making sure that clips needed for playout are available on the physical Viz Engine hardware.
-
If a separate Viz Engine is used as video wall preview, select the preview video wall in External Preview. Everything that is Armed in Viz Multiplay will be taken first to the external preview engine. The preview engine can have any resolution, but it need to have the same aspect as the program engine.
-
Viz Engine 5.2 and newer versions, support up to 16 GFX channels and Superchannels. Do not enable more than you need. The number of channels does not need to match the total number of screens you have: channels are virtual areas that can span over several screens.
Note: To be able to use more than 8 channels in Legacy video wall configuration, additional GFX and clip channels must be enabled in the DynamicChannels scene using Viz Artist.
-
Enable or disable Arm and Fire workflow. This checkbox is only available if both Viz Engine and Media Sequencer support the feature.
In the bottom half of the window, the following information is shown, based on what Viz Multiplay reads out from the connected Viz Engine:
-
The Graphic Hub host name and user name of Viz Engine.
-
The resolution of Viz Engine.
The Graphic Hub info should match the global Graphic Hub settings in Settings > Servers. The resolution can be manually adjusted, or refreshed with the Refresh button. The resolution is used by Viz Multiplay to draw thumbnails and to display correct aspect of the wall and of the channels in the Video Wall Designer.