Common installer problems and how to resolve them. If your issue isn't covered here, collect the installer logs (see Collecting Logs for Support) and contact Vizrt support.
The Installer Browser Tab Never Opens
Symptom: you launched vamctl.exe, the console window is open, but no browser appears.
Resolve:
- Look at the console window. It prints a line that starts with
GUI host started on http://127.0.0.1:5077. - Open that URL in a browser manually.
- If the URL refuses connections, an existing
vamctlmay be running. Open Task Manager, end any leftovervamctl.exeprocesses and relaunch.
Another Operation Is Already Running
Symptom: a long operation (install, deploy, backup) does not start, because another operation is still running.
Resolve: the installer permits only one long-running operation at a time. Open the step of the running operation. The wizard reconnects to it and shows its progress. Wait for it to finish, then retry.
If the operation has obviously hung (no progress for many minutes, no log output), close the installer, end any leftover vamctl.exe processes in Task Manager and relaunch.
Prerequisite Check Fails: "Hyper-V Is Not Enabled"
Symptom: the check fails, and the log reports Hyper-V feature is not enabled. Please enable it in Windows Features and restart.
Resolve: the installer checks Hyper-V but does not enable it.
- Enable Hyper-V in Windows Features. On Windows Server, use Server Manager > Add Roles and Features > Hyper-V.
- Restart the host.
- Launch
vamctl.exeagain, so that it runs the check again.
Prerequisite Check Fails: Virtualization Is Disabled
Symptom: the installer (or Hyper-V) reports that hardware virtualization is not available.
Resolve:
- In Task Manager > Performance > CPU, check that Virtualization shows Enabled.
- If it is disabled, enable it in the host BIOS/UEFI, typically Advanced > System Options > Virtualization Technology (VT-x) and Virtualization Technology for Directed I/O (VT-d), then reboot.
- On a nested/virtualized installer host, make sure the outer hypervisor exposes virtualization to the VM.
Podman: Machine Will Not Start
Every installation needs a working Podman machine on WSL 2, see Prerequisites > Podman and WSL 2. A Windows update, a WSL update, or a reboot that left WSL half-started is the usual cause of this breaking, and the failure surfaces on the Prepare Installer step or when the cluster is created.
Symptom: the Podman row on Prepare Installer fails or hangs, or cluster creation reports that the Podman machine is unavailable.
Resolve in this order, and stop after the step that fixes it:
-
Check what the machine thinks it is doing:
podman machine list -
If it is stopped, start it. If it reports that it is already running while the installer disagrees, stop it first and start it again:
podman machine stoppodman machine start -
Reset WSL itself. This is the single most effective step after a Windows or WSL update:
wsl --shutdownwsl --updateThen start the machine again. Note that
wsl --shutdownstops every WSL distribution on the host. -
Confirm WSL 2 is the default and the kernel is current:
wsl --statuswsl --set-default-version2 -
Reboot the host. A pending Windows update that has not finished installing keeps WSL in a broken state until it does.
-
If the machine is still unusable, recreate it. This discards the machine's contents, which is safe because the installer rebuilds what it needs:
podman machine stoppodman machinermRe-run the installer, which recreates the machine with the settings it requires.
-
If preparation still fails on the Podman row, let the installer rebuild Podman for you. See Podman: Recovery Modes.
The installer needs the machine to be rootful, and it sets that itself. If you created a Podman machine by hand, expect the installer to stop and restart it while applying that setting. It does not change the networking mode of a machine that already exists.
Do not make the Podman WSL distribution boot systemd. Adding [boot] systemd=true to /etc/wsl.conf inside podman-machine-default is widely repeated online as a fix for an unreachable Podman socket, and it breaks the Talos image build: under that workload the distribution terminates and drops the API socket part-way through the build. The Podman machine image starts its API socket without systemd, so the init system is never the cause of an unreachable socket and changing it never fixes one.
Podman: Recovery Modes
The Podman row on Prepare Installer is a health check, not just a test. It verifies the Podman installation, rewrites containers.conf when it is wrong, realigns the Podman system connection with the running machine, and then probes the Podman API. Much of what the sections above describe by hand, the installer therefore already attempts on its own.
When the check cannot reach Podman it writes a diagnostic block to the log: the WSL distributions, the Podman machines, the Podman system connections and the raw podman info error, followed by the remediation steps to try, in order. Read it under Open Logs in the installer, or in the log file.
Choosing the Recovery Mode
One setting, Reinitialize Podman, decides how far that check may go to repair a broken installation:
- With the setting off, the default, only non-destructive recovery runs. The installer starts an existing machine, repairs
containers.confand the system connection, and then stops and reports if that is not enough. - With the setting on, destructive recovery is authorized. Once the non-destructive steps fail, the installer works through a ladder and re-tests after each rung: reset the machine (stop, remove, fresh init, start), then
podman system reset --force, then uninstall and reinstall Podman through Scoop followed by another reset.
Destructive recovery removes the Podman machine, and can uninstall and reinstall Podman itself. Everything held in the machine (images, containers and volumes) is lost. That is safe on a host where Podman serves only VAM, because the installer rebuilds what it needs, but not on a host where Podman also runs other workloads. Turn the setting off again once Podman is healthy, so that a transient failure is answered with a restart rather than a rebuild.
Set it in either place, because both change the same value:
Where | How |
|---|---|
Installer GUI | Settings, then Reinitialize Podman. It is a normal setting, not one hidden behind Show advanced. |
Configuration file |
|
With the setting on, re-run the Prepare Installer step. Recovery runs as part of the Podman check, so there is nothing else to start.
The last rung of the ladder is skipped when Podman was not installed by the installer, which does not uninstall software it does not own. The log says so: Podman is externally installed; installer cannot perform managed Scoop reinstall automatically. See Podman: Two Installations Clash.
Podman: Two Installations Clash
Symptom: podman behaves differently depending on which console window runs it, two console windows report different versions, the installer cannot see a machine that podman machine list shows, or the log contains:
Careful: program podman has been externally installed. Please uninstall the program and let the installer install it!This happens because the installer installs and manages Podman through Scoop, and recognizes its own installation by the scoop\shims folder in the resolved executable path. A Podman installed any other way (the MSI from the Podman releases page, Podman Desktop, or another package manager) counts as external. Both can be present at once, because Scoop puts its shims on the user PATH while an MSI writes to the machine PATH. Which podman.exe runs then depends on the console window: an elevated console, a console opened before the installer ran, and a console under a different account can each resolve a different binary, and therefore a different version.
An external Podman still works, but the installer treats it as hands-off:
- The installer does not update it, because it does not own the installation.
- The last step of destructive recovery is skipped, so a broken Podman must be repaired by hand.
- Both installations share the connection configuration under
%APPDATA%\containers\, so a machine created by one version can be unreachable from the other.
Resolve:
-
List every
podmanthe PATH resolves:Get-Commandpodman-All|Select-ObjectSource, Version -
If more than one appears, keep the one under
scoop\shimsand remove the others through Settings > Apps > Installed apps. Uninstall Podman Desktop as well if it is present: it brings its own Podman. -
Close every open console window. A window opened before the change keeps the old PATH and keeps resolving the removed binary.
-
Open a new console and confirm that only one entry remains.
-
Re-run the Prepare Installer step.
Run step 1 in the same kind of console the installer runs in. An elevated console and a normal one produce different answers, and that difference is itself the symptom.
Podman: Installation Is Incomplete
Symptom: preparation fails with Podman environment verification failed. Your Podman installation may be incomplete.
Before it uses Podman, the installer checks that win-sshproxy.exe is present in the Podman installation folder, and that containers.conf points at that folder. win-sshproxy.exe forwards the machine's API onto a Windows named pipe, so nothing reaches Podman without it. The installer writes that pointer itself, into %APPDATA%\containers\containers.conf:
[engine]helper_binaries_dir = ["<podman-install-folder>"]An interrupted install or update, or a hand-edited containers.conf, breaks either check.
Resolve:
-
Confirm the helper binary exists. For the Scoop installation the installer manages, that is:
Get-ChildItem"$env:UserProfile\scoop\apps\Podman\current"-Recurse-Filterwin-sshproxy.exe -
Inspect the configuration file and check that
helper_binaries_dirpoints at the folder from step 1:Get-Content"$env:APPDATA\containers\containers.conf" -
If only
containers.confis wrong, re-run the Prepare Installer step. The installer rewrites the file itself, which is non-destructive and needs no setting change. -
If
win-sshproxy.exeis missing, the Podman installation itself is damaged. Reinstall Podman: turn on Reinitialize Podman and re-run preparation, or reinstall by hand when Podman came from somewhere other than the installer. See Podman: Recovery Modes.
Podman: Networking or DNS Fails Inside the Machine
Symptom: Podman runs, but pulls fail, the registry is unreachable, or name resolution fails from inside the machine while the host itself is fine. Typically appears after a WSL update, or when a VPN client is connected.
Resolve:
-
Test resolution from inside the machine:
podman machine ssh --"getent hosts registry.vizrt.cloud" -
Reset the WSL network stack, which is what most often fixes it:
wsl --shutdownThen start the Podman machine again.
-
If a VPN is connected, disconnect it and retry. Split-tunnel and full-tunnel VPN clients frequently take over WSL's DNS. If the install must run over the VPN, reconnect it after the Podman machine is running, or set a DNS server explicitly in
%UserProfile%\.wslconfig:[network]generateResolvConf = falseand provide
/etc/resolv.confinside the machine. -
If the installation has to run with the VPN connected throughout, turn on VPN Compatible Mode in Settings (
VPNInstallationinappsettings.json). The installer then creates the Podman machine with user-mode networking, which keeps the machine reachable when a VPN client takes over the host's routes.User-mode networking is applied when the machine is created, so turning the setting on changes nothing about a machine that already exists. Turn it on first, then remove the machine and re-run the installer so that it recreates the machine with the setting applied:
podman machine stoppodman machinerm -
If your registry uses an internal certificate authority, the CA must be trusted inside the Podman machine as well as on the host. See Registry Access.
Podman: Not Enough Memory or Disk
Symptom: the Podman machine starts, but the cluster fails to come up, or containers are killed.
On WSL 2 the machine's resources come from WSL, not from podman machine set. That command reports success and changes nothing. Set them in %UserProfile%\.wslconfig:
[wsl2]memory = 16GBprocessors = 8Then apply the change and start the machine again:
wsl --shutdownpodman machine startSize the values against the cluster you configured, and leave the host enough memory for Windows itself. See Prerequisites > Installer Host.
Prerequisite Check Fails: "Cannot Reach Vizrt Registry"
Resolve: this is a connectivity problem from the installer host to the package registry.
- Open a browser on the installer host and visit
https://registry.vizrt.cloud/(or your internal mirror). - If your environment uses a proxy, configure WinHTTP proxy settings:
netsh winhttp set proxy <proxy>:<port>. - If the installer host has no internet access, see Offline (Air-Gapped) Installation.
Cluster Install Fails: "Node Did Not Become Ready"
Symptom: cluster installation completes provisioning, but one or more nodes never report Ready.
Resolve:
- Read the reason under the failed step in the wizard, or the whole log with Open Logs.
- Common causes:
- The static IP you allocated is already in use. Pick a different IP and retry.
- Talos cannot resolve the package registry, because DNS is unreachable. Confirm DNS works from the node's network.
- The Hyper-V host or vSphere cluster lacks RAM/CPU for the configured node sizes.
- After fixing the underlying issue, click Retry on Cluster Install Summary. The installation runs again, and you do not need to restart the wizard.
Hyper-V: Virtual Switch or VM Creation Fails
Symptom: on a Hyper-V install, provisioning fails while creating the virtual switch or the node VMs.
Resolve (virtual switch):
- The public switch needs a physical network adapter facing your network. If that adapter already belongs to another virtual switch, the installer uses that switch. If the installer cannot create the switch, create it yourself with the expected name. For step-by-step instructions, see Hyper-V on a Notebook: Creating the Virtual Switches Manually. They apply to any Hyper-V host.
- Conflicts with leftover switches from a previous attempt can block creation. Remove stale VAM switches (for example,
VAMPublicSwitchandVAMPrivateSwitch) in Hyper-V Manager > Virtual Switch Manager, then retry.
Resolve (VM creation):
- The base path is already in use: a folder with the VM name already exists in the Hyper-V destination path. Choose a different path or delete the leftover folder.
- An IP address is already in use: one of the node IPs (control plane, worker, or VIP) is taken by another machine or a VM outside the selected context. Free the IP or change it on the Cluster Config step.
- A disk I/O error, or no space left: the Hyper-V host disk is full. On the Cluster Config step, click Show advanced settings and point Hyper-V destination path at a disk with more free space, or free space on the current one.
Hyper-V on a Notebook: Creating the Virtual Switches Manually
Using a notebook as the Hyper-V host is not recommended. If you do, the installer can fail to create the virtual switches, or create them in a way that leaves the node without access to the services it needs. The usual causes are a Wi-Fi connection, a VPN connection to the network that hosts Active Directory Certificate Services (ADCS) and your DNS servers, or a dock or USB network adapter.
Symptom: the installation stops while creating the public virtual switch, and the installation log shows one of:
Error creating virtual switch 'VAMPublicSwitch'No network adapters added for the host
Or the switch is created, but the node later cannot reach services on your network. See Connected Through a VPN.
Resolve: create the switches yourself in Hyper-V Manager, then select them in the installer. When a switch with the expected name already exists, the installer uses it instead of creating one.
Switch | Name | Type | Needed for |
|---|---|---|---|
Public |
| External, shared with the host | Every Hyper-V installation. The nodes attach to it. |
Private |
| Internal | Installations with worker nodes only. It carries the traffic between the nodes. |
An installation without worker nodes runs entirely on the public switch and never uses the private switch, so for such an installation create only the public switch.
Creating an external switch moves the notebook's network connection onto the new switch, so the connection drops for a few seconds. Do this at the notebook itself, not over a remote session through the same adapter.
Wired Connection (Built-In, Dock or USB Adapter)
This is the recommended setup for a notebook. Connect the notebook by cable to the network where the services the installation needs (such as your DNS servers and ADCS) are reachable directly.
- Open Hyper-V Manager and select Virtual Switch Manager.
- Select New virtual network switch, then External, then Create Virtual Switch.
- Set Name to
VAMPublicSwitch. - Under Connection type, select External network and choose the wired adapter. Do not choose a VPN adapter or the Wi-Fi adapter.
- Select Allow management operating system to share this network adapter. The installer reaches the node over this network, and clearing this option takes the adapter away from Windows, which disconnects the notebook.
- Leave Enable virtual LAN identification for management operating system cleared, unless your network requires a VLAN for the host.
- Select OK, and confirm the warning about network connectivity.
- In the installer, on the Cluster Config step, select
VAMPublicSwitchunder Public virtual switch. The wizard confirms withUsing existing switch "VAMPublicSwitch" — no adapter binding needed.
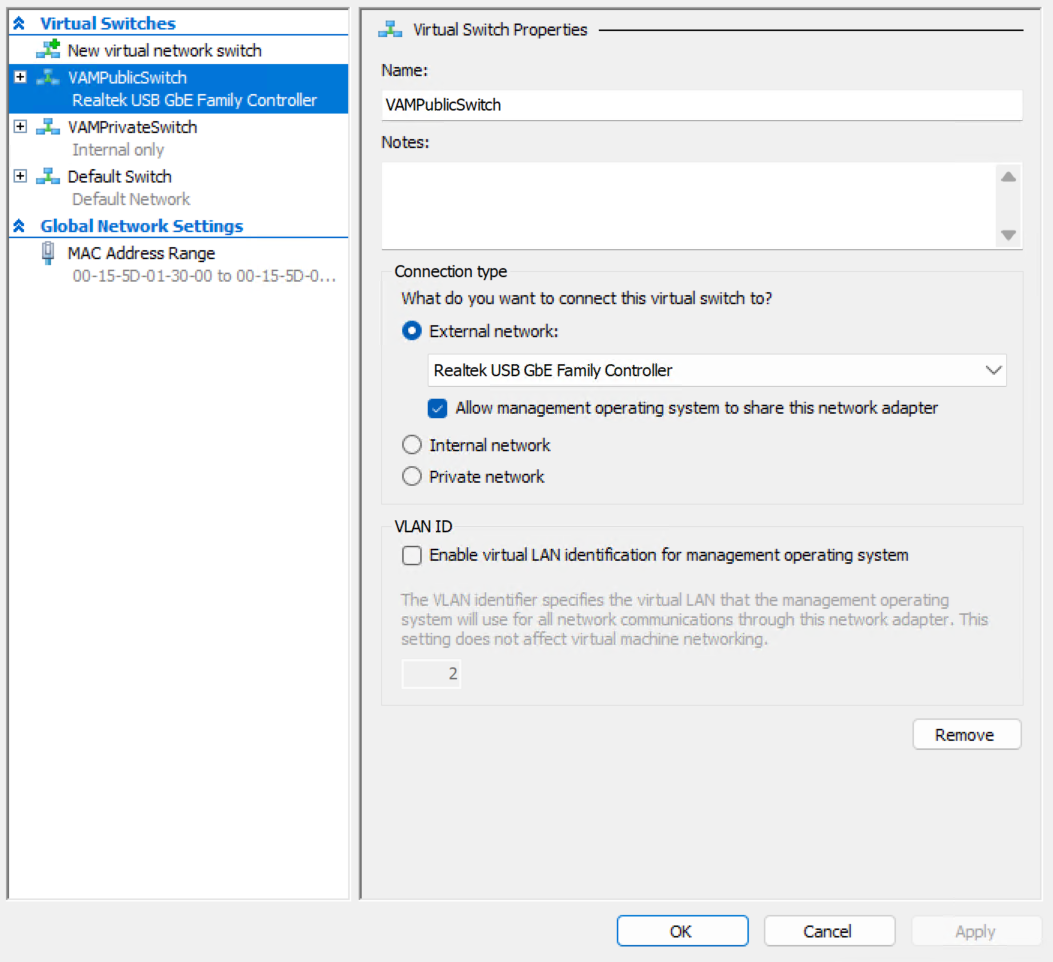
The same switch from an elevated PowerShell prompt, where Ethernet 3 is the Name of your wired adapter as listed by Get-NetAdapter:
Get-NetAdapterNew-VMSwitch -Name 'VAMPublicSwitch' -NetAdapterName 'Ethernet 3' -AllowManagementOS $trueA dock or USB adapter becomes part of the switch. When the notebook is undocked or the adapter is unplugged, the cluster loses its network until the adapter is connected again.
Wi-Fi Only
Follow the steps for a wired connection, and in step 4 choose the Wi-Fi adapter.
Expect these limitations:
- Not every Wi-Fi network gives the node an address of its own. If the node does not get an address, give it a static IP instead of DHCP. See Nodes: Static IP, DHCP, or DNS Problems.
- The node's address belongs to the Wi-Fi network it was installed on. When the notebook joins another network, the cluster is no longer reachable at that address. Keep the notebook on the same network.
Connected Through a VPN
Symptom: the switch is created and the node starts, but the installation later cannot reach services that are only available through the VPN, such as ADCS or the domain DNS servers.
The cause is that the public switch connects the node directly to the network the notebook's adapter is plugged into. The VPN only carries the notebook's own traffic, so the node cannot use it to reach anything behind the VPN.
Resolve:
- Do not bind the public switch to the VPN adapter. VPN clients add a virtual adapter, and Virtual Switch Manager can list it under External network, in the example below as Barracuda Virtual Adapter (VPN). It does not give the node a working connection, and binding a switch to it interferes with the VPN connection itself.
- Connect the notebook by cable to the network where those services are reachable without the VPN, and create the public switch on that adapter as described in Wired Connection (Built-In, Dock or USB Adapter).
- If the services can only be reached through the VPN, they cannot be used from a node on this notebook. Install on a host that is connected to that network directly.
A VPN also affects the installer's own Podman machine. See Podman: Networking or DNS Fails Inside the Machine.
Private Switch for a Multi-Node Installation
Only a multi-node installation needs the private switch.
- In Virtual Switch Manager, select New virtual network switch, then Internal, then Create Virtual Switch.
- Set Name to
VAMPrivateSwitch. - Under Connection type, select Internal network.
- Select OK.
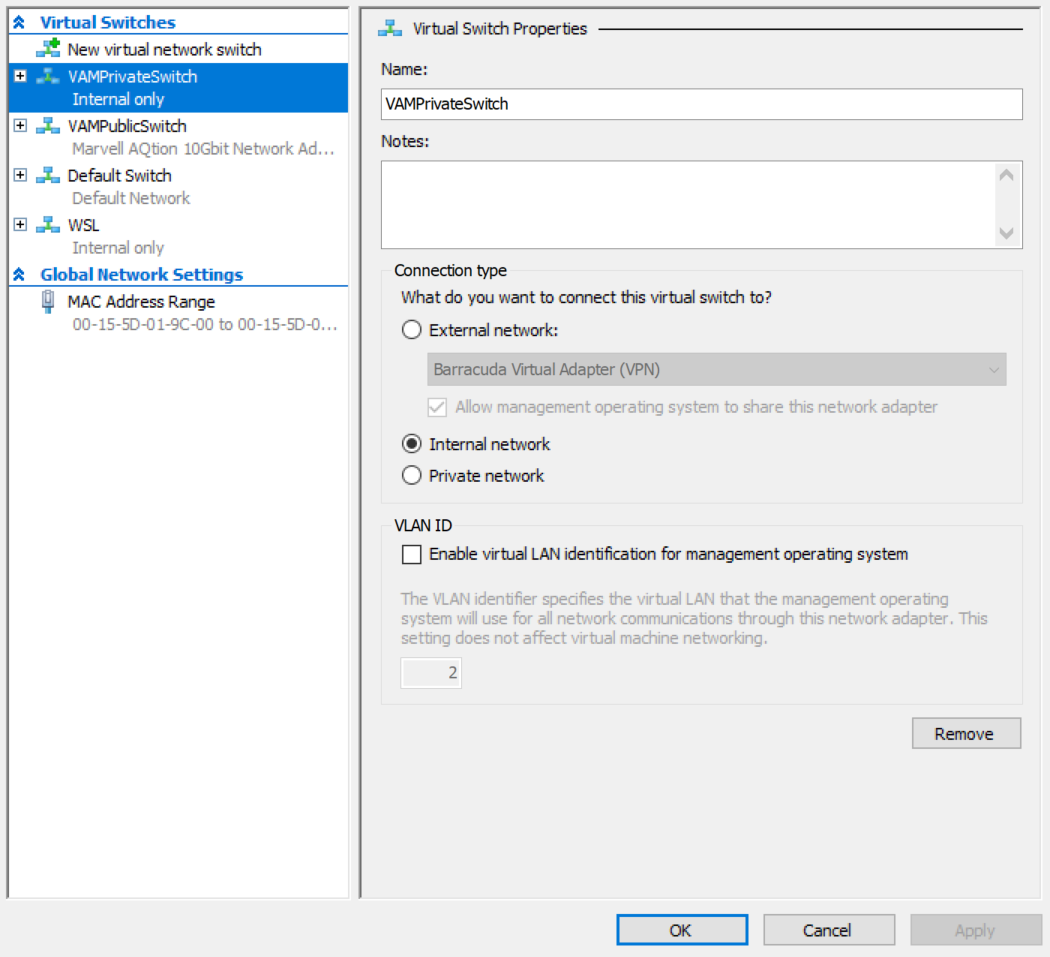
Or from an elevated PowerShell prompt:
New-VMSwitch -Name 'VAMPrivateSwitch' -SwitchType InternalCreating the switch is all that is needed. The installer configures it: it assigns 10.6.0.1/24 to the switch's host adapter vEthernet (VAMPrivateSwitch), enables forwarding, and creates the NAT InternalNat for the 10.6.0.0/24 network.
The Cluster Config step has no field for the private switch. The installer selects it in this order:
- A switch named
VAMPrivateSwitch. - Otherwise, an internal switch whose name contains
private. - Otherwise, no existing switch: the installer creates
VAMPrivateSwitch.
- Do not use
Default SwitchorWSLas the private switch. The installer never selects either of them, and refuses to use them. Both are managed by Windows:Default Switchchanges its address on every reboot, andWSLcarries the network of WSL, which the installer's Podman machine runs on. On newer Windows versions the WSL switch is namedWSL (Hyper-V firewall). The same applies. - Check the switch before you install. For a multi-node installation, the Cluster Review step shows Private switch under Infrastructure. VAMPrivateSwitch (created if missing) means the installer creates the switch. If it shows a switch you do not want the installer to configure, rename that switch in Virtual Switch Manager, return to the Cluster Config step, and click Refresh interfaces.
- If the installation stops and the log reports that the switch is the WSL 2 virtual switch, which Windows owns or is the built-in Hyper-V Default Switch, which Windows owns, the saved installer settings name a Windows switch. Return to the Cluster Config step and click Refresh interfaces: the installer then selects its own switch, VAMPrivateSwitch, which the Cluster Review step shows under Private switch. Retry the installation. If the message comes back, contact Vizrt support.
- If the log reports
Network adapter 'vEthernet (VAMPrivateSwitch)' not found, Windows did not create the switch's host adapter. Remove the switch in Virtual Switch Manager, create it again, and retry.
To remove switches left over from an earlier attempt, see Hyper-V: Virtual Switch or VM Creation Fails.
Nodes: Static IP, DHCP, or DNS Problems
Symptom: nodes fail to come up, or DNS shows as invalid.
Resolve:
- If DHCP is unreliable in your environment, do not use DHCP in the wizard, and provide a valid static IP, subnet and gateway per node.
- A valid, reachable DNS server is always required. If a node's configured DNS is wrong or unreachable it may show an INVALID IP in its network configuration. Confirm the DNS servers you entered are reachable from the node network.
- If the control plane IP changed after a reboot (DHCP lease change), clients can no longer reach the API server. Give the control plane a fixed IP (DHCP reservation or static) to avoid this.
Deployment Fails on a Single Package
Symptom: cluster install succeeded, but during package deployment one package fails while others succeed.
Resolve:
- Read the error under the failed step in Deployment steps, or the whole log with Open Logs.
- Fix the cause.
- Click Retry in the status banner. Retry runs the whole deployment again.
Certificate (ADCS / Enterprise CA) Deployment Fails
Symptom: deployment fails at the certificate/issuer step, with an error that the issuer resource is invalid, for example that spec.url, spec.templateName, or spec.caBundle is the wrong type, or "Error deploying Cluster Issuer".
This almost always means one of the ADCS inputs was left blank or mis-typed, so a placeholder was not substituted with a real value.
Resolve:
- Return to Deployment Options and confirm every field in cert-manager (ADCS), see Running the Installer > View 2: Deployment Options.
- Confirm that the Username account can request certificates from the Certificate template on your ADCS server, and that the ADCS web service URL is reachable from the cluster.
- Re-run the deployment.
Sanity Check Shows "Endpoint Not Reachable"
Symptom: deployment succeeded, but the post-install sanity check reports your public hostname is unreachable.
Resolve:
- Confirm the DNS A record for your hostname points to a control- plane node IP.
- Confirm TCP 30443 is open from your test location to that IP. See Prerequisites > Network.
- If the installation uses the built-in certificate authority, your browser warns about the self-signed certificate. That is expected, but
curland similar tools may refuse. Test with a browser to rule TLS out.
Licensing and the License Server
Almost every licensing symptom is a connectivity or a license-content problem between the entitlement orchestrator and the license server. See Prerequisites > Licensing for how VAM licensing works and what the server must provide.
Symptom: VAM opens and browsing works, but saving, uploading or deleting fails with 402 Payment Required.
This means VAM lost its VAM Core license while it was running, so it runs read-only. Either the license server cannot be reached, or it does not hold a VAM Core license.
Resolve: work through this in the Configuration Service.
- Open Packages, click Show all packages if system packages are hidden, and open the Entitlement Orchestrator package (ID
entitlement-orchestrator). Confirm it is installed and healthy. - Open its Logs tab. The log names the license servers the package knows and reports what it found on them.
- If it names the wrong servers, note that the Configuration Service cannot change the server list. Contact Vizrt support.
- If the servers are right but nothing is found, test reachability from the node network on TCP 22350, then confirm that the licenses are present in the container on that server and that CodeMeter's network server is enabled.
Symptom: the orchestrator pod never becomes ready, or its log contains VIZLIC_WIBURUNTIME_INIT_FAILED.
The cause is that the licensing runtime inside the pod failed to start. This is a pod-level fault, not a license-content problem, so it is not fixed by changing the server list.
Resolve: restart the package from its detail view in the Configuration Service. If the fault repeats, save the log from the Logs tab and raise a support case. The orchestrator runs as a single replica by design, so a brief gap while it restarts is expected and existing sessions keep working.
Symptom: VAM pods restart repeatedly, and the VAM log shows one of the following messages:
Licence check failed: no entitlement snapshot from the orchestrator within 00:00:30 (app=VAM, feature=write).Licence check failed: app VAM with feature write is not licensed.
The first message means the entitlement orchestrator is not reachable or has not sent a license snapshot within the startup wait time. The second means the orchestrator is running but VAM is not licensed.
Resolve: check that the VAM Core license is present on the license server and that the entitlement orchestrator is running, as described for 402 Payment Required above. The orchestrator re-reads the license server every 30 seconds, and VAM starts once the license is found.
Sign-In and Authorization
Sign-in problems, such as a redirect URI mismatch, missing roles, an expired client secret or an access denied error from storage, are covered with their causes and fixes in Identity Provider Setup > Troubleshooting Sign-In.
Registry Access
Symptom: on the Registry Login step, the status panel reports Attention required, with Harbor login failed. or a message that the robot account cannot pull from its tier.
Resolve:
- Click Open Logs. The log gives the reason, for example that the registry rejected the credentials or that the Podman machine could not be reached.
- If the registry rejected the credentials, check that Harbor Username holds the full robot account name, in the form robot$vam+installer, and that Harbor Password holds its token. If the token has expired, ask Vizrt support for a new one.
- If the Podman machine could not be reached, see Podman: Machine Will Not Start.
- If the message says that the robot account cannot pull from its tier, the account lacks the permissions it needs. Ask Vizrt support for the correct credential.
- Make sure that the installer host reaches
registry.vizrt.cloudover HTTPS (443).
If your network uses an internal certificate authority, for example for a proxy that inspects TLS traffic, the Podman machine must trust it as well as the host. The installer does not add certificates to the Podman machine, so contact Vizrt support if your network needs this.
Inspecting the Cluster
Most of what you need is in the Cluster and Health views of the Configuration Service, which need no cluster credentials and no command line. See Cluster and Health.
From the Command Line
Reach for kubectl when the Configuration Service itself is unreachable, or when you need something it does not show, such as secrets or gateway routes. The installer writes a kubeconfig on the installer host. For a bring-your-own cluster, use yours.
kubectl get nodes -o wide # node status, roles, IPs, versionskubectl get pods -A -o wide # pod health across all namespaceskubectl get deployments -A # READY vs DESIRED replicaskubectl describe pod -n <ns> <pod> # events, restarts, image-pull errorskubectl logs -n <ns> <pod> --tail=100 # recent logs (add --previous for a crash loop)kubectl get events -A --sort-by=.metadata.creationTimestamp # recent cluster eventskubectl get svc,httproutes -A # ingress / gateway routingkubectl get secrets -A | Select-String domain-tls # the gateway TLS cert secretOn Talos-based clusters kubectl top needs the metrics server and may report Metrics API not available. Use talosctl dashboard for live node CPU/memory instead. Prefer these read-only commands. Avoid editing cluster resources by hand except on Vizrt support's guidance.
Collecting Logs for Support
Click Open Logs in the installer to read the log of the current session. The installer writes one log file per run, named console-log-<timestamp>.txt, in %APPDATA%\Vizrt\vamctl\logs\.
Attach the log files of the affected runs to your support case. Check them for passwords or secrets before you share them.