
Viz Artist User Guide
Version 5.1 | Published October 31, 2023 ©
Post Render Scenes
Scenes can be exported as video or image files. This process is called post rendering.
Note: Post rendering is not possible with clips or live video feeds. However, these items can be post rendered if the clips are place within the stage.
This section contains information on the following topics:
Post Render Screen
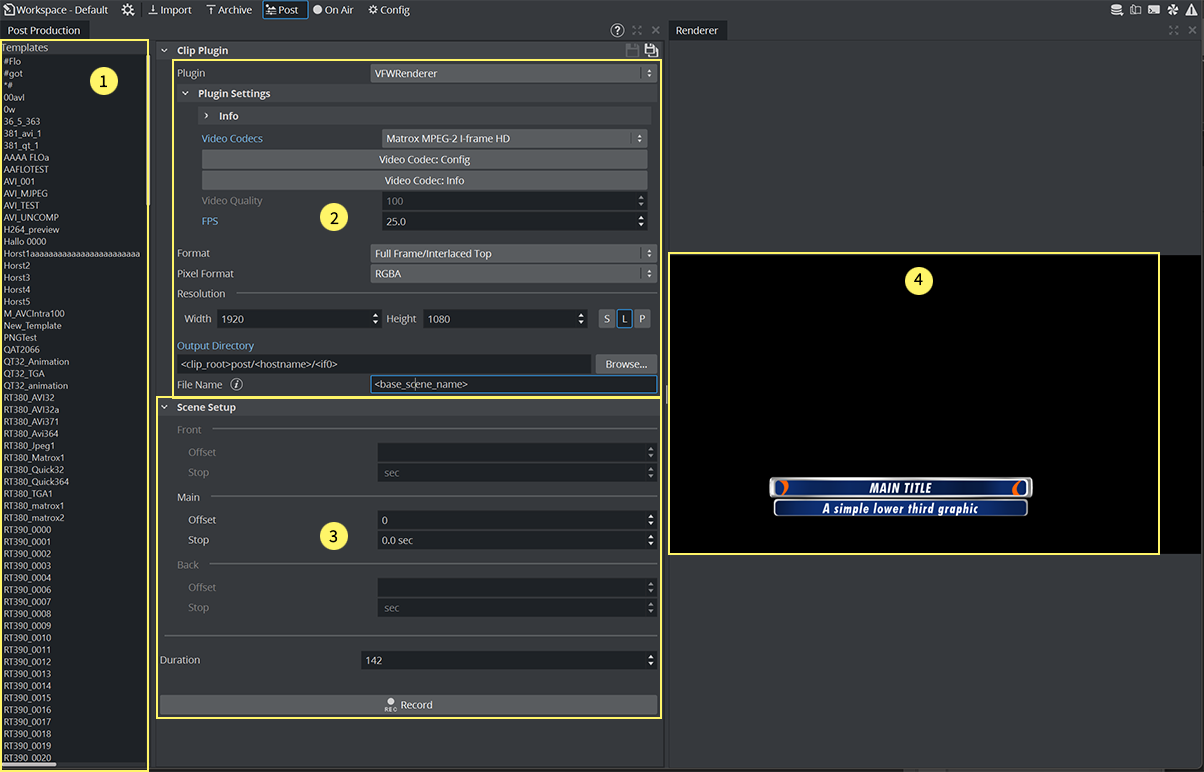
The post render panel consists of:
-
Templates (1) (see Post Render Templates).
-
Output Settings (2) (see Post Rendering Plug-ins): Used to configure the output format and the destination of your post project
-
Post rendering setup (3): The configuration for your scenes to be rendered (In the Classic Render Pipeline you can render Front, Main and Backlayer) and set various offsets and stop points. Offsets can be used for the Main, Front and Back Layer, so they start at different times.
Stop points in post are usually lost, therefore the Stop points can be changed to a pause duration.
Note: Layers need to be set before switching to the post renderer.
-
Output preview (4)
To Post Render a Scene
-
Open the Scene to be post rendered.
-
Assign (if needed ) Front and Backlayer.
-
Click Post. The Scene is loaded Main Layer target area.
-
Select a Template to load all settings or choose your output module. Output modules are integrated as plug-ins. These can be one of the following:
|
Format |
Supports Alpha |
Description |
|
JPG |
|
JPEG uses a lossy form of compression and therefore is not well suited for line drawings and other textual or iconic graphics. Sharp contrast results in noticeable artifacts. |
|
PNG |
|
PNG is a raster-graphics file-format that supports lossless data compression. PNG images also support transparency. The PNG plug-in allows to set a quality level. |
|
TGA |
|
TGA files are based on a lossless RLE compression . This type of compression works acceptably well for simpler images, such as icons, cartoons and line drawings, but performs poorly on photographs. TGA files support transparency. |
|
TIFF |
|
TIFF files are widely used and use a lossless compression. TIFF files support transparency. |
|
VBN |
|
Vizrt Binary are already compressed mipmapped images. It is the same format as already used when storing images on Graphic Hub. |
(1) If native Alpha format is not supported, a separate file can be generated (RGB AAA).
|
Clip Format |
Comments |
|
VFWRenderer |
Based on Microsoft Video For Windows technology. Requires codecs in 64bit to be installed on the Windows System. |
|
Video Renderer |
The plugin is based on Microsofts DirectShow filters. Therefore it also requires 64bit codecs to be installed on the Windows System. |
|
Matrox File Writer |
Based on the Matrox SDK. Requires installation of Matrox Topology driver. Capabilities depend on the Matrox board and/or license. |
Information: Additional settings like options, information, quality, FPS are exposed by the installed codecs.
-
Select a frame Format. Viz Artist/Engine always renders 50 images per second for PAL or 60 for NTSC. Dependent on the post render format, not all of them or not the full frames are stored. Options are:
-
Full Frame: Stores 50 or 60 full height frames for each second of video. The number depends on the video settings, PAL/50 or NTSC/60 frames, and the size also changes with the video format (720x576 for PAL digital and 720x486 for NTSC digital). Normally TV is 25 or 30 interleaved frames, but in this case the post rendering produces twice the amount of pixels needed. An editing system (or wherever you put the images you render) can throw away 50% of the pixels and still produce a “normal” video stream.
-
Fields Top/Fields Bottom: Stores 50 fields per second of video. It is the same amount of data as interlaced top/bottom, but instead of shuffling the data the post rendering process writes different files for each field.
Note: First Field top is only used for NTSC format, Standard is First field bottom
-
Interl. Top, Interl. Bottom: Stores 25 interlaced frames for each second of video. Each frame consists of two fields (half size of PAL or NTSC for example 720x288). These two fields are combined line by line. Interlaced top means that the first line of the first field is the first line in the interlaced frame. In interlaced bottom the first line of the second field is the first line in the interlaced frame. This determines field dominance.
-
Full Frame Skip: Stores every other full frame, resulting in 25 (or 30 for NTSC) frames per second.
-
-
Select the color settings. These can be
-
RGB: Creates RGB images. Here a pixel is represented by three bytes containing a red, green and blue sample.
-
RGBA: Creates a red, green and blue sample, along with an additional color sample, all in a single image. When shown on top of other images, RGBA pixels are blended with the background pixel according to the value of this alpha component.
-
RGB AAA: Creates an RGB and an Alpha image for each image rendered.
-
-
Select resolution: By default, the output resolution is set. You can scale down your output format, but you can not set it higher.
-
Output Destination: The destination is specified by the Output directory, the filename defines the naming convention. You can use the following placeholders:
Variable
Definition
<absolute_scene_name>
Expands to the complete path of the loaded scene.
<base_scene_name>
Expands to the scene name.
<clip_root>
Expands to the clip_root.
<hostname>
Expands to the host name.
<if0>
Expands to the IPV4 network address of the first network interface.
<if1>
Expands to the IPV4 network address of the second network interface.
<if2>
Expands to the IPV4 network address of the third network interface.
Example Usage
<clip_root>post/<hostname>/<if0>/<base_scene_name>Tip: Hover over the setting to see how those placeholders will be applied on your system:

-
Set an Offset, if required. How the offset affects the Scene can be seen in the Post Rendering area.
-
If your scene(s) has Stop points in the timeline, these can be converted into Pause intervals (in seconds).
-
Finally specify the Duration of your recording.
-
Click the Record Button to start your export.
Post Render Templates
If Scenes are post rendered often, with the same settings, create a Post Render Template. To use a saved template double-click it in the Template panel.
Note: Post rendering templates are saved in the Graphic Hub and not on the local machine.
To Save a Post Render Template
-
Configure all the settings in the procedure To Post Render a Scene.
-
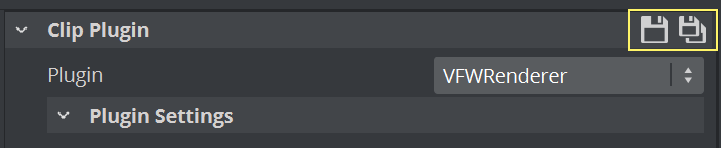
In the Clip Plugin Panel, click Save or SaveAs
-
If required, Enter a name for the template.
-
Click OK. Saved templates show in the Templates panel.
To Change a Post Render Template
-
Double-click the post rendering template in the Templates panel.
-
Change the required settings.
-
Click Save.
To Load a Post Render Template
Double-click the post rendering template in the Templates panel.
To Rename a Post Render Template
-
In the Templates panel, right-click the template and select Rename.
-
Enter a new name and click OK.
To Delete a Post Render Template
In the Templates panel, right-click the template and select Delete <name>.
Post Rendering Plug-ins
Post rendering plug-ins define the format of the post rendered files. Viz Artist offers a set of image and video rendering plug-ins:
VideoRenderer Plug-in
The video rendering plug-in render a Scene to a Video clip using DirectShow. It requires 64bit DirectShow plugins to be installed and the Codec must also include an Encoder. As the number of such plugins is limited, we recommend to use either an image sequence or the Matrox File Writer.
Matrox File Writer
The Matrox File writer is only available, if a Matrox board is present. This can be a native board with Codec upgrade or a DSX Core virtual license.
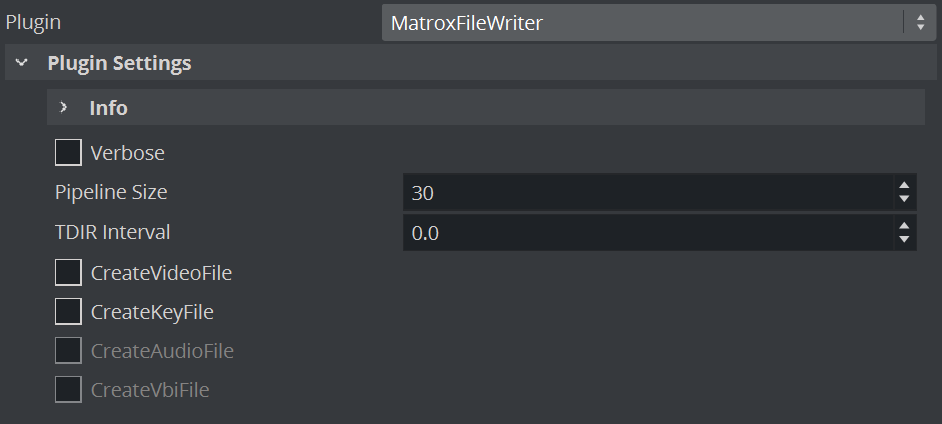
These additional settings for the Matrox File Writer plug-in:
-
Pipeline Size: Defines the number of internal buffers in frames for the matrox framework to operate. For SD+720p+1080i should be around one second (~25-30). It is recommended that you leave the default values.
-
TDIR Interval: Sets the interval time, in seconds, to update the video file while it is recorded. The value must be 1 or more (less than one does not activate the TDIR feature).
Note: TDIR is only supported on .avi, .p2.mxf, xdcam.mxf, xdcam_422.mxf, .mov, and .wav containers. The MATROX_MOV .mov containers write a separate file (<basename>.Ref<.extension>) that is updated to read the .mov file. This reference file needs to be used while the file is growing. The QT_MOV containers update the .mov file directly.
-
CreateVideoFile: Creates a fill clip when set to On.
-
CreateKeyFile: Creates a key file when set to On.
-
CreateAudioFile: Not in use.
-
CreateVbiFile: Not in use.
-
CreateProxyFile: Specifies a custom resolution copy of the clip when set to On. These settings behave in a similar manner to the video file options and show when this is set to On.
-
Video Resolution: Shows clip resolution information.
See Also
-
Video Output Clip Output section of the Viz Engine Administrator Guide