Viz Channel Branding User Guide
Version 5.1 | Published October 26, 2023 ©
Configuring Import and Update Folders for Network Drives
A Windows service does not have access to network drives mapped with aliases such as M:\ when mapped using a regular domain user.
Working with Import and Update Folders
The following procedures describe how to configure this solution's components to use network drives for playlist imports and updates when running Media Sequencer as a Windows Service.
To set playlist imports and update destination path for schedule files
-
Start Viz Channel Branding Client in Scheduling mode.
-
Open the Configuration settings.
-
Click Channel Settings > Import/Export Settings > General Settings.
-
Set the Destination path for the schedule files to import or update.
Note: For this case network paths, such as UNC paths (for example, \network\...) are supported; however, mapped drives are not.
To enable automatic import
-
Click Global Settings > Import/Export settings > Automatic Import.
-
Set:
- Automatic import interval
- Playlist importer folder path
- Playlist importer log level
To configure Media Sequencer network authentication
-
In Windows, click Start.
-
Open the Control Panel, select System and Security > Administrative Tools.
-
Open Services.
-
Select and right-click the Vizrt Media Sequencer service.
-
Select Properties.
-
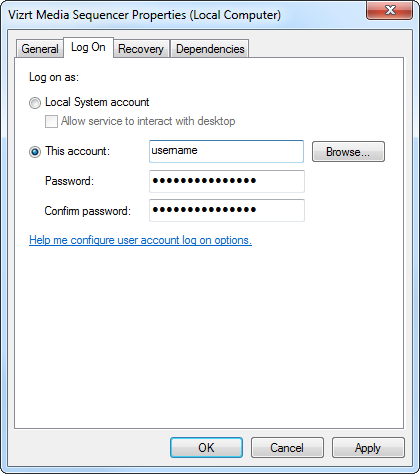
Select the Log On tab:
-
Select the This account radio button.
-
Enter a username and password that has access to the network share you want to connect to.
-
Apply and click OK.
Note: If Vizrt Media Sequencer service is already running, please restart the service for the new settings to take effect.
Troubleshooting
Microsoft Excel schedule files cannot be imported
Note: Microsoft Excel and other Microsoft Office applications are not designed to be run as a server application, and Microsoft does not support this usage.
-
Create a folder named Desktop in the following location:
-
32-bit systems: C:\Windows\System32\config\systemprofile
-
64-bit systems: C:\Windows\SysWOW64\config\systemprofile
-
-
For more information, see the following knowledge base article on Arcana Development and/or the following Microsoft knowledge base article on Considerations for server-side automation of Office.