
Viz Pilot User Guide
Version 8.5 | Published December 16, 2019 ©
Timeline Editor
The timeline editor is used to add graphics to a video timeline. The editor is available to Viz Pilot News users.
Search for a video using Viz Pilot News and preview proxy versions of the video clips. When you have found/edited the video, it is possible to open the video in the built-in timeline editor.
The timeline editor offers basic functionality for adding graphics to the video timeline. The graphics are added using data elements that are saved to the Viz Pilot database (normal graphics workflow).
When using data elements, the timeline editor will add them as placeholders on the video timeline. The placeholders will display snapshots of the graphics as video overlays (fetched from the Preview Server). The placeholders can of course be manually adjusted on the timeline.
A story item containing clip and graphics references from the timeline editor will appear as a group in the playlist. Issuing a Take command on the group will trigger the video clip and timed graphics.
This section contains the following topics:
Timeline Editor Functions
This section contains the following topics:
-
Set Timeline Name
Editor Control Bar Functions
The editor consists of a control bar and a preview window.
Timeline Editor Functions
The control bar contains the following functions.
|
Function |
Description |
|
|
Play or Pause the clip. <SPACE> |
|
|
Adjust the volume of the clip |
|
|
Add graphics to the timeline. <INSERT> |
|
|
Delete the currently selected graphics from the timeline. <DEL> |
|
|
Scrub marker (cursor). Drag to scrub the clip. |
|
|
Click the poster frame marker to jump the cursor to the marker. The preview window will display the frame that will be used as the poster frame. |
|
|
Set poster frame to the current position of the cursor. <P> |
|
|
When selected, the video will loop during playout. Note that graphics will not loop. <CTRL + T> |
|
|
Set the mark-in point to the current position of the cursor. <I> |
|
|
Set the mark-out point to the current position of the cursor. <O> |
|
|
Jump the cursor to mark-in point. <SHIFT + I> |
|
|
Jump the cursor to mark-out point. <SHIFT + O> |
|
|
Play from mark-in to mark-out. <SHIFT + SPACE> |
|
|
Drag the Zoom control to increase or decrease the time scale shown on the timeline. <Mouse wheel> or <CTRL + ‘+’> / <CTRL + ‘-’> |
|
|
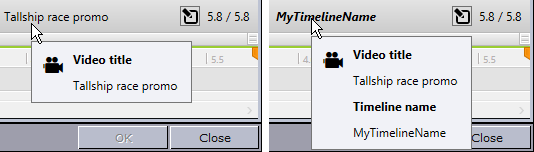
Set timeline name. The Set Timeline Name button appears when you hover over the video title. |
|
|
The Timeline Editor supports progressive download. The Buffering indicator is displayed above the timeline - gray above timeline sections where buffering has not yet been done, and green where the media is buffered locally. |


Multiple Tracks in the Timeline Editor
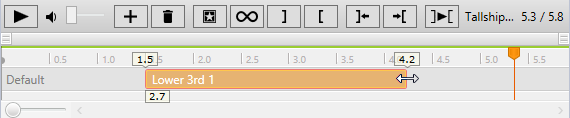
The Timeline Editor supports multiple tracks for transition logic scenes. This allows graphics to overlap and play out correctly, but requires that all data elements are based on the same transition logic set.
The tracks reflect the layers in the transition logic scene. A track is displayed in the timeline editor if an element using that layer has been added.
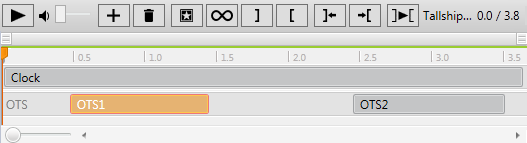
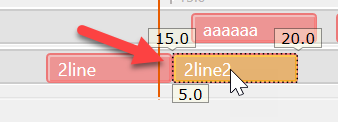
Graphics from the same layer must not be overlapped, and the timeline editor will indicate a possible conflict by coloring the graphics placeholders red, as shown below:
Position elements on the timeline with snapping
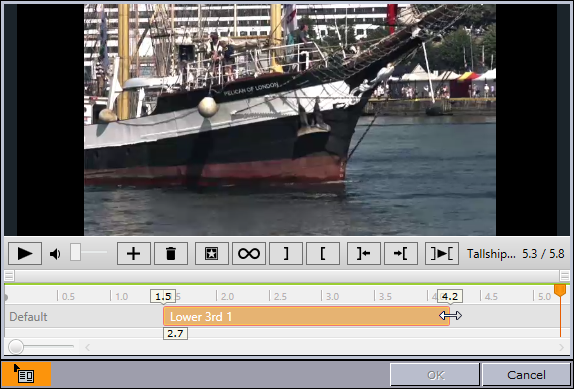
Graphics snap to each other if they are on the same track.
To reproduce:
-
Open a video with multiple graphics on the same timeline.
-
Drag one graphic towards another.
-
Elements snap together once they get close enough. This means the in and out points on the elements line up on the timeline, as shown here:
Tip: Press CTRL while dragging a graphic to disable snapping.
Set Timeline Name
After adding graphics in the timeline editor you can give a timeline name to the resulting composite element. If the timeline name is set, it is put into the MOS element (mosAbstract node), otherwise the video title will be used. The timeline name will be displayed in the newsroom story and in the playlist.
Reopening a MOS item in a newsroom system that supports updating the items, will also update the existing name.
Note that if you open an existing item that has a timeline name, the timeline name will remain the same when editing, but will not appear as a changed name next to the label. This enables you to override the timeline name again or set it back to empty if you wish to use the name that was previously set.
The atom xml generated by the timeline editor will have the timeline name set as the atom:title (this remains empty if not set).
You can:
-
Hover your cursor over the video title/timeline name to see names in full.
-
Set or edit the timeline name, by either:
-
Right-clicking the video name and select Set timeline name.
-
Hovering over the video name and pressing the Set timeline name button
 .
.
-
-
Clear the timeline name by right-clicking the video name and selecting Clear timeline name.
Keyboard Shortcuts for Timeline Editor
|
Key |
Description |
|
Mouse wheel |
Zoom in and out |
|
CTRL + ‘+’ |
Zoom in |
|
CTRL + ‘-’ |
Zoom out |
|
CTRL + ‘0’ |
Reset zoom |
|
Insert |
Add new graphics |
|
Enter |
Open selected data element for editing |
|
Del |
Remove currently selected graphics from the timeline |
|
Space |
Play/Pause |
|
Arrow |
Move focus to next or previous graphic item |
|
CTRL + Arrow |
Move graphics in small steps back and forth on the timeline |
|
CTRL + SHIFT + Arrow |
Move graphics in big steps back and forth on the timeline |
|
SHIFT + Arrow |
Select multiple graphics |
|
CTRL + ALT + Arrow |
Increase or decrease duration of graphic by a small amount |
|
CTRL + ALT + SHIFT + Arrow |
Increase or decrease duration of graphic by a large amount |
|
CTRL + L |
Move the selected graphics next to the one to the left |
|
CTRL + R |
Move the selected graphics next to the one to the right |
|
CTRL + ALT + L |
Stretch the selected graphics next to the one to the left |
|
CTRL + ALT + R |
Stretch the selected graphics next to the one to the right |
|
CTRL + H |
Sets video position to start of the clip |
|
CTRL + E |
Sets video position to end of the clip |
|
CTRL + T |
Activate looping of the video |
|
, |
Scrub backwards one frame. (If frame rate not provided in the asset, scrub back 0.02 seconds) |
|
. |
Scrub forwards one frame. (If frame rate not provided in the asset, scrub forward 0.02 seconds) |
|
CTRL + , |
Scrub backwards 1.0 second |
|
CTRL + . |
Scrub forwards 1.0 second |
|
P |
Set poster frame |
|
I |
Set mark-in |
|
O |
Set mark-out |
|
SHIFT + I |
Go to mark-in |
|
SHIFT + O |
Go to mark-out |
|
SHIFT + Space |
Play the mark-in to mark-out area. |
|
SHIFT + drag the in/out marker bar |
Move the bar between the in and out points to move both points at the same time. |
Note: Media keyboard shortcuts for play, pause and mute should also work.
Working with the Timeline Editor
This section contains the following topics:
Add graphics to a video clip timeline
-
In Viz Pilot News, click the Media tab to search for videos.
-
Right-click the video item, and from the context menu select Open in Timeline Editor.
-
To add graphics, click the Add button
-
This will open the Template and Data Elements view.
-
-
Select a template or previously saved data element, and click OK.
-
Clicking OK will prompt the template or data element to be saved.
-
After it is saved you will see a graphics placeholder on the timeline.
-
-
Adjust the placeholder to set the desired duration of the animation.
-
Optional: Repeat steps 3 and 4 to add more graphics.
-
Drag and drop the timed video and graphics onto your story.
-
 : Depicts an item that can be added (by drag and drop) to a newsroom story.
 -
OK: Saves a reopened story item back to the story.
-
Cancel: Cancels any changes.
Note: Graphics may be overlaid on the timeline; however, graphics that use the same layer (front, middle, back or transition logic layer) will not play out correctly.
-
Timeline Update Service
When a video timeline (standalone video or video composite element) is opened in the Timeline Editor, it will check if a Timeline Update Service (TUS) is defined in the system. If defined, it will POST the playable relative timeline to the TUS.
TUS is called both when opening a video from the results of a media search, and also when opening a video or composite element from a rundown in a newsroom system. In this case the TUS might already have run on the video when it was previously created by Viz Pilot, but it is still run again.
The TUS is provided by the customer themselves, and is an HTTP service that complies with an API. Viz Pilot will invoke the relevant URL and will expect the result to follow the given protocol.
The API prescribes an HTTP service, listening on the configured URL for POST requests with the media type Atom Feed (application/atom+xml;type=feed), with content as defined by the Playable Relative Timeline format, and responding with content of the same format.
-
Set up TUS:
-
The TUS is provided by the customer.
-
Specifications for the playable relative timeline format can be accessed from the Documentation page of the Pilot Data Server itself.
-
-
Configure TUS in the Pilot Data Server:
-
Browse to http://<Pilot Data Server host:port>/settings#Params
-
Set timeline_update_service to the URL that Viz Pilot is expected to (HTTP) POST Playable Relative Timeline documents to. The response is expected to be a document in the same format with any updates.
-
-
Use TUS once configured:
-
Open Viz Pilot News and search for videos. When you preview a video in the Timeline Editor, the courtesy graphic is displayed.
-
-
Example:
-
One of the use cases for TUS is adding courtesy graphics. In this case the TUS could return an updated playable relative timeline, with a courtesy graphic added, or return the same timeline it was given if no changes were made. If no value is set in timeline_update_service, then no courtesy graphic is added (this is the default behavior).
-
Viewing an Asset Stored in Viz One
As soon as a new asset is published by Viz One and appears in a search result, it can be opened in the Timeline Editor.
For Viz One assets that have been fully ingested and processed by Viz One, the Timeline Editor will provide a full preview. However, if Viz One is still processing the asset (ingesting the high-res video or creating the proxy video), the Timeline Editor will provide a preview based on the information available to it at the time.
While Viz One is processing the asset:
-
The timeline duration reported by the Timeline Editor will equal the high-res video duration reported by the asset, at the time of opening it in the Timeline Editor.
-
If no proxy video is available from the asset, the Timeline Editor will open with a blank video preview area, with all video preview related controls (play, pause, volume) disabled.
-
If there is a proxy video, but its duration (as reported by the asset) is shorter than the high-res video, then video preview will only be available for the first part of the timeline. Seeking beyond that is possible, but the video preview will not be updated there.
-
It is possible to add graphics and in/out points even where there is no video preview. These areas are marked on the buffer indicator line with moving black and white stripes.
-
The Timeline Editor sets the out point to the length/duration of the currently available portion of the video. If the high-res is still growing when the timeline is opened in the Timeline Editor, then this out point will be somewhere in the middle of the final video.
Note: When played out, only the part before the out point will be played.
-
To see an updated timeline for the asset, reopen the Timeline Editor.
Note: Depending on version and configuration, different Viz One installations may behave differently with regards to the details on which the Timeline Editor is reliant. For more information on Viz One, contact Vizrt Customer Support at www.vizrt.com.
Known Limitations
-
Graphics may be overlaid on the timeline; however, graphics that use the same layer (front, middle, back or transition logic layer) will not play out correctly. The timeline editor will always indicate a possible conflict by coloring the graphics placeholders red. To use overlapping graphics based on transition logic scenes, see Multiple Tracks in the Timeline Editor.
-
Current limitations on the Media Sequencer will cause the following behavior:
-
If you issue a Take on a timed group (1), and while that group is played out issue a Take on graphics in another layer (2), the Media Sequencer will take out the last taken element instead (2) when issuing the timed Take Out command (for the timed graphics). It is therefore not recommended to take other data elements on-air while a timed group is being played out.
-
-
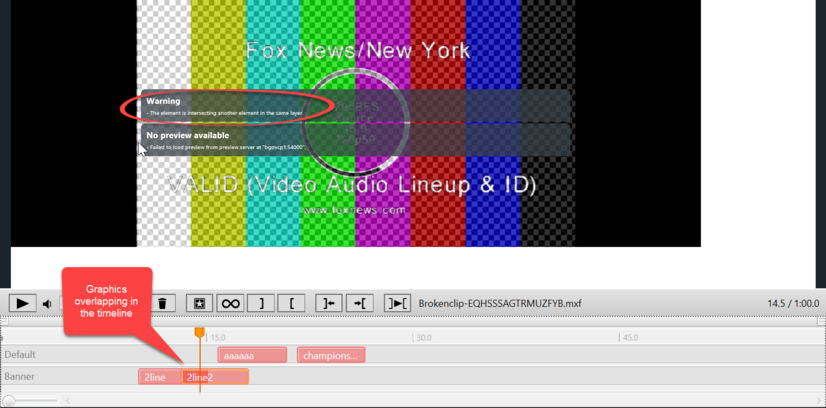
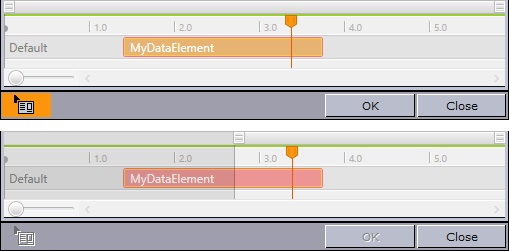
Invalid Timeline! The element is not fully inside the area marked by the In and Out points.
Timelines which have elements which are outside or intersecting the Mark In/Mark Out points cannot be saved or dragged to the rundown.
In the image below, the first timeline shows a normal element, while the second timeline contains an element which intersects the In/Out points - the second timeline cannot be saved or dragged. -
If loading timeline elements (overlay graphics), or calling update service (Timeline Update Service) takes more than 2 seconds, an abort button is shown on the loading screen. Clicking the abort button will cause the video to be loaded with a missing or incomplete timeline with overlay graphics, depending on which of the two operations was aborted.
Timeline Editor Preview Mode

A basic version of the Timeline Editor is available for previewing video elements from within a template or data element. Video preview and scrubbing is available, however the controls for timeline manipulation are disabled.
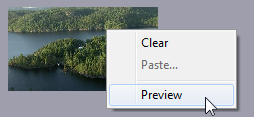
The Preview option is available from the context menu of the video element.
Preview is only available if the image component in the template lists is VideoMediaSearch in it’s ImageSources, and is only enabled if a video asset is actually selected.