
Viz Pilot User Guide
Version 8.5 | Published December 16, 2019 ©
Wizard
This section contains the following topics:
Using the Template Wizard
The easiest way to create a template is to use the Wizard (opened from the File menu), however, it's also possible to create a template from scratch without adding a scene to it.
-
The first step of the Wizard lets you select a Viz Engine renderer to connect to.
IMPORTANT! This step only appears if you have not selected a rendering engine. If no rendering engine is available, you must add one during installation and configured using the Viz Pilot Configuration Tool, see Configuration.
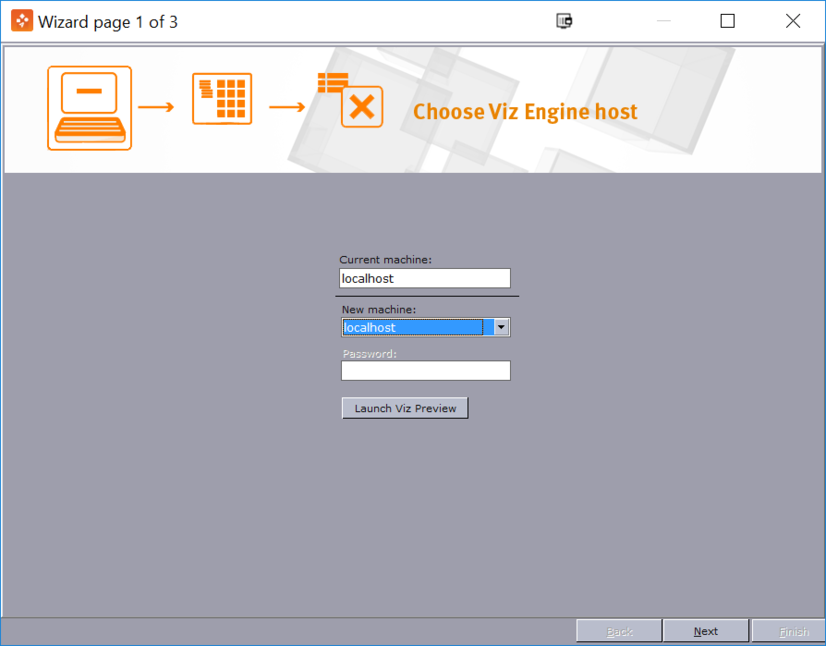
Note: The Launch Viz Preview button only appears if a preview engine has been installed and configured on the Template Wizard client machine, see Local Preview in Template Wizard.
-
The Wizard’s second step is where the template scenes are selected. The folder structure (left) shows what is available on the currently connected Viz Engine. Scenes displayed in the middle pane can be dragged and dropped from the scene display pane onto the Selected Scenes pane (right).
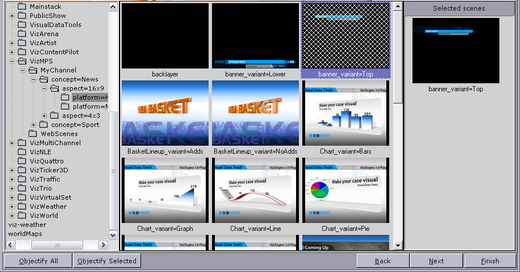
Tip: If a scene is loaded on Viz, it will not take into account any changes made by the scene designer after it was loaded; hence, it is good practice to clean up or restart Viz Engine before adding scenes for template generation.
-
Objectify All / Objectify Selected: Generate GEOM objects from all or the selected transition logic front scenes. The GEOM objects are used by the background scene. If transition logic scenes are exported to a different Viz Graphic Hub, and there already exists a template for them, the GEOM objects must be regenerated for the scene to work properly when played out or previewed. This feature does not require the template to be rebuilt.
-
Finish: Finishes the template creation with a default layout and selection of exposed objects.
-
-
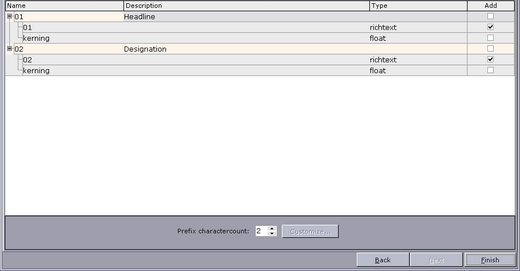
The Wizard’s final step shows a list of exposed and editable objects. The objects are numbered and each object property can be shown and subsequently accessed in the template.
-
Name: Shows the names of the objects properties.
-
Description: Shows the descriptions of the objects properties. The text is fetched from the description fields of the corresponding Control plugins in the scene.
-
Type: Shows the data types of the objects properties.
-
Add: Sets which properties to include in the template.
-
Prefix charactercount: Sets the number of prefixes to be used when generating a template with a table style layout. This is used for scenes that do not use control plugins like Control List or Control Chart for table creation. For example, if a scene consists of four groups, and each group has three sub-containers, each with text and images, it may be desirable to auto-generate a table layout representing the sub-groups rather than having a long list of form elements on the template form. Remember to set the Field Identifiers for each group. For example: Group 1 with 011,012,013, and Group 2 with 111, 112, 113 and so on.
-
Customize: Arranges the components before the template is generated.
-
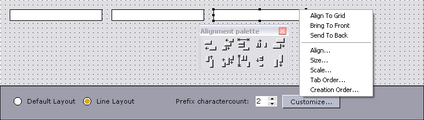
Enabling the Prefix and Customize options
-
Add the key linelayout_visible__to the ContentPilot.ini file under the Template_Wizard section with the value y (Yes).