
Viz Artist User Guide
Version 5.2 | Published March 20, 2024 ©
Tips and Tricks
The following lists some typical use cases and most common mistakes:
Building TextBG Functionality
The TextBG plug-in in Classic pipeline allows any background graphics (like a Noggi, Rectangle) to grow or shrink according to a variable text string. This is a often required functionality that can also be built using Flexbox and Box Transformation:

To have the Box scale accordingly to the text dimension, the following need to be set:
-
Disable the Geometry aware Scaling in the Box Transformation.
-
Width and Height in Flexbox should be set to auto.
-
The Bounding Box property of the Text needs to be set to Typographic.
This should make sure that box dimensions are already following the textbox dimensions. To have a background, add a Rectangle with Flexbox plugin. As Tracking Container use the container holding the text geometry.
-
Set the margins of your rectangle to be 0 (or according to design).
Example of Building TextBG Functionality with Three Containers
-
Add three containers with one as a parent and two as children.
-
Add the FlexBox plug-in on all three.
-
Set Flex Grow value on the parent FlexBox to 0.
-
In FlexBox for all three containers, set the Sizes W/H from the Dimensions section to auto.
-
For child containers, disable the Geometry aware scaling.
-
Add the Text plug-in into one of the child containers with some text, and add rectangle/Noggi to the other one.
-
Add material to child containers for visibility.
-
Check the BoundingBox property of the Text plugin-in and make sure it's set to Typographic.
-
Select the FlexBox plug-in of the child container with geometry rectangle/Noggi attached to it, then drag/drop the container with Text plug-in as Tracking container to it.
-
Change the text and it should automatically resize the Geometry based on Text size.
-
Use the z-index of the text container's BoxTransformation to move text a bit ahead of the geometry (Z-index=1).
Building AutoFollow Functionality
AutoFollow allowed a container to follow another containers position based on its bounding box. This is also possible in the Box transformation world, but needs some different way of organizing.
Create a container and split it into the two required containers, one for the master and the second one for the container following the master. Depending on how the second container should stick on the the master, the FlexDirection should be either Column or Row, normal or reversed. The second container has a fixed width/height, therefore Grow and Shrink should be set to 0. Set the width and height according to the dimension you want to achieve. The second container now follows the first container based on the layout chosen as Flex Direction.
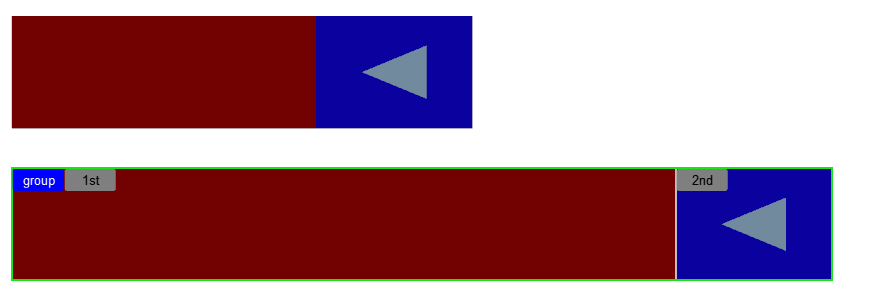
Example of Building AutoFollow Functionality with Three Containers
-
Add three containers with one as a parent and two as children.
-
Add the FlexBox plug-in on all three.
-
Add rectangle/Noggi geometry and material to child containers for visibility.
-
Name child containers properly, one as lead, and another as a follower (for the purpose of having the same name here).
-
For the follower container, set the Grow and Shrink values to 0 in FlexBox.
-
Now the following can be done in a row or column directions.
-
For auto-follow in row direction:
-
First, we need to set the parent container's FlexBox plug-in Flex Direction to row.
-
Then follower container we need to have a specific value for Width (Sizes/W) in pixels (fixed size) or percent (will always be a percentage of the screen).
-
For the lead container, we also need to set the Width to 0%.
-
Now if we resize the parent containers FlexBox Width, we will see that the follower follows the lead container in the row direction.
-
-
To do the same in the column direction.
-
First, we need to set the parent container's FlexBox plug-in Flex Direction to Column.
-
Then follower container needs to have a specific value for Height (Sizes/H) in pixels (fixed size) or percent(will always be a percentage of the screen).
-
For the lead container, we also need to set the Height to 0%.
-
Now if we resize the parent containers FlexBox Height, we see that the follower follows the lead container in the Column direction.
Building TextBG and AutoFollow Capability with Six Containers
-
Build the TextBG Functionality.
-
Build AutoFollow Functionality.
-
Add the parent container in auto-follow as a child to the container with text in TextBG Functionality.
-
Set width/height for parent auto-follow part to be 100%.
-
Then, set the Offset for the second container in auto-follow to be the same as W/H ( for row direction set Offset/L to be the same as Width, for column direction set the Offset/R to be the same as Height).
-
Remove geometry and material from first container of auto-follow.