Viz Multiplay User Guide
Version 2.6 | Published September 20, 2019 ©
Setup and use external preview
The Armed column will give you a hint of what is ready to be played out, but not an accurate preview. If you want a real Viz Engine preview of the content ready to be played out you must configure an external Viz Engine as a preview. Depending on how much hardware you have available, this preview can be a simple VGA version of the Viz Engine, a Video Engine with a simulated Matrox hardware (a Matrox X.Open dongle), or a full Viz Engine with high end graphic cards and NVIDIA Mosaic.
Keep in mind the following:
-
It is possible to preview live sources if your preview engine is a video enabled Viz Engine with a Matrox video card. In this case, the SDI in signals must be split to go into both the video wall and the preview engine.
-
Viz Trio’s local Viz preview can also be used as an external preview. But it is mainly used for testing because Viz Trio’s local preview function (reading pages) and the video wall preview will conflict.
To setup and use external preview
-
Click Settings > Profiles
-
Click on a profile and create a new video wall inside of it
-
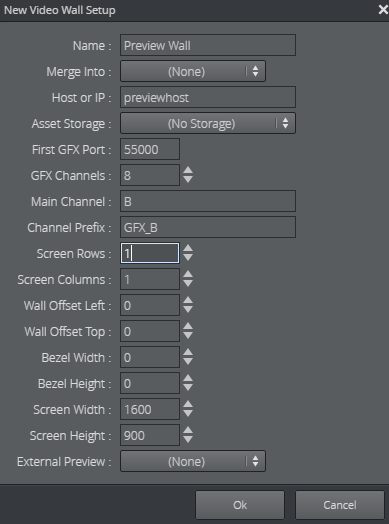
This video wall will represent the preview wall. If you use a Viz Engine with one screen to preview the video wall, enter the same amount of GFX channels as in the main wall. However, set the rows and columns to 1 and name it, for example, Preview Wall

-
Click OK to generate the channels for the preview wall
Note:
These will not be visible in the main playout GUI
-
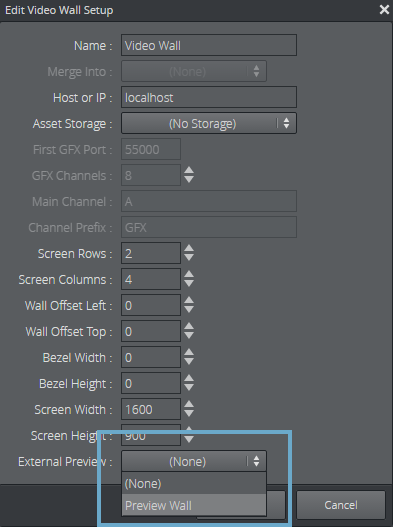
Double click the main video wall in the Video Wall list in your profile
-
Select your newly created preview wall in the External Preview combo box

-
Click OK
Now, whenever you arm presets and elements (with 1-TAP mode disabled), these elements are played out on the preview engine. In this way, the preview engine can act as a “real” preview for the main wall, depending on what kind of hardware you use as a preview wall. -
Go to Settings > General. Set the Extra Armed button to CONTINUE:

This will make an extra button appear in the Armed column. Whenever an element is armed, it is taken on the preview engine. Clicking CONTINUE will now continue the element on the preview engine. In this way, you can preview a full sequence of stop points in a graphics on the preview engine before it is taken on air in the program engine.