
Gateway Administrator Guide
Version 5.4 | Published March 22, 2022 ©
Installing Database Client
This section describes how to install and test the Oracle Database 11g Client. For further documentation, please see the Oracle Documentation website:
-
http://www.oracle.com/technology/software/products/database/
-
http://www.oracle.com/technetwork/indexes/documentation/index.html
Note: Installing the Oracle Database Client is not necessary if you connecting to Oracle or Graphic Hub via the Pilot Data Server.
Important! A 64-bit Oracle Client is required because the Media Sequencer is a 64-bit application.
Before installing Gateway, check the language settings for the Oracle client. The National Language Support (NLS_LANG) parameter must be the same as on the Vizrt database.
This section has more information about these topics:
Also see the Oracle software and documentation.
Pre-installation
-
If there is an existing Oracle Client installed, create a backup of the tnsnames.ora file.
-
Remove any previous or older versions of the client.
-
Download the client from Oracle’s web site.
-
Click Downloads, and follow the instructions to make sure that the correct Oracle Database Client installation executable is selected..
To Install the Oracle Client
Note: The installation procedure below is according to Oracle Client version 10.2.0.1.0. For a reference on another version, see the Oracle web site.
-
Log on as a member of the Administrators group to the computer on which to install Oracle components. For installations on a Primary Domain Controller (PDC) or a Backup Domain Controller (BDC), log on as a member of the Domain Administrators group.
-
Double-click the installer (setup.exe).
-
In the Welcome screen, click Next.
-
In the Select Installation Type screen, select type Runtime.
-
In the Specify Home Details screen, click Next.
-
In the Product-Specific Prerequisite Checks screen, click Next.
-
In the Summary screen, click Next to start the actual installation and configuration.
Note: Do not use the Oracle Net Configuration Assistant (NetCA) unless there are specific client connection configuration needs. Using the NetCA is beyond the scope of this guide.
-
Click Next.
-
In the End of Installation screen, click Exit, then click Yes to exit from Oracle Universal Installer.
-
Optionally, delete the \temp\OraInstalldate_time directory to remove the temporary files that were created during the installation process. The OraInstalldate_time directory holds about 45 MB of files.
-
Restarting the computer also removes the OraInstalldate_time directory.
-
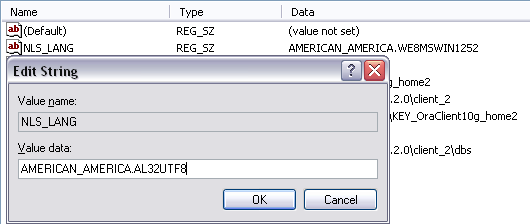
To Set the Language Setting for the Oracle Client
-
Start the Registry Editor (regedit) on the Start menu.
-
Click the Run menu option, enter regedit, and click OK.
-
-
Open the path \HKEY_LOCAL_MACHINE\SOFTWARE\Wow6432Node\ORACLE\KEY...<version>.
-
Double-click the registry setting for NLS_LANG.
-
Edit the string and change it to AMERICAN_AMERICA.AL32UTF8, and click OK.
Note: To help give Vizrt customers the best possible support, American English is chosen as the default language for log messages.
To Test the Installation
-
Start a command-line tool, and type the following:
sqlplus userid/password@tnsname -
It is also possible, if a TNS name alias is not configured, to use an easyconnect string:
sqlplus userid/password@hostname/SID -
Check that the output is something like the example output below:
C:>sqlplus pilot/pilot@VIZRTDBSQL*Plus: Release10.2.0.1.0- Production on Thu Mar2412:17:192014Copyright (c)1982,2010, Oracle. All rights reserved. Connected to: Oracle Database 10g Release10.2.0.1.0- Production SQL>
See Also