Viz Mosart Administrator Guide
Version 5.5 | Published July 22, 2024 ©
GPIO
GPI functionality supports triggering any template from the currently active template set and includes a selection of optional control commands.
Adding GPI/O control to a device is performed in Viz Mosart AV Automation (Devices > Properties > GPI/O tab).

GPO
Note: In Template Editor for the GPIO device, you enter:

- 0 for GPO 1
- 11 for GPO 12 etc.,
in the same way as GPI.
-
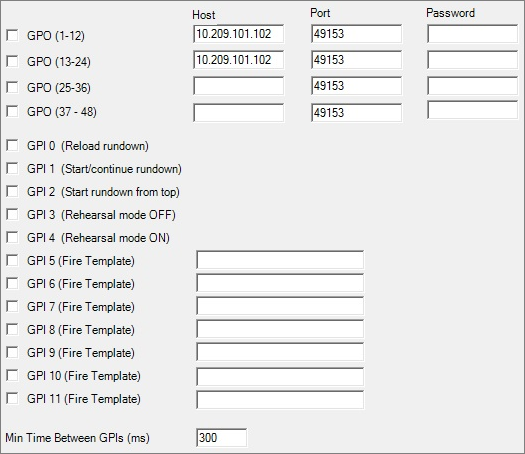
GPO (0-11): Enables a WebIO box for the first 12 GPO when checked. Note that this has to be configured for GPI 0-11 to be enabled.
-
GPO (12-23): Enables a WebIO box for the second 12 GPO when checked.
-
GPO (24-35): Enables a WebIO box for the third 12 GPO when checked.
-
GPO (36-47): Enables a WebIO box for the fourth 12 GPO when checked.
-
Host: Hostname or IP address to the WebIO GPI/O box.
-
Port: Port on the WebIO GPI/O box.
If configured as 80, Mosart will use the HTTP WebIO protocol, while for other Port values Mosart will use the Binary WebIO protocol. -
Password: Defines the password, if needed.
GPI 0-4
The first 5 GPI signals are connected to fixed Viz Mosart commands for backward compatibility.
-
GPI 0 (check box): When the external pulse is received, reload rundown is triggered: The timeline is stopped and the current rundown is reloaded from the NRCS cache.
-
GPI 1 (check box): Start/continue rundown. Will trigger the TAKE-NEXT event and with that start the timeline or advance to the next timeline element.
-
GPI 2 (check box): Start rundown from top. Will start the rundown from the first story..
-
GPI 3 (check box): Disable rehearsal mode.
-
GPI 4 (check box): Enable rehearsal mode.
-
GPI 5-11 (check boxes/custom): Enables firing of the template or command given in the text box.
-
Min Time Between GPIs (ms): Threshold time before a new trigger command will be processed.
GPI 5-11
Each of the GPI signals 5-11 may be assigned to either trigger a Viz Mosart control command, trigger an arbitrary template from the active template set or trigger a direct take, as follows.
Note: A GPI/GPO device must first be configured. The configuration of GPI/GPO devices is done in AV Automation Devices - GPIO.
Triggering a Template
Taking a template using one of GPIs 5 to 11 (Fire Template) adds the corresponding template to the timeline.

GPI Control Commands
As template to the timeline (see GPIO above) is not always wanted behavior, you can instead insert a control command.
To Trigger Mosart Control Commands
-
To trigger a Mosart Control Command enter a valid command in the text field associated with the GPI signal.
Supported commands are:-
DIRECTTAKE: Trigger the numbered direct take.
-
CLEARFOREGRUONDGRAPHICS: Removes all CGs
-
SKIPNEXTSTORY: Skips next story item
-
UNSKIPNEXTSTORY: Unskips next story item
-
TAKELASTGRAPHICSOUT: Removes last CG
-
TAKEMENUALGRAPHICSOUT: Removes manual CGs
-
PLAYCUEDVIDEOSERVER: Plays out the last cued clip on a video server
-
PAUSEPLAYINGVIDEOSERVER: Pauses the currently playing clip on a video server
-
STOPPLAYINGVIDEOSERVER: Stops the currently playing clip on a video server
-
RECUECUEDVIDEOSERVER: Recues the last cued clip on a video server
-
Direct Takes
A direct Take is an example of an available control command.
Syntax
DIRECTTAKE|<the Recall number of the direct take>
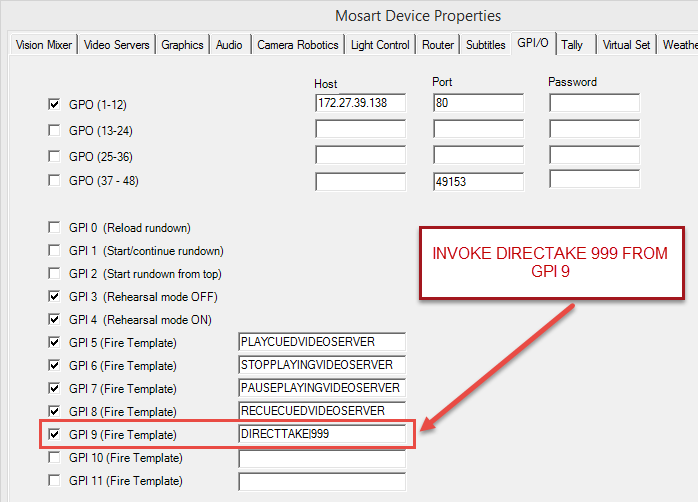
Example: DIRECTTAKE|999
will trigger direct take 999 (see screenshot below).

To Trigger a Mosart Template
This can be used to trigger a Mosart template from the active template set:
Syntax: [TemplateType]|[Variant]
-
Example: Camera|1
Troubleshooting
Verifying the Connection
Verifying
-
Assign a direct take to a GPI between 5 and 11.
-
Restart AV Automation.
-
Trigger this GPI from the external device connected to this GPI (see GPIO below).
-
Verify on the Mosart server that the corresponding GPI is executed.
Direct takes are shown in the AV Automation Log window (lower left) at Take.
To test GPI signals without using GPI
There is an simple method to test the GPI configuration.
-
If a GPI/GPO device is configured, as shown above, GPI signals 0-9 can be simulated inside AV Automation using keyboard sequence CTRL+SHIFT+<number> to trigger a corresponding GPI, where <number> is the GPI number +1 (modulo 10).
For example, CTRL+SHIFT+6 triggers GPI 5.
Configuration Issues
If the GPIO will not import the configuration file directly, a workaround is to save the current configuration and using Notepad++ or similar, to compare the difference between the new configuration and the existing configuration.
Amend the configuration on the existing configuration to match the new settings.