
Graphics Plugin Administrator Guide
Version 2.1 | Published October 06, 2017 ©
Mac-based NLE Systems
Using a Mac-based NLE system, such as Apple’s Final Cut Studio or Adobe’s Premiere for Mac, requires an installation of the Graphics Plugin. The Graphics Plugin installs the Graphics Plugin configuration tool and the Graphics Plugin Editor.
This section contains information on the following topics:
Prerequisites for Mac-based NLE Systems
Before installing the Graphics Plugin, a Media Sequencer and a Viz Engine must be running (on a Windows machine).
Note:
Viz Engine and the Media Sequencer must both run on Windows 7, or later. It is recommended to run the Media Sequencer separately on a Windows Server 2008 or Windows 7. In smaller production environments, however, the Media Sequencer may run on the Viz Engine machine.
The Media Sequencer should preferably contain a Viz Trio show to confirm that the connection is working properly; however, the Graphics Plugin Editor has status indicators indicating connections to Viz Engine, the host application (FCP or Premiere for Mac) and the Media Sequencer which should be sufficient information to confirm a correct setup.
Introduction to Mac-based Graphics Plugin Systems
The Graphics Plugin Editor is a tool used to fetch graphics content for use with NLE systems on Mac. This editor enables Mac-users to incorporate graphics from Vizrt’s Windows-based Viz Engine and Media Sequencer to the NLE workflow.
A basic setup requires a Viz Engine and a Media Sequencer, where the Media Sequencer holds the actual data (for example text and image reference(s)) and Viz Engine the graphic scenes.
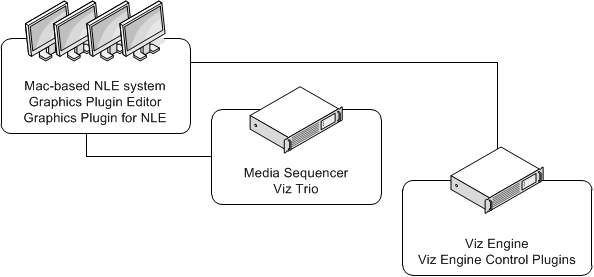
A prerequisite is that a Viz Trio operator has created a show with graphics templates on the Media Sequencer. Once the show is available on the Media Sequencer, the Graphics Plugin Editor is able to display the graphics such that the NLE user can select and edit the content and add it to the timeline.
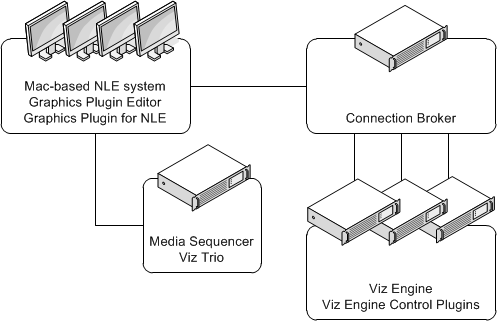
A more advanced setup that uses the Connection Broker enables the Connection Broker to select engines from a pool of Viz Engines.
A typical setup using the Graphics Plugin Editor is as follows:
-
NLE machines
-
Mac-based NLE system (Adobe, Avid, or Final Cut)
-
Graphics Plugin (with Graphics Plugin Editor)
-
-
Viz Engine
-
Graphic Hub with graphic scenes
-
Optional: Datapool plugins for Viz Engine
-
-
Optional: Connection Broker
Installation of Mac-based Graphics Plugin Systems
The following procedures install the Graphics Plugins, which enable the use of the Graphics Plugin configuration tool and the Graphics Plugin Editor.
Note:
The installer requires an OS X user with administrator privileges.
To install the Graphics Plugin for Adobe on Mac
-
Double-click the disk image file (*.dmg) to open the package file.
-
Double-click the package file (*.pkg) to start the installation.
-
In the_ Graphics Plugin for Adobe installer, _click Continue until the installation has finished.
-
Eject the file.
To install the Graphics Plugin for Avid on Mac
-
Double-click the disk image file (*.dmg) to open the package file.
-
Double-click the package file (*.pkg) to start the installation.
-
In the Graphics Plugin for Avid installer, click Continue until the installation has finished.
-
Eject the file.
Note:
Support for Avid on Mac is new in version 2.0 of the Graphics Plugin.
To install the Graphics Plugin for Final Cut Pro
Note:
Separate Graphics Plugin installers exist for Final Cut Pro 6+7 and Final Cut Pro X.
-
Double-click the disk image file (*.dmg) to open the package file.
-
Double-click the package file (*.pkg) to start the installation.
-
In the Graphics Plugin for Final Cut installer, click Continue until the installation has finished.
-
Eject the file.
To install the Graphics Plugin for Final Cut Pro X
Note:
Separate Graphics Plugin installers exist for Final Cut Pro 6+7 and Final Cut Pro X. Previous versions of the plugin cannot be used with Final Cut Pro X.
-
Double-click the disk image file (*.dmg) to open the package file.
-
Double-click the package file (*.pkg) to start the installation.
-
In the Graphics Plugin for Final Cut X installer, click Continue until the installation has finished.
-
Eject the file.
The Graphics Plugin may not be shown in Final Cut Pro x if previous versions of the plugin are still installed. If this occurs, run the following commands in a terminal window:
sudo rm -rf /Library/Plug-Ins/FxPlug/viznle_plugin.fxplug sudo rm -rf /Library/Application Support/Final Cut Pro System Support/Plugins/VizFcpNotifier.bundleAllow Mac NLE to use Editors on a Windows Remote Host
To allow a Mac-based NLE program to use other editors, such as Viz Pilot NLE, on a Windows remote host, do the following:
-
Start C:\Program Files(x86)\vizrt\Pilot 6.1\VCPAxNle.exe
-
In Premiere/Avid on the Mac, create a new effect and click Edit
-
NLE will now start communicating with Viz Pilot on the Windows host
-
Open a data element, and click save
-
The effect may now be rendered in Premiere/Avid
If you have used Graphic Plugin Editor on your Mac before, you must delete the existing plugin. You may also need to exit and re-open Avid Media Composer in order for the setting to be applied.
Note:
Transition Logic scenes need to use Viz Pilot as the editor. They will not work if using Viz Trio/GraphicPlugin Editor.
Configuring Adobe Premiere Pro on Mac
After the plugin has been configured the first time, the configuration can be accessed in various ways:
-
By clicking the Graphics Plugin Config button
-
By selecting the Graphics Plugin Config option on the Graphics Plugin Editor menu. Optional: Press the shortcut keys Command + , (comma).
For details on advanced configuration options, see the Graphics Plugin configuration tool’s tooltips or the Graphics Plugin Configuration Tool section.
To configure the Graphics Plugin for Adobe on Mac using the configuration tool
-
Start Adobe Premiere Pro for Mac.
-
Open a project.
-
Add a Transparent Video clip to the project:
-
In the Project panel, make sure that the Project tab is selected, and click the New Item button in the lower right corner.
-
From the menu that appears, click Transparent Video.
-
In the New Transparent Video dialog box that opens, make sure the resolution matches the current sequence settings, and then click OK.
-
Drag the new transparent video clip to the Sequence panel.
-
-
Add the Graphics Plugin to the project:
-
In the Project panel, click the Effects tab.
-
Navigate to Video Effects > Vizrt > Graphics Plugin, and drag the plugin onto the transparent video clip in the Sequence panel.
-
-
Select the transparent video clip that holds the plugin.
-
Click the Effect Controls tab in the upper left corner.
-
Press the Setup icon.
-
From the dialog box that appears, click Configure.
The Graphics Plugin configuration tool then opens. -
Make sure that the General tab is selected.
-
Select a Viz Engine:
-
Specific Viz Engine: Sets a Viz Engine connection.
-
Connection Broker: Sets a Connection Broker connection.
-
-
Select a Media Sequencer.
-
Click the OK button to confirm the settings and close the configuration tool.
Note:
To apply a new configuration, close and reopen your NLE system. If the new settings are still not applied, delete the existing graphic and add a new one.
Configuring Avid Media Composer on Mac
See Graphics Plugin Workflow with Avid Media Composer.
Note:
To apply a new configuration, close and reopen your NLE system. If the new settings are still not applied, delete the existing graphic and add a new one.
Configuring Final Cut Pro on Mac
After the plugin has been configured the first time, the configuration can be accessed in various ways:
-
As a result of an error message, for example if the Viz Engine or Media Sequencer is unavailable
-
By clicking the Graphics Plugin Config button (see To configure the Graphics Plugin for Final Cut using the configuration tool)
-
By selecting the Graphics Plugin Config option on the Graphics Plugin Editor menu. Optional: Press the shortcut keys Command + , (comma).
For details on advanced configuration options, see the Graphics Plugin configuration tool’s tooltips or the Graphics Plugin Configuration Tool section.
To configure the Graphics Plugin for Final Cut using the configuration tool
-
Start Final Cut Pro.
-
Select the Effects tab in the Browser window, and add the Graphics Plugin effect to the timeline.
-
Select the Controls tab and click the Graphics Plugin Config button.
-
In the Graphics Plugin configuration tool that opens, select a Viz Engine.
-
Viz Engine: Sets a Viz Engine connection.
-
Connection Broker: Sets a Connection Broker connection.
-
-
Select a Media Sequencer.
-
Click the OK button to confirm the settings and close the configuration tool.
Note:
If all connections are working properly, a list of Viz Trio shows from the Media Sequencer should appear. Selecting a show will display all templates. Selecting a template will display the tab-fields and preview the graphics.
Note:
To apply a new configuration, close and reopen your NLE system. If the new settings are still not applied, delete the existing graphic and add a new one.
Configuring Final Cut Pro X on Mac
See step 5 of Graphics Plugin Workflow with Apple Final Cut Pro X.
Note:
To apply a new configuration, close and reopen your NLE system. If the new settings are still not applied, delete the existing graphic and add a new one.
Removal of Mac-based Graphics Plugin Systems
The following procedures describe how to delete the Graphics Plugins.
To remove the Graphics Plugin for Adobe on Mac
To remove the Graphics Plugin for Adobe, use Finder, Terminal or some other tool to remove the following files:
/Library/Plug-ins/MediaCore/viznle_plugin.plugin
-
/Library/Application Support/Adobe/Common/Plug-ins/[CS version]/MediaCore/viznle_plugin. plugin per installed CS version (for example CS5 and CS6)
To remove the Graphics Plugin for Avid on Mac
To remove the Graphics Plugin for Avid, use Finder, Terminal or some other tool to remove the following files:
/Library/Application Support/Avid/AVX2_Plug-ins/Vizrt/AvidGraphicsPlugin.avx/
To remove the Graphics Plugin for Final Cut
To remove the Graphics Plugin for Final Cut, use Finder, Terminal or some other tool to remove the following files:
/Library/Plug-ins/FxPlug/viznle_plugin.fxplug
/Library/Application Support/Final Cut Pro System Support/Plugins/VizFcpNotifier.bundle
/Library/Frameworks/VizCocoa.framework (used by older Graphics Plugin versions)
To remove the Graphics Plugin for Final Cut Pro X
To remove the Graphics Plugin for Final Cut X, use Finder, Terminal or some other tool to remove the following files:
/Applications/FCPXGraphicsPlugin.app