
Graphics Plugin Administrator Guide
Version 2.1 | Published October 06, 2017 ©
Typical Workflows for NLE Work Stations
The third party NLE workstations have different ways of importing and inserting graphics into video, but the Graphics Plugin itself has the same interface across all third-party programs.
The various workflows are described in the following sections:
Graphics Plugin Workflow with Adobe Premiere Pro
The following steps are performed when adding Vizrt graphics to a sequence in Adobe Premiere Pro:
Note:
It is a prerequisite that the Graphics Plugin for Adobe has been successfully configured, see Configuring Adobe Premiere Pro on Mac.
-
Open a project in Adobe Premiere Pro.
-
Add a Transparent Video clip to the project:
-
In the Project panel, make sure that the Project tab is selected, and click the New Item button in the lower right corner.
-
From the menu that appears, click Transparent Video.
-
In the New Transparent Video dialog box that opens, click OK.
-
Drag the new transparent video clip to the Sequence panel.
-
-
Add the Graphics Plugin to the project:
-
In the Project panel, click the Effects tab.
-
Navigate to Video Effects > Vizrt > Graphics Plugin, and drag the plugin onto the transparent video clip in the Sequence panel.
-
-
Select the transparent video clip that holds the plugin.
-
Click the Effect Controls tab in the upper left corner.
(If the Effect Controls tab is not visible, go to the menu bar > Window > Effects Control, and check this option). -
Navigate to Graphics Plugin > Control, and click the Edit button that appears.
-
In the editor (Viz Trio, Viz Pilot or Graphic Plugin Editor), specify the controllable items of the graphics element being used, and click the Save/Save and Render in NLE button.
-
Back in Adobe Premiere Pro, a graphics element has now been added to the transparent video clip.
-
Create another Transparent Video with graphics plugin and drag it to the timeline to have multiple graphics.
Graphics Plugin Workflow with Avid Media Composer
For Windows, the supported editors are Viz Trio and Viz Pilot.
For Mac, the supported editors are Graphics Plugin Editor (acts like Viz Trio to retrieve the scene from the Media Sequencer) and Viz Pilot (where Viz Pilot is on a remote host).
-
In Avid Media Composer, create a new project.
-
Import a video by right-clicking on the Bin window and selecting Import.
-
Click on the film icon on the item that you imported, and drag into the Timeline window.

-
In the Project window, click on the Effect Palette tab (represented by a square purple icon), select Vizrt > Graphics Plugin, and drag it to the video in the Timeline window.

-
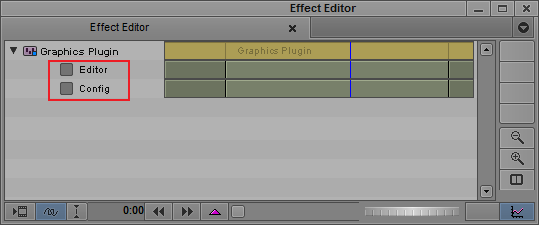
Open the Effect Editor by going to Tools > Effect Editor.
-
In the Effect Editor window, under the Graphics Plugin, select the Editor checkbox to start importing graphics into Media Composer. Viz Trio, Viz Pilot or the Graphics Plugin Editor (Mac) will be started.
-
Edit and save a template.
-
Check that you are in Effect mode (the Mixer icon is highlighted in the Timeline window). This allows you to see graphics animations in the Preview windows.

-
Play the video clip or scrub the timeline to see the new effect.
Note:
The graphics will not preview if you created another video layer with the plugin.
Graphics Plugin Workflow with Apple Final Cut Pro
-
Start Final Cut Pro.
-
Import and add a video clip to the timeline.
-
Drag the Graphics Plugin generator effect to the timeline.
-
Double-click the effect on the timeline to enable the effect controls in the Viewer window.
-
Click the Graphics Plugin Editor button under the Controls tab, and the Graphics Plugin Editor will be started.
-
Edit and save a template.
-
When done, click OK.
-
Scrub the timeline to see the new effect.
-
Press Command + R to render the new effects.
-
Play the video clip to see the new effect.
Graphics Plugin Workflow with Apple Final Cut Pro X
To use Vizrt graphics in Final Cut Pro X (FCPX), you need to generate a graphics template in Motion first. The only thing that FCPX can do is to adjust the length and position of the graphics to align with the video, so the majority of the tasks (such as importing graphics or doing NLE configuration) are done within Motion.
With Final Cut Pro X, use Motion to create a Final Cut Generator, then use this generator in FCPX to add the effect on your timeline. You can have a single Viz generator that you will edit in FCPX, or one preconfigured generator per scene.
-
Start Motion and select Final Cut Generator.
-
On the right-hand side, click Add a generator > Generator > Vizrt Graphics.
-
Go to the Inspector tab, select the Generator tab and choose Editor.
Here you will find the Config and Editor buttons. With the editor, you can open Viz Trio or the Graphic Plugin Editor, and select and configure the scene to use in the effect. -
Import a graphic and save.
-
If you want to be able to edit the scene or the configuration from Final Cut Pro X, you need to explicitly allow it from Motion. To do this:
-
Hover over the Setting area under the Generator tab
-
Click the arrow icon that appears near the Config button
-
Choose Publish
-
-
Save the template. You can create a new category for Vizrt Graphics so that items are easier to find later.
Note:
Once you have saved your effect in Motion, you must restart FCPX to make sure that it recognizes your new generator.
You are now ready to use the Generator in FCPX.
-
Open FCPX, create a new project and import media.
-
Your effect will now appear in the generator list. Drag your effect to the timeline.
If you have explicitly published the parameters in Motion, you will see the Config and Editor buttons when selecting your effect and go into the Generator configuration panel. -
Click on the Generator button, select the graphics template from step 6 and drag it into the timeline
To export the video without burning in the Viz graphics
-
Select your effect and go in its Info configuration panel
-
Select the Roles parameter and then select Edit Roles in the popup menu. The Role Editor window will appear.
-
In the lower-left corner of the Role Editor, click the "+" button to add a new video role named "VizGfx".
Make sure you select this role for all your Viz effects. -
When exporting your video with (File > Share > Master File), go to the Settings panel and set the Roles As parameter to Multitrack QuickTime Movie.
-
You will get a button to edit the roles you want to export. Click on it and unselect "VizGfx" to get all the effects except yours.
Graphics Plugin Workflow with Quantel
-
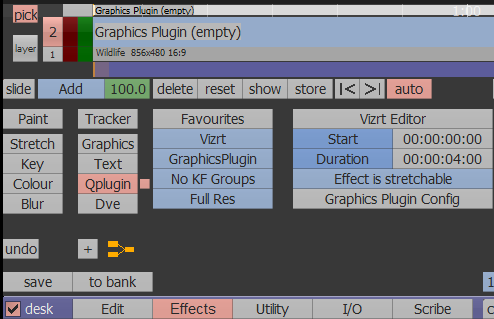
In Quantel, import a video by dragging a clip from the file browser to the workspace, and then clicking the Import button
-
Make the video available as a layer by dragging the video to the preview pane. It is now available as a layer and can be seen on the timeline.

-
Create a layer for the Graphics Plugin effect by pressing the Layer button (to the left of the timeline), and then dragging it on top of the video layer on the timeline.
-
Add the Graphics Plugin effect to the layer by selecting the Tracker > Qplugin button in Quantel and then selecting Favorites > Vizrt > select > VizNlePlugin
-
To change the starting point or duration of the effect, drag the mouse over the Start and Duration fields in the Vizrt Editor box.
-
Edit the effect by pressing the Vizrt Editor button. The editor will open.
For example, in Viz Trio, you can save a template as a page, make changes to the page and then preview it. Press Save and Render in NLE. -
In Quantel, scrub to see the effect.
-
Render the sequence by pressing the Render button.
Tip:
For a demonstration of Quantel and the Graphics Plugin, see the following tutorial video.