
Graphics Plugin Administrator Guide
Version 2.1 | Published October 06, 2017 ©
Windows-based NLE Systems
Using a Windows-based NLE system, such as Avid’s Media Composer, Adobe’s Premiere, or Quantel’s QEffects, requires an installation of the Graphics Plugin. The Graphics Plugin installs the Graphics Plugin configuration tool and an NLE version of Viz Trio.
In order to configure the Graphics Plugin for use, a Media Sequencer and a multiplexed Viz Engine must be running.
Note:
Viz Engine and the Media Sequencer both run on Windows XP or 7. Note that Viz Engine 3.7, and later, do not support Windows XP. It is recommended to run the Media Sequencer separately on a Windows Server 2008 or Windows 7. In smaller production environments, however, the Media Sequencer may run on the Viz Engine machine.
This section contains information on the following topics:
-
Basic Configuration of Windows-based Graphics Plugin Systems
-
Advanced Configuration of Windows-based Graphics Plugin Systems
Introduction to Windows-based Graphics Plugin Systems
Viz Trio is an advanced character generator that is used to produce content for use with a Windows-based NLE system. Similar to the Graphics Plugin Editor, Viz Trio basically requires a Viz Engine and a Media Sequencer.
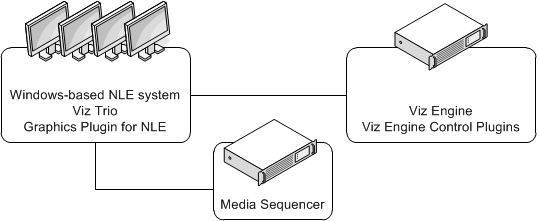
A typical setup using Viz Trio is as follows:
-
NLE machines
-
NLE system
-
Graphics Plugin (includes bundled Viz Trio)
-
-
Media Sequencer
-
Viz Engine
-
Graphic Hub with graphic scenes
-
Optional: Datapool plugins for Viz Engine
-
Viz Pilot basically requires a Viz Engine and a Viz Pilot database. The Viz Pilot database (Oracle 10g) is where the templates, template data elements, and its associated data is stored.
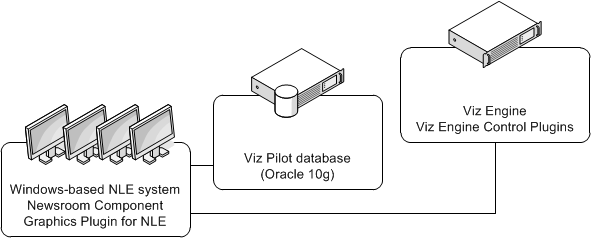
A typical setup using Viz Pilot is as follows:
-
NLE machines
-
NLE system
-
Viz Pilot
-
Graphics Plugin
-
-
Viz Pilot database installation
-
Oracle 10g
-
-
Viz Engine
-
Graphic Hub with graphic scenes
-
Optional: Datapool plugins for Viz Engine
-
Installation of Windows-based Graphics Plugin Systems
The installer requires a Windows user with administrator privileges.
-
To install the Graphics Plugin for Adobe on a Windows machine
-
To install the Graphics Plugin for Avid on a Windows Machine
To install the Graphics Plugin for Adobe on a Windows machine
Note:
Adobe Premiere Pro (or Adobe AfterEffects) must be installed on the workstation before installing the Graphics Plugin for Adobe.
-
Double-click the Windows installer file (*.msi) to start the installation.
-
Click Next in the appearing Welcome dialog box.
-
Click Next in the Custom Setup dialog box.
-
Optional: Select the features to be installed.
-
Optional: Select a different installation location.
-
-
Click Install in the Ready to Install dialog box to start the installation.
-
Click Finish to end the installation process.
See Also
To install the Graphics Plugin for Avid on a Windows Machine
Note:
Separate installers apply for 32- and 64-bit NLE systems. The 32-bit installer should be used together with Media Composer 5/NewsCutter 9 (or older), the 64-bit installer with Media Composer 6/NewsCutter 10.
-
Double-click the Windows installer file (*.msi) to start the installation.
-
Click Next in the appearing Welcome dialog box.
-
Click Next in the Custom Setup dialog box.
-
Optional: Select the features to be installed.
-
Optional: Select a different installation location.
-
-
Click Install in the Ready to Install dialog box to start the installation.
-
Click Finish to end the installation process.
See Also
To install the Graphics Plugin for Quantel
-
Double-click the Windows installer file (*.msi) to start the installation.
-
Click Next in the appearing Welcome dialog box.
-
Click Next in the Custom Setup dialog box.
-
Optional: Select the features to be installed.
-
Optional: Select a different installation location.
-
-
Click Install in the Ready to Install dialog box to start the installation.
-
Click Finish to end the installation process.
See Also
Basic Configuration of Windows-based Graphics Plugin Systems
This section explains the basic configuration of a Graphics Plugin for Windows.
For Advanced configuration options, open the configuration tool and select the Advanced tab. For more information about the Advanced options, see the Graphics Plugin configuration tool’s tooltips or the Graphics Plugin Configuration Tool section.
Configuration steps for the following plugins are described:
-
To configure the Graphics Plugin for Adobe on a Windows machine using the configuration tool
-
To configure the Graphics Plugin for Avid on a Windows machine using the configuration tool
-
To configure the Graphics Plugin for Quantel using the configuration tool
To configure the Graphics Plugin for Adobe on a Windows machine using the configuration tool
-
Start the NLE system; Adobe Premiere Pro.
-
Open a project.
-
Add a Transparent Video clip to the project:
-
In the Project panel, make sure that the Project tab is selected, and click the New Item button in the lower right corner.
-
From the menu that appears, click Transparent Video.
-
In the New Transparent Video dialog box that opens, click OK.
-
Drag the new transparent video clip to the Sequence panel.
-
-
Add the Graphics Plugin to the project:
-
In the Project panel, click the Effects tab.
-
Navigate to Video Effects > Vizrt > Graphics Plugin, and drag the plugin onto the transparent video clip in the Sequence panel.
-
-
Select the transparent video clip that holds the plugin.
-
Click the Effect Controls tab in the upper left corner.
-
Navigate to Graphics Plugin > Control, and click the Graphics Plugin Editor button that appears.
-
From the dialog box that appears, click Configure.
The Graphics Plugin configuration tool then opens.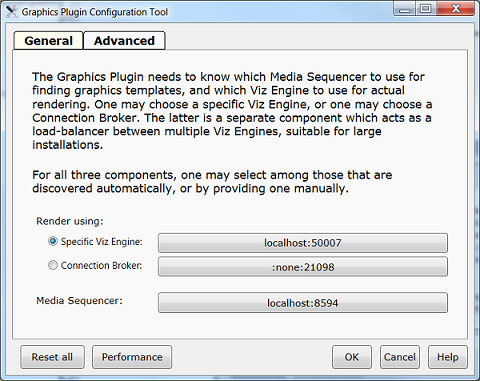
-
Make sure that the General tab is selected.
-
Select a Viz Engine:
-
Specific Viz Engine: Sets a Viz Engine connection.
-
Connection Broker: Sets a Connection Broker connection.
-
-
Select a Media Sequencer.
-
Click OK to confirm the settings and close the configuration tool.
See Also
To configure the Graphics Plugin for Avid on a Windows machine using the configuration tool
-
Start the NLE system.
-
Create a new project and add a video clip to the timeline.
-
On the Tools menu select Effect Palette and Effect Editor.
-
In the Effect Palette, open the effect category named Vizrt.
-
Drag the GraphicsPlugin effect onto the timeline.
-
In the Effect Editor, click the Config button to open the Graphics Plugin configuration tool.
The Graphics Plugin configuration tool then opens.
-
Make sure that the General tab is selected.
-
Select a Viz Engine:
-
Specific Viz Engine: Sets a Viz Engine connection.
-
Connection Broker: Sets a Connection Broker connection.
-
-
Select a Media Sequencer.
-
Click OK to confirm the settings and close the configuration tool.
After the plugin is configured the first time, the configuration can be accessed by clicking the Graphics Plugin’s Config button in the Effect Editor window. The Editor option is unavailable as long as no Viz Engine and Media Sequencer are configured using the Graphics Plugin configuration tool.
Note:
If all connections are good, the Editor button will appear, making either Viz Trio or Viz Pilot available for use. For more information on how to configure Viz Trio and Viz Pilot, read the Viz Trio and Viz Pilot user guides, respectively.
Note:
When working with the Graphics Plugin for Avid, an effect is not automatically re-rendered when changing the length of an already rendered effect. In order to re-render this, select Clear Renders at Position from the context menu.
To configure the Graphics Plugin for Quantel using the configuration tool
-
Start the NLE system; Quantel.
-
Add a clip to the timeline (the clip is added in layer 1).
-
Create a new layer (layer 2).
-
Make sure that the second layer is selected.
-
Make sure that the Effects tab is selected (lower left).
-
Click the Tracker > Qplugin button.
-
Click Favorites > Vizrt > select > VizNlePlugin.
The Graphics Plugin effect is then added to the second layer in the timeline. -
In the Vizrt Editor that appears, click the Viz NLE Config button.
The Graphics Plugin configuration tool then opens.
-
Make sure that the General tab is selected.
-
Select a Viz Engine:
-
Specific Viz Engine: Sets a Viz Engine connection.
-
Connection Broker: Sets a Connection Broker connection.
-
-
Select a Media Sequencer.
-
Click OK to confirm the settings and close the configuration tool.
Advanced Configuration of Windows-based Graphics Plugin Systems
This section explains how to set up a default configuration for all users of a computer by adding a master settings file.
A master settings file is useful in large installations where a system administrator can collect common settings into a shared file, and have this picked up by all users on a computer or all users on a network (by putting the file on a Windows share). There is currently no facility in the config tool to edit such a shared settings file, but an advanced user should be able to get this to work by copying the %APPDATA%\Vizrt\VizNLE\vizplugin.xml file that the config tool produces into the desired shared location.
If a master settings file is loaded and a user settings file is loaded later, then the latter will take precedence in case of any conflicts. So if for instance the loglevel defaults to "none", and the master settings file sets the loglevel to "report" and the user settings file sets the loglevel to "extreme", then the value of "extreme" is the one that is respected by the Graphics Plugin. But if the master settings file sets the Viz Engine hostname, and the user settings file is silent on this point, then the Viz Engine hostname in the master settings file will be used.
Before loading the user settings, the master settings file is looked for and potentially loaded as follows:
-
The Graphics Plugin asks the Windows registry for the SettingsDir string in the registry path under the listed registry locations.
-
If the string is found, and its content turns out to be a path to a folder, then the filename vizplugin.xml is looked for at that location.
-
If that file is present, it is loaded as a default configuration before loading the individual user settings file.
Registry paths:
|
Host system |
Registry path |
|
Adobe |
HKLM\SOFTWARE\[vizrt]\NLE\After Effects |
|
Avid |
HKLM\SOFTWARE\[vizrt]\NLE\AVX2 |
|
Quantel |
HKLM\SOFTWARE\[vizrt]\NLE\Quantel |
|
Edius |
HKLM\SOFTWARE\[vizrt]\NLE\EDIUS |
Removal of Windows-based Graphics Plugin Systems
The Graphics Plugin is removed using Windows’ Uninstall or change a program.
-
To remove the Graphics Plugin for Adobe from a Windows machine
-
To remove the Graphics Plugin for Avid from a Windows machine
To remove the Graphics Plugin for Adobe from a Windows machine
-
Open Uninstall or change a program.
-
Select Vizrt Graphics Plugin for Adobe.
-
Click Uninstall.
-
Click Yes in the appearing confirmation dialog box.
To remove the Graphics Plugin for Avid from a Windows machine
-
Open Uninstall or change a program.
-
Select Vizrt Graphics Plugin for Avid.
-
Click Uninstall.
-
Click Yes in the appearing confirmation dialog box.
To remove the Graphics Plugin for Quantel
-
Open Uninstall or change a program.
-
Select Vizrt Graphics Plugin for Quantel.
-
Click Uninstall.
-
Click Yes in the appearing confirmation dialog box.