
Viz Artist
Version 3.11 | Published August 27, 2018 ©
Media Asset Panel
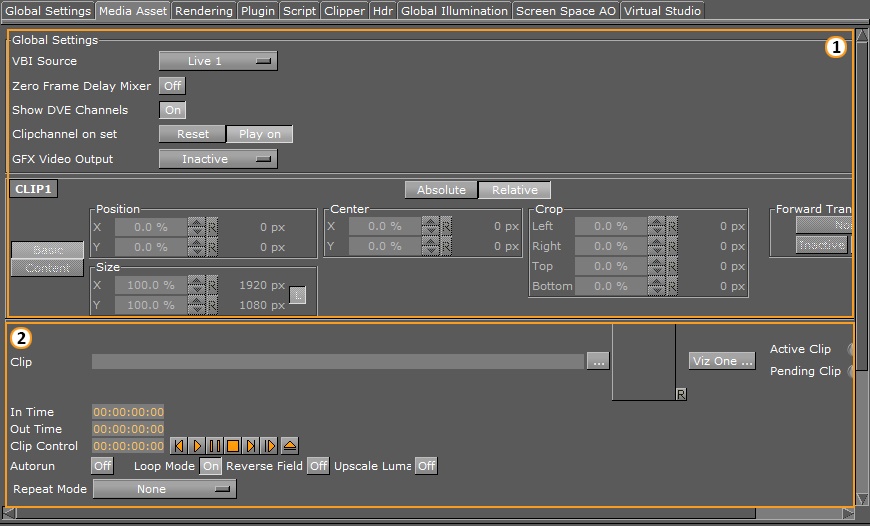
This panel contains parameters and settings for Media Assets. There are different types of Media assets available like Clip Channels, GFX Channels, Image Channels, Live Input Channels, IP Stream Channels and Super Channels. In the image below, section 1 contains details shared across all Media Assets. Section 2 contains details specific to the selected media asset (See section Media Asset Clip Settings).
This section contains information on the following topics:
Common Media Asset Properties
|
Item |
Description |
|
1 |
|
|
2 |
Clip Channel Properties / Live Channel Properties / IP Stream Channel Properties / GFX Channels Properties, Image Channels Properties |
|
3 |
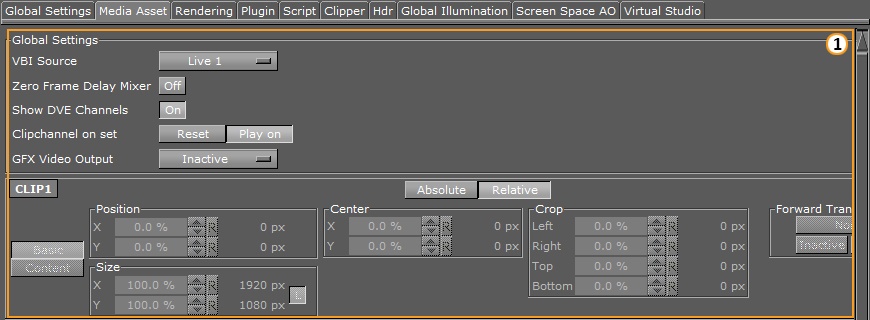
Global Settings (section 1)
These are the common Media Asset properties.
-
VBI Source: Selects which channel to use for output. Types of data sent include closed captions, teletext, time codes and other digital data. The setting Clip Timecode Type can enable Viz Engine to provide additional time code data in the VBI-signal, if required. The setting can be changed by editing the Viz Configuration file and setting the variable clip_timecode_type = <VALUE>. Please refer to the table Clip Time Code Type values below for valid values. It can also be set on the fly using the Send application to issue the following command: CONFIGURATION*CLIP_TIMECODE_TYPE SET <VALUE>
Note: This setting only applies for installations with Matrox cards.
Note: If you are using more than one specific Media channel in your scene, just click on the text of "CLIP1" (in section 1) and you can switch to the other clip channels used in the same scene.
-
Zero Frame Delay Mixer: Set to On to give the shortest input to output delay, with graphics on top. For this to work correctly, specific values for H-/V- phase must be set. For the input/output configuration, input A is bound to output A, and Input B is bound to Output B. Please observe that the resolution of the input is required to be the same as for the output. If running a Dual Channel setup, make sure that input A and input B are 100 % in sync, and using the same resolution.
Refer to H-/V- Phase Values for Zero Frame Delay Mixer for further information -
Show DVE Channels: Enables or disables DVE placeholder box drawing
-
Clip Channel on set:
-
Play on: Continues to play the clip even if the Scene does not contain that specific clip channel. This is the default behavior. When setting a Scene with this channel active, the clip will be shown from its current position onwards, when no clip or the same clip is set in the Scene.
-
Reset: Starts playout from the beginning of the clip when it has the same clip name, or show black when no clip is set in the channel at all.
Please observe that the commands and values are case sensitive. Any on-the-fly changes will be saved to the Viz Configuration file upon proper shutdown of Viz Engine.
-
Caution: Manual changes to the Viz Configuration file should never be made while Viz Engine is running. Close the engine, commit any changes, and start the engine. Make sure to always create a backup copy of the Viz Configuration File before making any manual changes.
-
Basic: Transforms the whole used Media Channel.
-
Content: Transforms the content inside the used Media Channel.
-
Position: The position controls are used to set the X and Y coordinates for the Media Asset. The coordinates are relative to the configured output format (see the Configuring Viz section of the Viz Engine Administrator Guide).
-
Size: Sets the X and Y values to define the size of the Media Asset. The size is based on the channel resolution as defined in the Video Input section of Configuring Viz (see the Viz Engine Administrator Guide), which may be different than the configured output resolution.
-
Center: Uses the Center X and Y values to define the center position of the Media Asset. As for the Size control, the Center position is relative to the configured channel resolution.
-
Absolute / Relative Position Controls: Controls to adjust the Position, Size, Center position, and Crop. The values can be provided either as Absolute pixel values, or as Relative percentage values. The corresponding value will be displayed next to the input value field. If provided with values that exceed the logical limit, the last value will be adjusted automatically to the maximum value. For example, if setting the Left crop value to 51 %, and then the Right crop value to 75 %, the Right crop value will be set to 49 %. Applies to DVE only.
Note: By default, the center position for DVE transformations is defined as the top left corner of the DVE placeholder. Setting the DVE Center X and Y positions to 50 % will define the center for the transformations as in the middle of the DVE placeholder. This behavior deviates from that of transforming Containers, as they have their transformation center in the middle.
-
Crop: Allows the designer to crop the Media Asset as required. The crop values are relative to the size as defined using this editor.
-
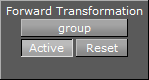
Forward Transformation: Forwards transformations to the container which was dragged and dropped to this parameter. The transformation is mapped to the XY plane of the container. This allows a video wall control application like Viz MultiPlay to control virtual (3D) Video Walls as well. This applies only to Media Assets added as Texture, and the Forward Transformation controls will only be visible for selected Texture Media Assets.
-
Identifier: The name of the target container.
-
Active: Forwarding is active.
-
Reset: Resets forwarding to the specified container.
-
H-/V- Phase Values for Zero Frame Delay Mixer
For Matrox X.mio2, DSX.LE2 and DSX.LE3 video boards:
-
PAL: Leaves the values at the default
-
NTSC: Leaves the values at the default
-
720p50: Valid H-Phase range from -900 to -1300
-
720p59.94: Valid H-Phase range from -600 to -1000
-
1080i25: Valid H-Phase range from -1600 to -2000
-
1080i29.97: Valid H-Phase range from -1100 to -1600
Media Asset Clip Settings
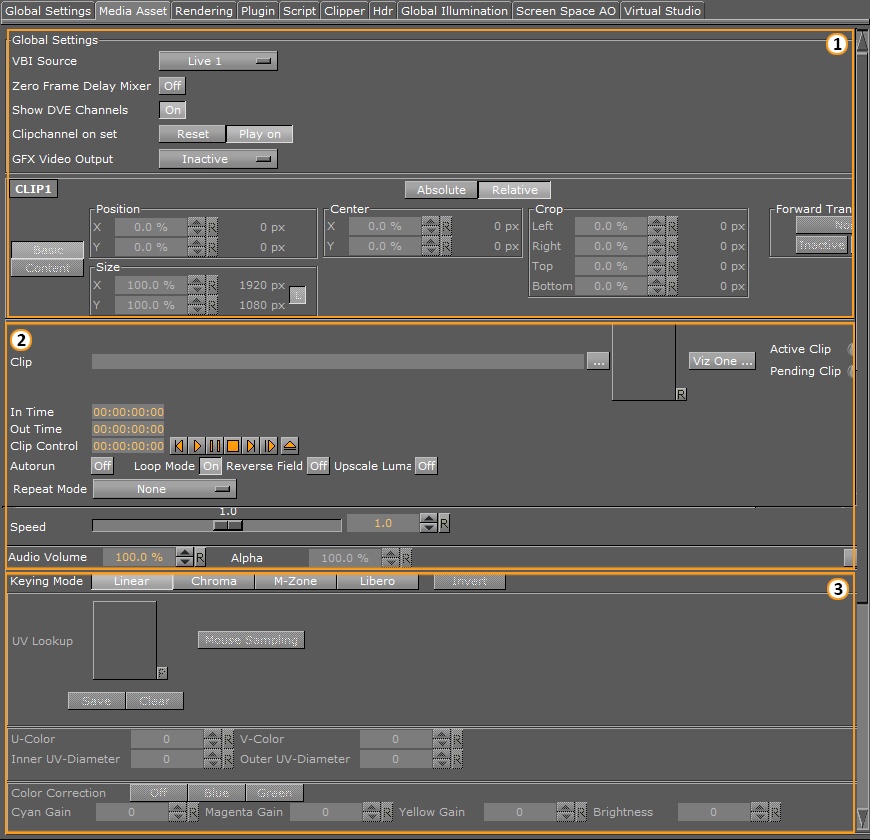
In addition to the common Media Asset properties, Video Clip also has these properties:
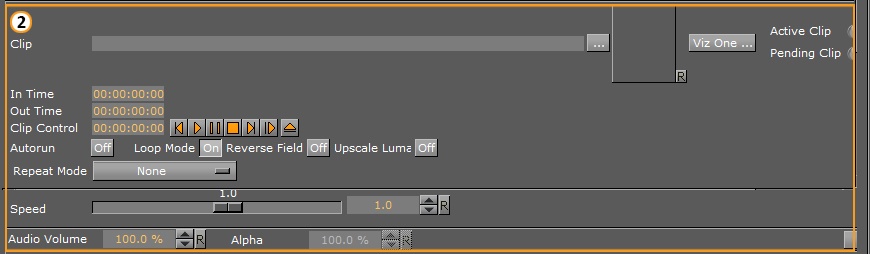
-
Clip: Selects the video clip to be shown:
-
In the Clip line, click
 , or
, or -
Drag a Video Clip item from the Server Panel, or
-
Click
 , and select a video clip to import.
 Note: See Transfer Clips From Viz One. To transfer and download videos from Viz One, Viz One must first be integrated and configured with Viz Artist/Engine.
Note: With the Clip Channel Media Asset it is possible to play images as DVE or Texture with the Matrox clip player. Supported image containers are jpg and png. The images have to be available on a physical disk.
-
-
Active Clip/Pending Clip: Displays the status of active and pending clips:
-
Green light shows that the clip has loaded successfully.
-
Grey light shows that no clip has been loaded.
-
Red light shows that there was an error during the clip loading process.
-
-
In Time: Sets the video clip ‘in time’.
-
Out Time: Sets the video ‘out time’.
-
Clip control: Shows player controls for the selected clip.
-
Autorun:
-
Off: As soon as the video clip is loaded, the first frame is presented.
-
On: As soon as the video clip is loaded, it begins to play.
-
-
Loop Mode:
-
Off The video clip will play only once.
-
On The video clip will play in a loop.
-
-
Reverse Field: As interlaced video contains two fields of a video frame, reverse playback of interlaced video can result in flickering unless the fields are also played back in reverse. On the Video version of Viz Artist and Engine with Matrox video hardware, Reverse Field is automatically enabled when playback speed is given a negative value.
-
Off: During reverse playback, the fields in interlaced mode are played out ‘as is’.
-
On: During reverse playback, the fields in interlaced signals are swapped to reduce flicker.
-
-
Upscale Luma:
-
Off: The key will be used ‘as is’.
-
On: The key information will be upscaled from 16-235 to 0-255.
-
-
Repeat Mode:
-
None: The playback of black frames when the clip is in an erroneous state.
-
Field: The first field of the last frame will be played out when the clip is paused.
-
Frame: The last frame will be played out when the clip is paused.
-
-
Speed: Controls playback speed. 1.0 is the normal speed. Values between 0 and 1.0 are forward playback in slow motion. Values above 1.0 are forward playback in fast motion. Likewise, values between 0 and -1.0 are reverse playback in slow motion. Values less than -1.0 are reverse playback in fast motion.
-
Audio: Sets the audio volume
-
Alpha: Adjusts the level of opacity for each layer. A value of 100 % is fully opaque and 0 % is fully transparent.
Clip Timecode Types
|
Value |
Description |
|
DEFAULT |
Mimics the behavior of earlier versions, and will provide a timecode if available. If not, no timecode information is provided in the VBI-signal. |
|
TIMECODE |
Will provide a timecode if available. If an explicit time code is not embedded in the clip, no timecode information will be provided in the VBI-signal. |
|
ZEROBASED |
The embedded timecode will be ‘0’ at the clip start and count up to the last frame, based on the number of frames in the clip. |
|
COUNTDOWN |
The embedded timecode will be the duration of the clip at the beginning and countdown to ‘0’, based on the number of frames in the clip. |
Media Asset Keying Settings
In addition to the common Media Asset properties, Keying has these properties.
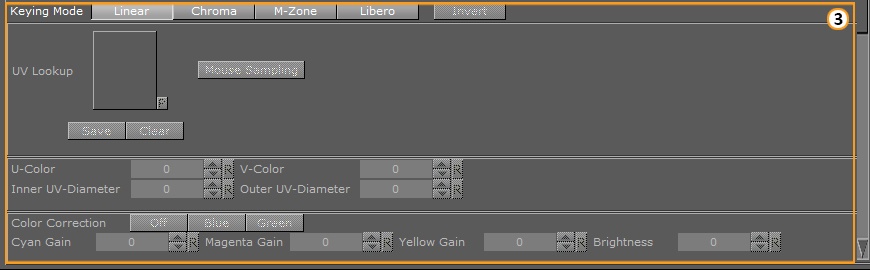
-
Keying Mode (Texture only: see Keying Mode):
-
Linear: No chroma keying
-
Chroma: Uses the internal chroma keyer
-
M-Zone: Uses the multi-zone keyer
-
Libero: Uses the Viz Libero keyer
-
Invert: Only works with Chroma and Libero
-
-
Talent Reflection: Sets Talent Reflection On or Off (use with Viz Virtual Studio):
-
Offset: Sets the offset of the talents lowest body part from where the reflection starts (pixels (Default: 0, Minimum: 0, Maximum: 1000))
-
Extend: Sets the extend of the total reflection (pixels). The reflection eases out with distances (Default: 300, Minimum: 0, Maximum: 1000)
-
Person Scale: Sets a global scale which applies to the talent (Default: 1, Minimum: 0.2, Maximum: 10)
-
Damping: Sets how many previous fields are to be used to calculate the current Y position. The larger the number the higher the damping, but the Y coordinate will be less responsive to quick movements. The setting is a compromise between a stable and a non-responsive Y coordinate for the reflection (Default: 2, Minimum: 2 Maximum: 100)
-
Key Scale: Sets the scale applied to the alpha of the reflection, on top of the parameters set in Offset (Default: 0.5, Minimum: 0.1, Maximum: 10)
-
Distortion X / Y: Parameter X defines by how much x axis is affected by the sinus distortion which goes vertically down the screen (Default: 1, Minimum: 1, Maximum: 10). Parameter Y defines how much the sinus waveform is stretched vertically down the reflection (Default: 0, Minimum: 0.001, Maximum: 1)
-
Brightness: Sets the brightness for video going through the chroma keyer (Default: 0, Minimum: 0, Maximum: 10)
-
Switching between different Media Assets
You can quickly switch between the different media assets used in your scene by clicking the name of the Media Asset selection box instead of individually selecting them in the Scene Tree Media Asset View.
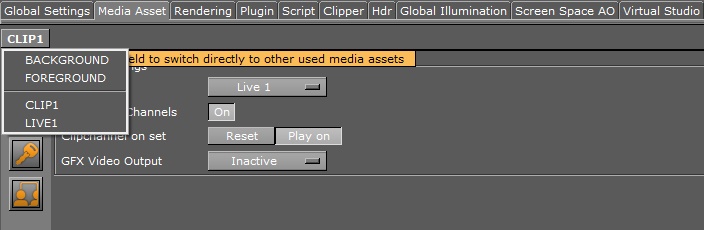
By clicking on the upper-left corner in the Media Asset settings, you can see the list of all used Media Assets in your scene. Here you can easily switch between the different Media Assets.
Live Properties
The Live video properties are listed in the common Media Asset properties.
Stream Properties
In addition to the common Media Asset properties, Video Stream also has these properties:

-
URL: Displays the URL of the Stream to be shown (Video Stream only):
-
Load: Loads the URL of the video Stream
-
Clear: Removes the URL of the video Stream.
-
-
Repeat Mode:
-
None: The playback of black frames when the stream is in an erroneous state
-
Field: The first field of the last frame will be played out when the stream is paused
-
Frame: The last frame will be played out when the stream is paused
-
GFX Properties
By default, a GFX Channel automatically inherits the camera settings of the Scene it is applied to. In addition to the common Media Asset properties, GFX Channels also have the following properties:

-
Scene: Drag a scene, which should be rendered in the GFX channel
-
Play Controls: Controls the animation of the set scene
-
Controlled: If activated, the GFX Channel animation can be controlled by the main or parent Scene animation controls, for example, if the animation in the main Scene starts, it triggers the start of the GFX Channel Scene
-
Force Key: If a GFX channel is rendered as Texture, it will be in RGBA. Therefore, the Scene needs to have keying information for an alpha channel (the key scene setting is set to auto key or a key plug-in is used in the Scene Tree). If the Scene does not have any keying information, enable Force Key to render the whole Scene keyed
-
Keep Aspect: Renders the GFX Scene with its own aspect ratio (undistorted) when set to On. Scales to fit the GFX channel size if set to Off.
-
Camera: Selects the camera view of the GFX Channel Scene.
-
Resolution: The GFX Channels will default to the resolution configured for the current Output Format in the Viz Engine configuration. To change the current resolution, click the Default Resolution button to make the Resolution X and Y fields available for input, and enter the desired resolution setting. Clicking the Default resolution again will reset the resolution for the GFX Channel, as well as disable the Resolution X and Y input fields. If the Default Resolution button is in a pressed state, and the Resolution X and Y fields are dimmed, the default resolution is in use.
Note: The resolution setting only applies to GFX Channels in Texture mode.
To View Media Asset (DVE or Texture) Properties
-
Add a Media Asset as DVE or Texture to a Scene.
-
In the Media Asset Manager select DVE or Texture (to view the added Media Asset)
-
Click on the required Media Asset.
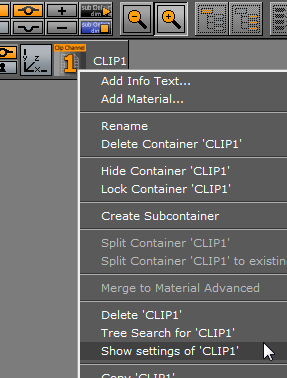
Note: DVE or Texture view: If a Media Asset has been added to a Scene, its properties can also be selected by a <right-click> on the Media Asset icon in the Media Asset list (Built Ins), and select Show settings of <clip channel>.
To View Media Asset (Texture) Properties
-
Right-click on the Media Asset icon in a container and select Show settings of [media asset type].
or:
-
Click on the Media Asset icon in the Container.
-
In the Texture Editor click on the Media Asset image icon.
In the properties panel the Media Assets tab is automatically selected, and the Media Asset Manager (Scene Tree panel) opens.