Viz Plug-ins User Guide
Version 5.2 | Published March 20, 2024 ©
Texture Slot

The Texture Slot plug-in allows multi-texturing like in the Classic Render Pipeline for Phong and PBR Materials.
You can create as many slots as you want and use the textures in these slots to blend with a PBR or Phong material. It can be blended with all available textures in either the Phong or the PBR materials.
Note: This plug-in is located in: Plugins > Container plug-ins > Global.
Compatibility Info: This plug-in works in the Viz Engine Render Pipeline only!
Plug-in Settings
To create a new Texture Slot, give it a unique name and hit the + button. The new slot is put on top of the existing ones. To reorder your slots, use the up and down arrows. To delete your slot, press the trash icon.
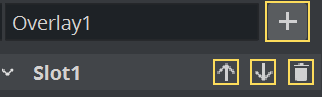
Note: Slots can not be renamed after creation.
-
sRGB Enabled: Provides support for extended colorspace when enabled.
Blend Settings
The Target defines which texture unit you want to blend with.
|
Target |
Available in |
|
BaseColor |
PBR/Phong |
|
Ambient |
Phong |
|
Diffuse |
Phong |
|
Specular |
Phong |
|
Emissive |
Phong |
|
Normal |
PBR |
|
Roughness |
PBR |
|
Metallic |
PBR |
|
Height |
PBR |
Information: The Ambient Occlusion texture is not accessible through the Texture Slot plug-in by design.
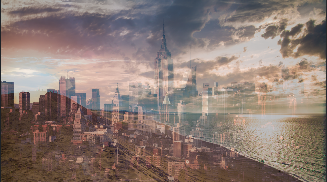
You can simulate an animated height effect if you, for example, blend an additional normal map to an existing one. The Color Blend mode defines how your image is blended with the Target image.
|
Target |
Slot |
|
|
|
|
Operation |
Explanation |
Sample |
|
Basic Operations |
||
|
Keep |
Keeps the Target image. |
|
|
Replace |
Replaces the Target with the Slot image. |
|
|
Average |
Uses the average pixel values of both images. |
|
|
Normal |
Replaces the Target with the Slot image. Same as Replace |
|
|
Lightening Operations |
||
|
Add |
Adds the Slot image to the Target image. |
|
|
Lighten |
Uses the lighter pixel value of both images. |
|
|
Screen |
With Screen blend mode, the values of the pixels in the two layers are inverted, multiplied, and then inverted again. The result is the opposite of Multiply: wherever either layer was darker than white, the composite is brighter. |
|
|
ColorDodge |
The Color Dodge blend mode divides the Target by the inverted Slot. This lightens the Target layer depending on the value of the Slot layer: the brighter the Slot, the more its color affects the Target. Blending any color with white gives white. Blending with black does not change the image. |
|
|
LinearDodge |
Brightens the Target color to reflect the Slot color by increasing the brightness. Blending with black does not have any influence - See LinearBurn |
|
|
Reflect |
This mode is useful when adding shining objects or light zones to images. |
|
|
Glow |
This mode is a variation of reflect mode (base and blend color swapped). |
|
|
Darkening Operations |
||
|
Subtract |
Subtracts the Slot image from the Target Image. |
|
|
Darken |
Uses the darker pixel value of both images |
|
|
Multiply |
Multiplies the Slot image with the Target image. |
|
|
ColorBurn |
The Color Burn mode divides the inverted Target by the Slot image, and then inverts the result. |
|
|
LinearBurn |
Darkens the Target color to reflect the Slot color by decreasing the brightness. Blending with white does not have any influence - See LinearDodge |
|
|
Contrast Effects |
||
|
Overlay |
Uses Screen blending on lighter pixels and Multiply mode on darker pixels. It is the opposite operation to the Hard Light blending. |
|
|
SoftLight |
Similar to Overlay, but appears softer. |
|
|
HardLight |
Uses Linear-Doge on lighter pixels and Linear Burn on on darker pixels. It is more intense than the Overlay and results in harsher lights. |
|
|
VividLight |
Uses Color Doge on lighter pixels and Color Burn on on darker pixels. It appears more extreme than the Hard Mix Effect. |
|
|
LinearLight |
Uses Linear Dodge blend mode on the lighter pixels and the Linear Burn blend mode on the darker pixels. Similar to the Vivid Light blend mode in overdrive, and typically results in a more extreme effect. |
|
|
HardMix |
Uses Linear Light as threshold. It is recommended to adjust the Blend Factor to achieve some great results. |
|
|
PinLight |
Lightens lighter pixels and darkens darker pixels. This is a wild blend mode that can result in patches or blotches (large noise), and it completely removes all mid-tones. |
|
|
Inversion Effects |
||
|
Difference |
Difference subtracts the Target from the Slot or the other way around, to always get a non-negative value. Blending with black produces no change, as values for all colors are 0. Blending with white inverts the picture. |
|
|
Exclusion |
This mode is basically the same as the Difference blend mode, except when similar colors cancel each other, the resulting color is gray instead of black. |
|
|
Phoenix |
This subtracts the lighter pixel from the darker pixel, and adds 255, giving a bright result. |
|
|
Negation |
|
|


Alpha Blend mode defines how the Alpha Channel of the Slot image will be used:
-
Keep: Keeps the Target Alpha.
-
Replace: Uses the Slot Alpha.
-
Add: Adds both Slot and Target Alpha channel.
-
Multiply: Multiplies both Alpha channels..
-
Subtract: Subtracts the Slot Alpha Channel from the Target Channel.
-
Reverse Subtract: Like subtract, but inverted afterwards.
-
Negate:
Blend effect defines how strongly the operation is applied to the Target image. This is defined from 0 (no effect at all) to fully (1).
Swizzle
The Swizzle part allows to exchange the various color channels. You can for instance ignore an alpha channel or fill it completely white (1) or black (1).
Texture Coordinates
This defines how the final composition will be applied to the Target Texture. Usually this is done in Vertex mode, but you can also overwrite it, for example to use the Slot Image as Reflection map. Additional mapping options can be achieved by using offset, scaling and rotation.