
Viz Multiplay User Guide
Version 3.0 | Published October 23, 2020 ©
External Preview
Although the Armed column provides an indication of content that's ready to be played out, it's not an accurate preview. For an accurate Viz Engine preview of the content, you must configure preview on an external Viz Engine.
Note: Depending on how much hardware you have available, the preview can be a simple VGA version of the Viz Engine (without clip playback), or a Video Engine with Matrox hardware for live input and clip playback.
Keep the following in mind:
-
The Program and Preview engines can have different resolution, but need the same aspect.
-
You can preview live sources if your preview engine is a video-enabled Viz Engine with a Matrox video card. The SDI in signals must then be split to go into both the video wall and the preview engine.
-
Although mainly used for testing since its local preview function (reading pages) and the video wall preview will conflict, Viz Trio’s local Viz preview can also be used as an external preview. The engines should have the same aspect.
Info: The data model behind the Viz Multiplay representation of the channels in the presets (the virtual areas of the video wall) used to communicate with Viz Engine is based on percent, even if the units in the GUI is pixels. This means that presets are compatible between a preview wall and a program wall with different resolutions. It also means that presets from one wall can be used on another video wall, as long as the aspect is the same.
Setting Up and Using External Preview
To set up a video wall system with Program and Preview engines, two video walls need to be created in the Profile. First you need to create the preview wall:
-
Start the preview Viz Engine engine, configure the resolution and set it in On Air mode.
-
Click Settings > Profiles
-
Click on a profile and create a new video wall inside it.
-
This video wall will represent the preview wall.
-
Click OK to generate the channels for the preview wall.
Note: These channels will not be visible in the main playout GUI in Viz Multiplay.
-
Repeat the process for the Program Video Wall. Remember to start it and set it in On Air mode.
-
When creating the program video wall in the Profile - select your newly created preview wall in the External Preview combo box.
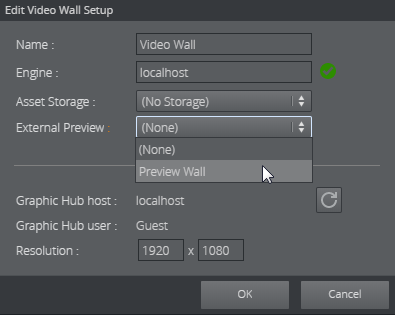
-
Click OK. Now, whenever you arm presets and elements (with 1-TAP mode disabled), these elements will be played out on the preview engine. The preview engine then acts as a “real” preview for the main wall, depending on what kind of hardware you use as a preview wall.
-
Go to Settings > General. Set the Extra Armed button to CONTINUE:

This makes an extra button appear in the Armed column. Whenever an element is armed, it is taken on the preview engine. Clicking CONTINUE now continues the element on the preview engine. In this way, you can preview a full sequence of stop points in a graphics on the preview engine before it is taken On Air in the program engine.