
Viz Multiplay User Guide
Version 3.0 | Published October 23, 2020 ©
Working with Superchannels
This section covers the following topics:
Note: Superchannels in Viz Multiplay requires Viz Artist / Engine. See the release notes for more on version requirements.
A Superchannel is an abstraction on top of specific media asset channels. Superchannels support different types of media assets: Images, Graphics, Clips, Streams, Live content etc. With Superchannels, content in each channel can be played out in an A/B workflow. Each Superchannel has two sub channels. One sub channel (A) is active, while the second (B) is inactive. New content can be prepared in inactive sub channels, and a transition effect can run the transition from the active to the inactive sub channel, switching their roles.
In a Superchannels-based video wall scene, you can customize transitions between preset positions in the video wall layout, and combine content and preset transitions to create more advanced visual video wall behavior.
Note: With Superchannels, each Video Wall design is represented by its own Viz Artist scene - whereas in the DynamicChannels solution, all video walls share one Viz Artist scene in the Graphic Hub.
Recommended Workflow
-
Create a video wall with a default scene in Viz Multiplay, and use Viz Multiplay's Video Wall Designer to create the basic presets.
-
Switch to Viz Artist for complex manipulation, like adding custom transitions.
-
When switching back to Viz Multiplay, remember to re-import the presets to the show.
Note: You can also create a Superchannels-based video wall scene in Viz Artist and import it into Viz Multiplay. The scene must then contain the Viz Artist Presets plugin, which organizes the presets in the video wall layout
Working with Superchannels in Viz Artist
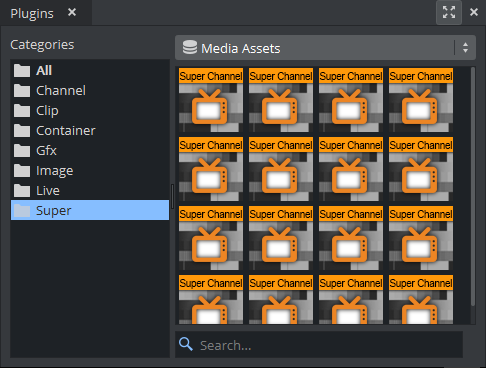
In Viz Artist, find Superchannels in the Plugins tab, under Super:
These channels should be added to the scene through the Presets plugin. The layout (size and position) of the Superchannels in the renderer can be organized manually in Viz Artist. A single set of pre-defined Superchannels layouts is called a preset. When played out, the scene will arrange the Superchannels in their previously saved (preset) position.
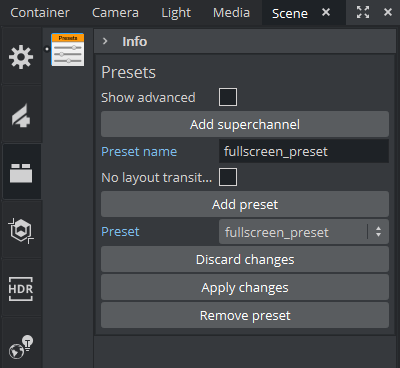
Organizing Presets with the Viz Artist Presets Plugin
Use the plugin to add and organize more presets in the same scene. To create a video wall scene in Viz Artist:
-
Create a new scene
-
Find the Presets under Plugins> Control > Scene Plugins and drag it into the Plugin section of Scene Settings.
-
Go to the Presets plugin GUI under Scene Settings > Plugin, and add, delete or manipulate presets and transitions between them. Each preset will get a name that is later visible to the Viz Multiplay operator - along with a visual representation of the preset.
-
Also use the Presets plugin to add superchannels to the scene - as this will auto create content transitions between the sub channels.
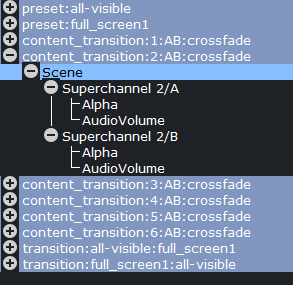
The plugin will automatically generate directors for
-
The preset initial position (for a Cut to the preset)
-
Transitions to and from all presets (one director per combination, running forwards or backwards)
-
Content transitions (crossfade) between content in each Superchannel
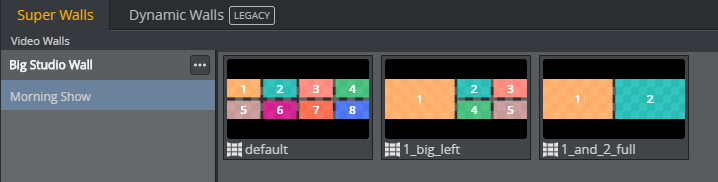
In the following example, two presets called all-visible and full_screen1 have been added to the scene using the Presets plugin:
When you're done in Viz Artist, the scene can be saved and imported into Viz Multiplay as a new video wall design.
Note: In Viz Multiplay, when you do a Take on a preset, the Media Sequencer ensures the director leading from the current preset to the taken preset is run inside the scene. When new content is taken inside a Superchannel in the preset, the Media Sequencer ensures the content transition director is run for the Superchannel, switching from the existing content to the new content. This director is run regardless of the old and new media asset type, for example, from clip to image or graphics to live. All content types will get the same transition.
Working with Superchannels in Viz Multiplay
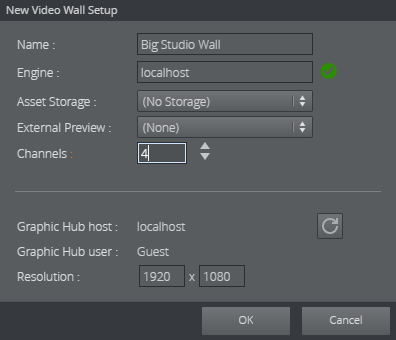
Create and organize presets with Viz Multiplay. To create a new video wall, create a profile and add a video wall under the VideoWalls tab.
Creating a Profile and Add a Video Wall
Note: The video wall engine must be started and in On Air mode when you create a video wall. Viz Multiplay will read out the Graphic Hub host and user name, along with the current resolution of the wall.
Note: This operation only needs to be done once per physical video wall.
-
Go to Settings > Profiles
-
Create a profile
-
Click the Plus button to add a video wall under the Video Walls tab
-
Specify the host name of the video wall Engine.
-
Specify the number of Channels you need,
-
Select an External Preview engine
-
Select the publishing point used if you use a Viz One media asset provider; this ensures that clips are transferred from Viz One to the playout engine.
When you click OK, the following happens:
-
The Media Sequencer creates viz and video handlers to communicate with the engine specified.
-
A new design entry is added to the video wall with the same name as the video wall.
-
A new scene is created under Vizrt/Videowall/ in the Graphic Hub.
-
A default preset is created inside the new video wall scene.
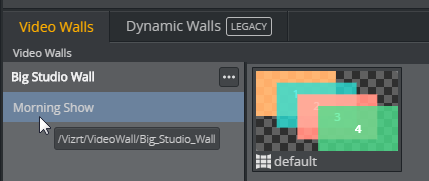
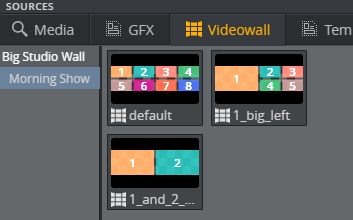
You now have a Video Wall in your profile (Big Studio Wall), a new scene (Vizrt/VideoWall/Big_Studio_Wall) in Graphic Hub with a default preset.
You can rename the design to something more descriptive. Although the design is renamed Morning Show in the screenshot below, it still points to the same scene in Graphic Hub. You can find the scene name and scene path to the video wall scene by hovering your cursor over the design entry in the Super Walls tab:
You can add more designs (scenes) to this video wall later - for instance one for a morning show and one for an evening show.
Info: To switch designs, play out the corresponding presets from Viz Multiplay. The engine will then play out the new design scene with the wall presets.
New position and size data is sent from Viz Multiplay to Superchannels as a percentage - if you change the resolution or aspect, the presets maintain their same relative dimensions. The best practice is to start the wall engine in the resolution in which it is to be operated in order to ensure that this is correct from the beginning.
Note: Resolution and aspect data can be refreshed later if the video wall engine needs to change resolution.
Note: Editing, adding or removing a preset requires the Video Wall engine to be on and in On Air mode. This is because the data for a preset now is stored inside a scene, which requires the Viz Engine to save the scene. If the wall engine cannot be disturbed, the best practice is to edit video wall presets on a preview engine with resolution in the same aspect, in a different profile.
Working with Superchannel Presets in the Video Wall Designer in Viz Multiplay
Once a video wall and a scene with a default preset have been created, you can adjust preset positions and add more presets in the Video Wall designer:
-
Go to Settings > Profiles
-
Click the profile with the video wall engine
-
Click the design entry under a video wall (Morning Show in the example below)
-
The presets for the scene design are now visible
-
Right click a preset and select Edit preset
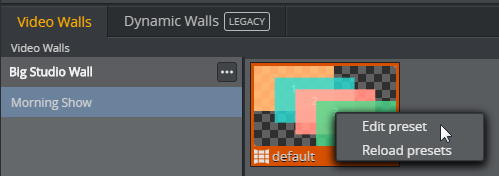
Now the Video Wall Designer opens. Here, you can add, delete, duplicate and edit presets with the Video Wall Designer tools.
When you click Save, the scene and all presets are saved in Graphic Hub through the Viz Engine. This means that the video wall Viz Engine must be started and On Air. When closing the Video Wall Designer, the updated presets for the design are displayed in the video wall manager:
Using Video Wall Presets in a Show
Superchannel video wall presets are resources belonging to a specific Profile. The Profile contains the video wall description and keeps track of the designs (scenes) for the video wall.
When creating a Show with content, the presets for the Video Wall you want to use in the Show must be imported into the VideoWall tab:
-
Click the Video Walls tab
-
Click the plus button
-
Click the video wall design to import the presets
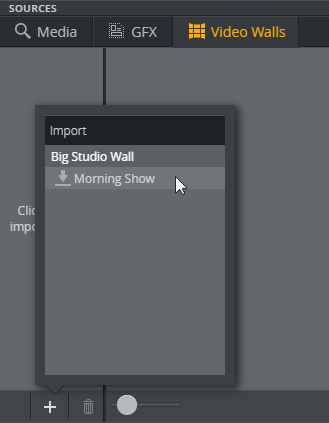
The presets for the video wall design you imported now appear in the Video Walls tab:
 |
|
To use the presets, drag them over to the Shortcuts bar.
Note: The recommended workflow is to create one Shortcuts tab per video wall design in order to group the presets belonging to each wall.
Note: When controlling multiple video walls from the same Show, it's good practice to create one Workspace per video wall - only displaying the channels and Shortcuts groups relevant for the video wall to control.