
Viz Multiplay User Guide
Version 2.5 | Published February 18, 2019 ©
Editing Graphics, Videos and Images
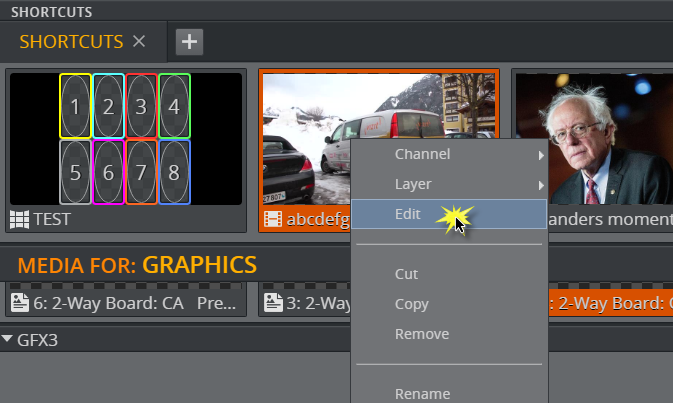
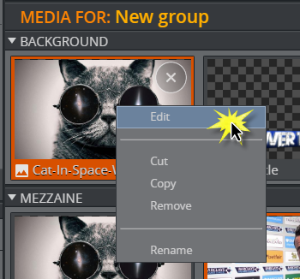
Once items have been added to the Media Column in a story, they can be edited (right-click the item and select Edit).
The editing options depend on the type of media:
Note:
The image editor is only available for images in GFX channels.
Editing Images
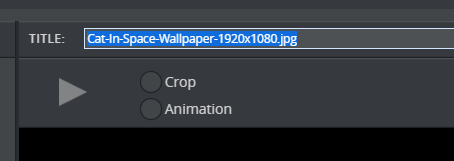
Use the Image Effect Editor to crop an image or add a zoom/pan animation.
Image Effect Editor
To open the editor, right-click an image and select Edit.
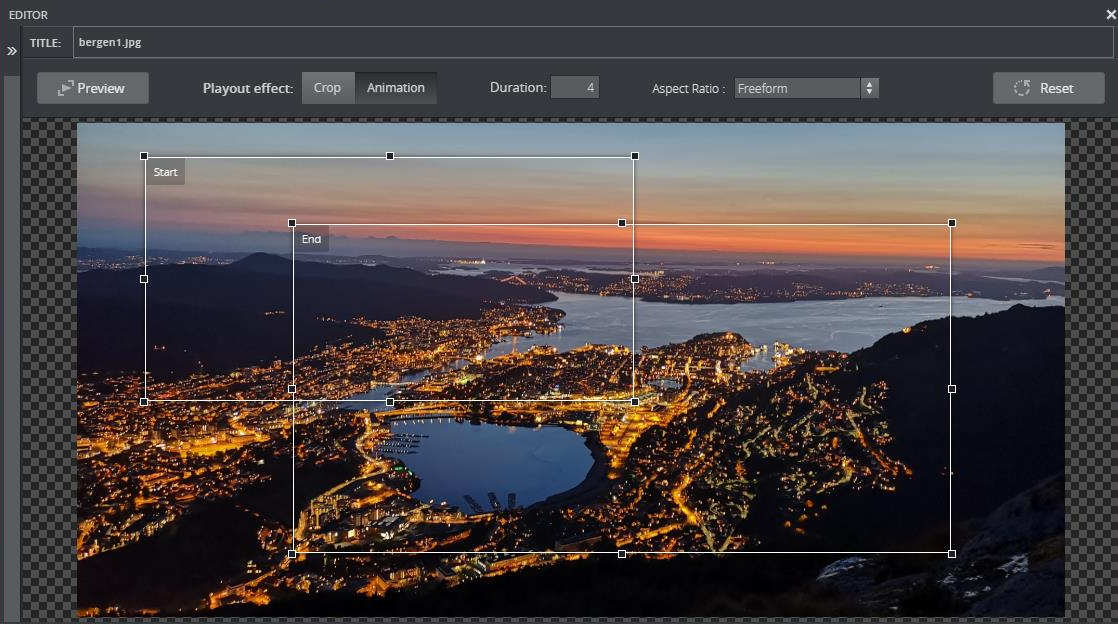
The Image Effect Editor allows you to crop or animate an image instantly using a crop rectangle. By default, the crop rectangle matches the image’s aspect ratio, but you can also freely set the rectangles’ aspect ratio.
-
To crop an image, drag the rectangle to the desired size.
Tip:
Hold Ctrl before dragging the crop rectangle to maintain the current aspect ratio.
-
To animate an image, select a start and end frame and a duration for the animation. Preview the animation using the Play/Stop button.
Note:
All changes are live and cannot be canceled.
Note:
The image editor uses a proxy image, so the image may differ slightly when played out on a Viz Engine.
-
To force a different aspect ratio of the rectangles, select a value from the Aspect Ratio list. The values in brackets are:
-
Freeform: Freely set the aspect of the rectangles.
-
Image: Aspect is locked to the aspect of the image.
-
GFX Channel: For filled presets - the aspect is locked to the aspect of the GFX channel the image is assigned to.
-
Profile Channel: Locks the aspect to the aspect set on the channel in the profile configuration.
-
-
Click the Reset button to reset applied effects to the default settings.
Editing Videos
Use the Video Editor to edit videos in GFX channels.
Open the video editor
-
Right-click a video in a channel in the Media Column or in the Shortcuts Bar.
-
Click Edit.
Tip:
Double-click a video in the Shortcuts Bar or Media Column to open the Image Effect Editor. However, double-clicking to open the editor only works in Offline Mode.
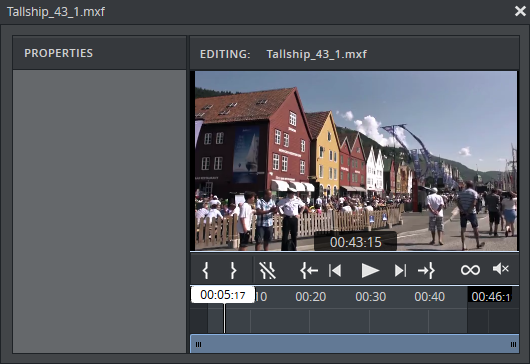
Video timeline editing options
The following buttons are available for video editing:

-
Set Mark In: Set an in point (I).
-
Set Mark Out: Set an out point (O).
-
Clear Mark In/Out: Clear in and out points (Shift + C).
-
Go to In point: Sets the playhead at the in point (Shift + I).
-
Move 1 frame back: Move the playhead one frame back (, -comma).
-
Play/pause: Play/pause the video (Space or Ctrl + Space).
-
Move 1 frame forward: Move the playhead one frame forward (. -period).
-
Go to Out point: Sets the playhead at the out point (Shift + O).
-
Loop video: Enable looping (R).
-
Volume slider: Adjust the clip volume (M to mute/unmute).
-
List of the keyboard shortcuts (Shift + K).
-
Zoom and pan: Click and drag the edges of the blue bar to zoom and move it to pan the timeline.
Editing Graphics
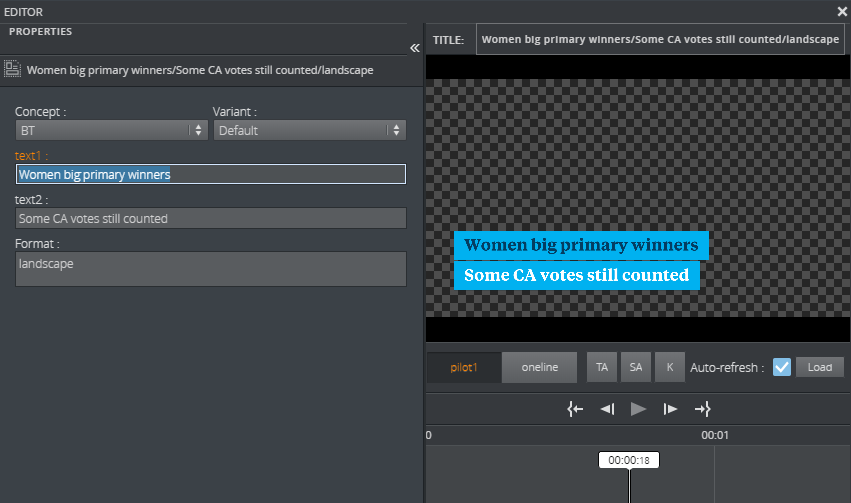
Open the Graphics Editor by right-clicking a graphics element and selecting Edit. Any changes made inside a graphical element are visible immediately.
On the left is the Fill In Form, where you can edit the fields that are available in the graphical element.
On the right, there is a Preview Window.
Note:
All changes are live and cannot be canceled,
Fill In Form
The window to the left is a Fill In Form for the graphics. It displays fields that are exposed by the designer in Viz Artist where the user can add content to the graphic. It can be text, choices in a drop-down list or media placeholders for media assets. Once changes are made in the Fill In Form, the Preview Window immediately updates to display them (as long as Auto-refresh is toggled on).
Custom HTML
The Fill In Form in Viz Multiplay is auto-generated based on the fields in the Viz scene. To change the appearance of the form, it is possible to replace the complete or parts of the form with your own custom HTML. This is an advanced feature, but the end result is that the user (the journalist or whoever fills in information) is exposed to a completely customized interface. To use this feature, see the Template Builder manual.
Maps
Maps from Viz World can be used in the Fill In Form if the graphics contains a Map field, which can be set in Template Builder version 1.0.2 and later. A Map field is generated when the Viz scene contains a map plugin.
Once there is communication with a Viz World server the user can select from a list of available maps in Viz World. In order to edit these maps, a local Viz World installation is required. Since Viz World only runs on Windows, the Map Editor is only available when Viz Multiplay is running on Windows machines.
Viz World Configuration
Viz World must be configured in a Pilot Data Server to establish communication between Viz Multiplay and Viz World.
In the Pilot Data Server Web Interface go to the shared_curious_server parameter (see the Database Parameters in the Viz Pilot guide) through Settings and add a hostname in the value column.
In the value column, use either:
-
hostname or IP
mapshostnameor,
-
full URL. Here the port must be defined
http://mapshostname:10301
Info
A Viz World server defined in the Viz Multiplay URL (maps=mapshostname) will override the server defined in the Pilot Data Server.
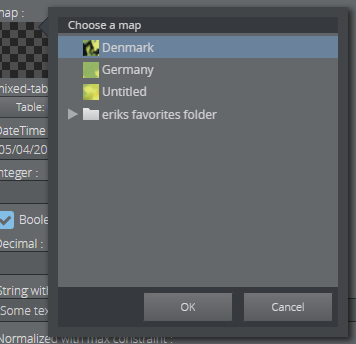
Choosing Maps
To select a map, click Choose map in the Fill In Form.
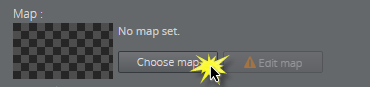
A dialog appears including the maps that are available from the Favorite folder in the Viz World Map Editor.
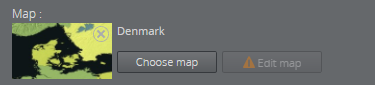
Select a map.
The map appears in the thumbnail in the Fill In Form and in the graphic in the preview window.
Using this feature of choosing a map only requires communication with a Viz World server. However, a local Viz World installation is required to edit maps. See below.
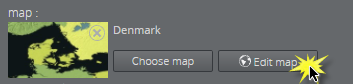
Edit Maps
The Edit map button is enabled only when a Viz World client 17.0 or higher is installed on the computer running Viz Multiplay, and the Map Client service is running. Normally the service is located here:
C:\Program Files\Vizrt\Common\Maps\MapClient.Service.exe
-
Double click this file. A window pops up and closes, and now the service is running.
Once a map is chosen and there is a running Map Client on the machine, the map can be edited. Click Edit map.
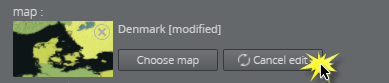
This opens up the Viz World Map Editor. All edits are performed inside this client, which means that Viz Multiplay has no control over your actions here.
After the map has been opened in the Map Editor the name is changed to e.g. Denmark [modified], indicating that the map has been edited.
To cancel the edit mode, click Cancel edit.
WARNING
Clicking outside the Viz World Map Editor while it is open hides the window behind the Viz Multiplay window. Viz Multiplay will keep listening for data coming from Viz World until the window is closed. Recover the Map Editor from the taskbar and close it, or click Cancel edit from Viz Multiplay.
The map thumbnail view will not be available after saving and re-opening a template including a map, however, the map will still be there. Once the Viz World Map Editor is opened and communication is established, the map thumbnail view is available.
The Preview Window will update according to the selected map and edits performed on it.
Warnings
Warning signs and grayed out map buttons indicate that the Viz World service is unavailable or that there is an error from the service.
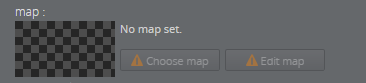
If no map is chosen or no default value is found, the Edit map button will be grayed out with a warning sign. A map has to be chosen before edits can be made.
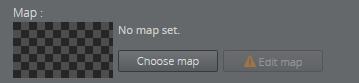
If a map is chosen, but the Edit map button is still grayed out, the map client is not detected.
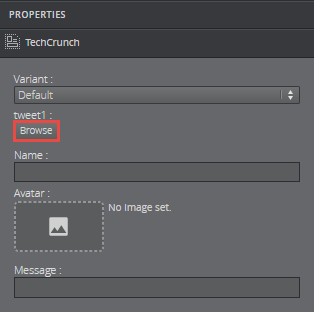
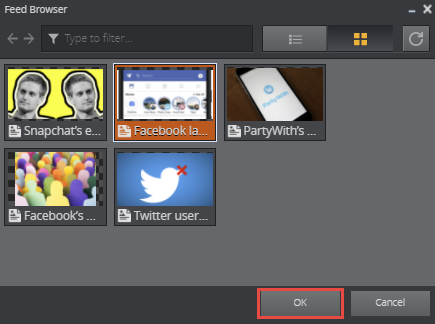
Feed Browser
If a graphic template contains a Browse button in the Fill In Form, the user can browse for a feed entry. The feed entry URL is pre-set in the template. Use Template Editor to change a field type from pure text to a Browse button linked to an Atom feed, or a dropdown with fixed choices.
Using the Feed Browser in the Fill In Form for a graphic is shown below:
-
Click the Browse button to open the Feed Browser.
-
The Atom entries of the feed will be presented as thumbnail if available. Select one of the entries and click OK.
-
Information from the entry will be used to fill in the feed browser fields in the template.

Preview Window
The Preview Window displays snapshots of the graphics and provides the user with an idea about how the graphics will look when played out in high resolution on a Viz Engine. The Viz Engine generate snapshots requested by the Preview Server. These are the functions of the Preview Window:
-
TA: Show/hide the Title Area in the edit window.
-
SA: Show/hide the Safe Area.
-
K: Show the key signal for the graphics.
-
Preview points: If the scene contains named preview points, such as stop points and/or tags in the director called Default, these are shown as buttons on the toolbar. If there is not enough space for the buttons, they appear in a drop-down list instead. Selecting a preview point shows a preview of the scene at the given point, and the playhead jumps to the point in time where the preview point is set.
-
Scrub the timeline back and forth by clicking on it or moving the playhead. If the scene does not have a director called Default, or the Default director does not have a duration, the timeline will be disabled.
-
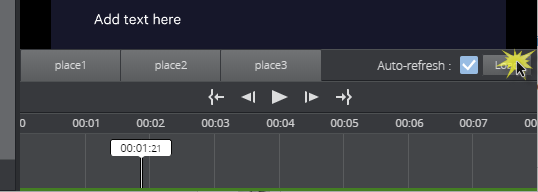
Auto-refresh: Auto-refresh is located at the bottom of the Preview Window and is by default toggled on which means that the Preview Window updates once there are any changes in the Fill In Form.
Toggle off Auto-refresh to turn this functionality off. To refresh the Preview Window in this mode click the Refresh button or click inside the Preview Window.
 -
Load: Clicking this button will load the animation of the graphics. Once loaded, indicated by a green line at the bottom of the timeline editor, media controls appear allowing for controlling the graphics animation in the Preview Window:
WARNING
The load animation feature will send a lot of snapshot requests to the Preview Server, so if many people do this at the same time it could result in performance issues.
Editing Presets
There are two types of presets, Presets and Filled Presets, each with their own editing options.
Preset
A Preset defines the layout of the graphics channels on a video wall.
New presets are created in the Videowall Tab. Drag presets to the Shortcuts Bar in order to switch between layouts during a broadcast and send presets to air.
This section covers the following:
-
Create a preset
-
Send a preset to air
-
Open the Video Wall Designer
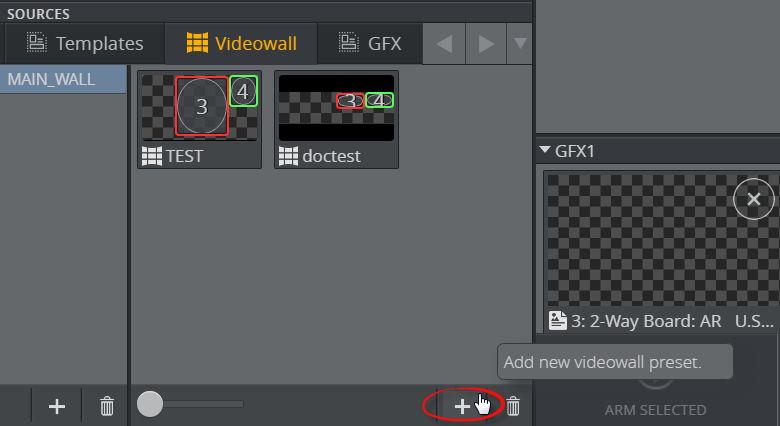
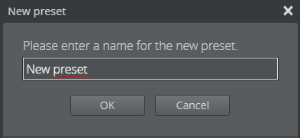
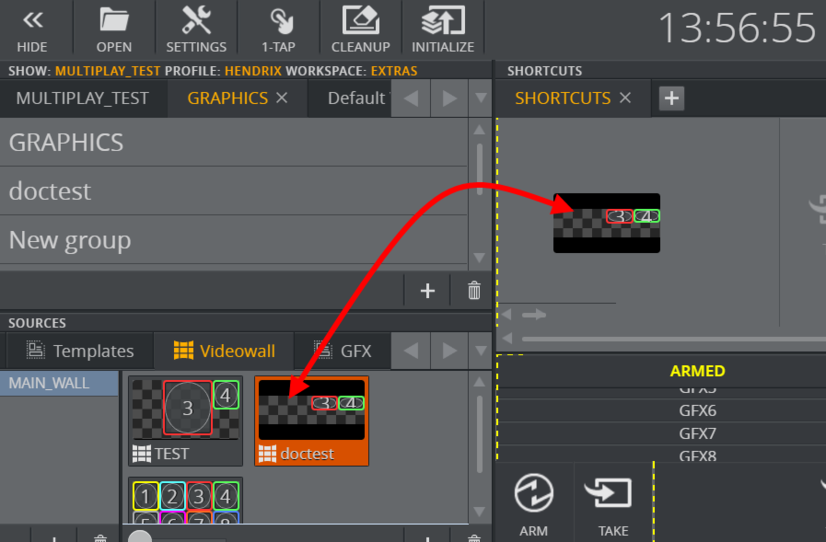
Create a preset
Add a new videowall preset.
-
Click the Videowall Tab in the Sources Pane.
-
Click the + icon.
-
Give the preset a title.
-
Click OK.
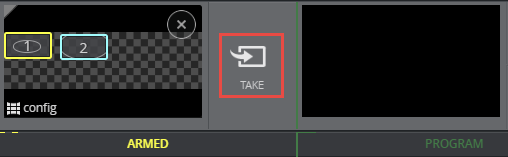
Send a preset to air
Send a preset to air via the Shortcuts Bar.
-
Drag a preset to the Shortcuts Bar.
-
Click the preset to send it to the Armed column.
Note:
In 1-Tap Mode, clicking a preset will send it straight to on air.
-
Click the preset in the Armed column, or click the Take button.
-
The preset moves to the to the Program column and is now on air.
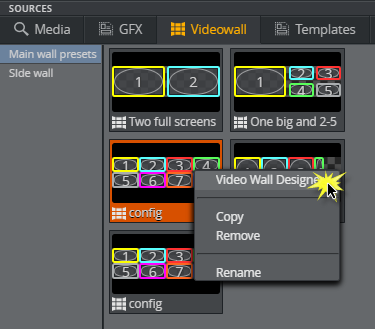
Open the Video Wall Designer
Edit the preset layout in the Video Wall Designer. There are two ways to access the Video Wall Designer, as described below:
Access the Video Wall Designer via the Videowall Tab:
-
Right-click a preset in the Videowall Tab.
-
Click Video Wall Designer:
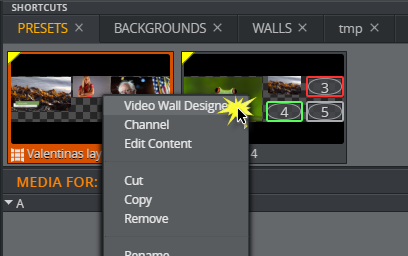
Access the Video Wall Designer via the Shortcuts Bar:
-
Right-click a preset in the Shortcuts Bar.
-
Click Video Wall Designer:
Filled Preset
A Filled Preset is a video wall layout which also includes predefined content. Use Filled Presets to send content onto your video wall quickly. Content can only be added to presets which are in the Shortcuts Bar.
Edit the content in a preset in the Preset Content Editor (right-click a preset in the Shortcuts bar and select Edit Content).
See Also
Renaming playlist entries
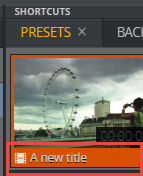
There are two ways to rename media items added to a playlist in the Shortcuts Bar or Media Column:
Rename from the context menu
-
Right-click an item in either the Shortcuts Bar or Media Column.
-
Click Rename.
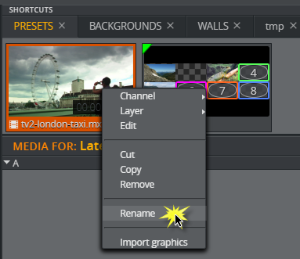
-
Enter a new title and click OK.
-
The new title is shown on the element.
Note:
The new name will not be overwritten by the auto-generation process when entering new field values in the Editor.
Rename from the Editor
-
Right-click an item in the Media Column.
-
Click Edit to open the Editor.
-
Click the title text field.
-
Enter a new title.
-
Press ENTER.
-
Click x to close the editor. The element is shown in the Media Column with the new title.