
Viz Multiplay User Guide
Version 2.5 | Published February 18, 2019 ©
Tricks and Hints
Filling clips/images in GFX channels instead of letterboxing
In GFX channels, the StillAndVideo scene will letterbox clips and images. If for instance a 16:9 clip or image is played out in a portrait GFX channel, the content will not be cut off, but placed inside the portrait area to fill the width but not the height. The GFX channel will be blank over and under the content. If you want to fill the whole GFX area always - scale up the content and cut it off - this can currently be done by manipulating the StillAndVideoScene like this:
Do one change in these 4 scripts:
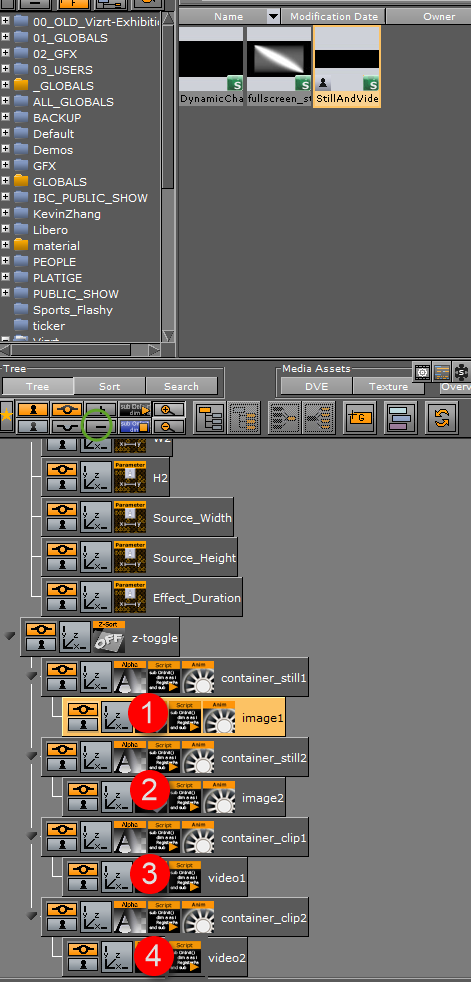
The script lines are:
-
if render_aspect>(my_aspect*kb_aspect) then .... for image1 and image2
-
if render_aspect>(image_aspect) then .... for video1 and video2
In these four script lines, change > (greater than) to < (less than). Click Compile and run for each script you open. Save the scene. Cleanup the renderer and take a preset again. Now the letterboxing should be changed to a fill.
Enabling transitions between video clips
The Viz Engine has 16 GFX channels and 16 video clip channels. In Viz Multiplay one clip channel is used per GFX channel. This means that 16 clips can be played simultaneously in 16 different GFX channels. Though, if fading between clips should be enabled, each GFX channel then needs two clip channels to perform the fading. This means that for each GFX channel that should have transition enabled, the number of GFX channels should be reduced with 1.
Example 1: 2 GFX channels with transitions enabled. In this scenario, clips with transitions should always be played in two special GFX channels - for instance, GFX1 and GFX2. These two GFX channels then need two extra clip channels to perform the fade. Using clip channels 15 and 16 for this - will then effectively mean that the video wall setup will only have 14 GFX channels available.
Example 2: 8 GFX channels with transitions enabled. In this scenario - all available GFX channels will have the possibility to play transitions between clips. This reduces the number of GFX channels to 8. GFX1 may use clip channel 9 for the transitions, GFX2 may use clip channel 10 and so one.
Setup clip transitions
-
In Viz Artist, open the Vizrt\DynamicChannels scene.
-
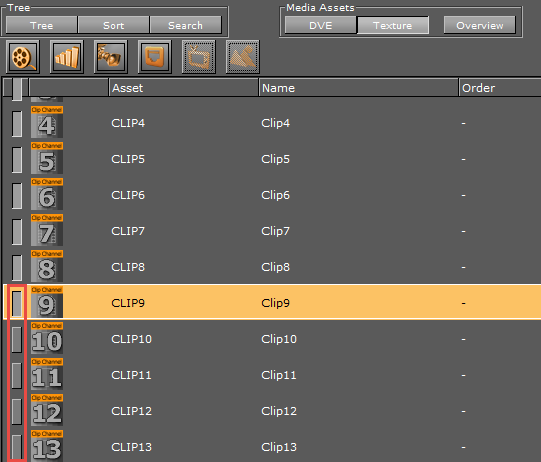
Go to MediaAssets > Texture and add (drag in) as many extra clip channels as needed (8 is added by default):
-
If more than 8 GFX channels are needed, go to Media Assets > DVE and enable as many GFX channels as needed.
-
In Multiplay, go to Settings > Profile Config.
-
Click the profile for the video wall and expand the GFX channels that should have clip transitions.
-
Double-click the video handler under each GFX channel:
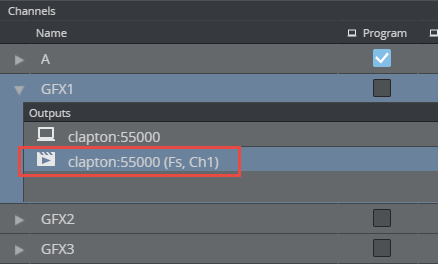
-
Check Use Transitions and enter the alternate clip channel number to use.
Usually, each GFX channel uses the corresponding clip channel number, but now, the clip channel number entered in Alternate Clip Channel will prevent the corresponding GFX channel to be used. In the example below, clip channel 9 is used for the fade, which means that GFX 9 is unavailable for clips.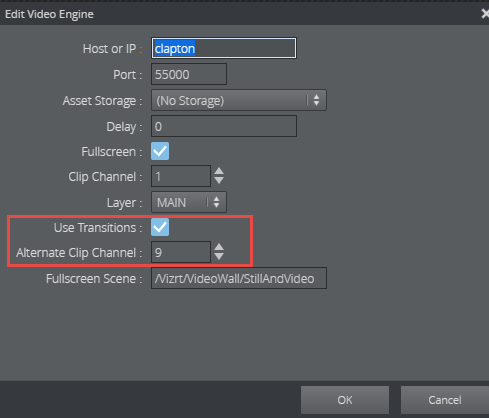
Tricks and Hints for Viz Engine 3.8.2 or later
Make sure you read and follow the recommendations in the Video Wall Configuration section of the Viz Engine Administrator Guide.
-
To get better performance, start viz.exe with parameter -w. In addition, set the setting create_default_renderer = 1 in the config file.
-
To see commands: “send MAIN SHOW_COMMANDS ON”.
-
If more than one GPU is used, and video clips and transitions flicker, send the command “RENDERER JOIN_SWAPGROUP 1”.
-
Remember that playing clips requires that all that frame rates and refresh rates match the videos - both in Clip in formats, renderer format and on the actual physical screens.
-
To see performance, send the command “RENDERER SET_PERFORMANCE 1”.
Tricks and Hints for NVIDIA Mosaic
Common Requirements
-
All monitors connected to the GPU must be identical models and running at identical resolutions/refresh rates. You can not have a different resolution/model 'control' monitor connected to the system without introducing tearing in at least one of the displays.
-
If possible, the monitors should be combined into a single large virtual monitor using Nvidia's Mosaic.
-
Only have one window rendering. If you are outputting to multiple monitors use a single large window that covers your entire desktop, not one window per monitor.
Quadros
-
When setting up Mosaic, be sure to not move monitors around using this dialog. Due to a driver bug this will disable the Preset you are trying to use in the next step. If your monitors are connected in reverse, change the connections manually.
-
In the Nvidia Control Panel, go to the "Manage 3D settings" page and select "Video Editing" as the profile/preset to be used.
-
Ensure the Windows taskbar is not on top of your display window.
We have tested our system with an external blackburst sync signal, if you try to use anything else than NTSC or PAL as sync format the screen will start to flicker.
For normal 50 Hz European format use PAL.
Performance Issues
This section covers the following topics:
-
DynamicChannel scene
-
Video wall setup
-
Background loading of images (performance)
DynamicChannel scene
The DynamicChannel scene must be seen as a template. It should not be used in the distributed version. It must be modified by a Viz Artist expert on location to match the customer system.
This will improve performance significantly:
-
In DynamicChannel, disable or preferably remove all GFX channels not in use. (The default DynamicChannels scene has 16 GFX channels, of which 8 are disabled.)
In addition, during the playout situation:
Before going on air, "warm up" (take) all the scenes that are going to be taken. Initializing is often not enough. Scenes should be taken on air and out again at least once on their GFX channel. The next time they are taken, Viz Engine displays them without affecting the overall performance.
Always take a preset on air before the show starts. Never take presets out. There should always be a preset on air.
Video wall setup
Configuring a video wall setup is not straight forward. Make sure you read and follow this advice.
Tip:
There are many factors impacting the performance of a video wall driven by one Viz Engine, so try experimenting and fine tune the setup with real content and real constraints.
Background loading of images (performance)
Support for background loading of images was added in Multiplay 2.2.
Note:
This is unrelated to the general config setting enabling background loading in Viz Config.
This fixes a bug that froze the video wall for notable periods. This arose when a fullscreen image was added to a show and taken to air without initializing it first. While downloading the image, the Viz Engine would then block the renderer and render the image, causing the wall to freeze.
Requirements
-
Background loading of images requires the latest official Viz 3.8.3.62368 build (or later) on the official FTP.
-
The #13 version (the scene version bundled with Multiplay 2.2) of the DynamicChannels scene must be present in Graphic Hub.
Note:
Images from an HTTP resource (Viz One and Media Service) can still cause a small frame drop in the renderer, but at least the renderer will download it in the background and not block for a long period.
Preparation of images in GH
Images from Graphic Hub should not cause any frame drop in the renderer if they are background-loading compatible. This means they should be DXT1 or DXT5 compressed images.
To check whether a GH image is background loading compatible:
-
Open Viz Artist, locate it in the server tree.
-
Right-click the image and choose Check for Background Loading.
To make a GH image background loading compatible:
-
Open Viz Artist, locate it in the server tree.
-
Open the image by double-clicking it.
-
Choose Convert Format in the left menu.
-
Choose DXT1 or DXT5 in the menu that appears.
-
Save it.