Viz Mosart User Guide
Version 5.0 | Published June 21, 2022 ©
Working with Story Recorder
This section presents
Managing a Story Recorder Session
Story Recorder offers three principle modes for supporting error-free production and recording of a Viz Mosart-driven show.
-
Record a Show as a Single Clip
This mode assumes that the show was made error-free and Story Recorder has captured the required scheduled performance. -
Pause-Fix-Retake Mode
An improvement has been identified, and the show is rolled-back to a chosen point, to take again. -
Publish an Early Version of the Show
Sending the recorded stories to a publishing point, either before the show is complete, or with additional stories appended later.
Preparations
To start a Story Recorder session
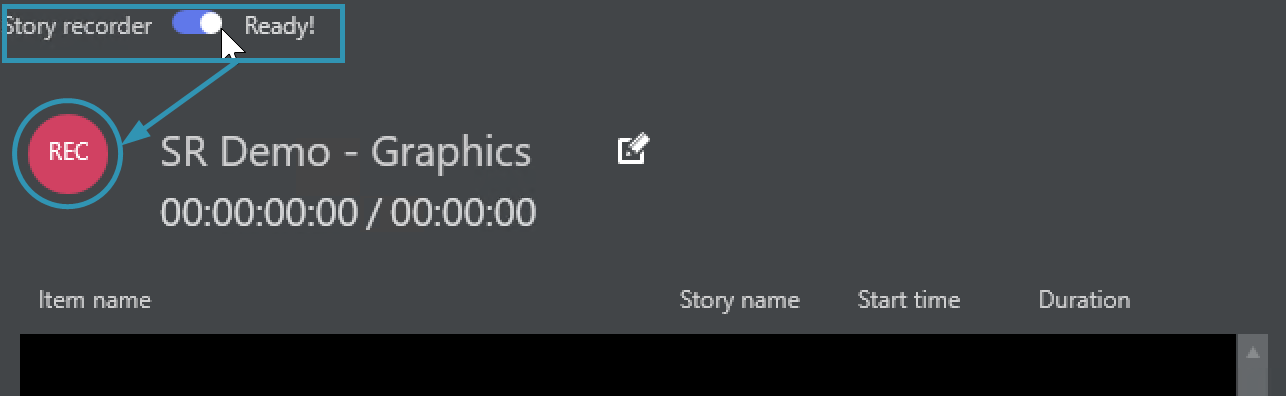
You activate Story Recorder with a switch at the top of the Story Recorder panel in Viz Mosart.
-
In the Story Recorder tool menu switch to On, as shown above.
-
After a few seconds start-up, the display indicates Ready, and the REC button is red, indicating the system is operational, ready to record.
-
From this point on, any story items taken on air (using the standard Take Next, default F12) will be recorded and displayed in Story Recorder panel, item by item (see below).
Note: Keep in mind that once switched on and the show started, Story Recorder will begin consuming considerable storage, recording all the media used for your ongoing show that is fed to PGM.
Tip: If Story Recorder fails to start up, please refer to the Troubleshooting and Housekeeping section.
Recording
Recording a Show as a Single Clip
This mode assumes that the show was made error-free and Story Recorder has captured the required scheduled production.
Tip: For a quick guide to what is displayed in Story Recorder, refer back to the illustration The Story Recorder Panel.
To record a show as a single clip
-
Ensure the rundown containing the show's story rows is loaded in Viz Mosart.
-
If the rundown begins with a Break template, for initializing equipment, make sure this entire story is executed before enabling Story Recorded mode.
-
From the Story Recorder panel, switch on Story Recorder mode (described above).
After a few seconds, the REC button is red, indicating the system is ready to record your show. -
If Step 2 above was performed, then execute Take Next to continue with the next story item in the show (this will be the first recorded story item). Otherwise begin the show by taking in the first story item of the show.
For each story item taken, a row is presented in the Story Recorder panel, the most recent indicated with Recording...

-
When the show is over, an instruction in the last template of the show will automatically pause the recording (see section Automatic Pause at Show End of topic Story Recorder Mode in the Viz Mosart Administrator Guide).
If an automatic pause has not been set, click the PAUSE button in Story Recorder panel or the Pause keyboard shortcut. -
(Optional) provide an alternative name for the final clip by changing the pre-populated field in the SR panel:

Note: The name displayed can be collected from the NRCS, as a characteristic of the first (Break) story. If not, Viz Mosart automatically inserts a name, based on the rundown name.
-
Click the Broadcast button.
A confirmation message and counter indicate that the clip has been sent for stitching.
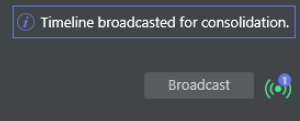
Note: The counter indicates the number of EDLs currently being stitched on the EDL transcoder. Each time you click Broadcast, a new task is sent. See also Broadcast below.
If you accidentally order the same stitching operation multiple times (by pressing Broadcast more than once for your required recording), you can cancel the transcoding job by reviewing the job queue on the transcoder. Your System Administrator can assist with this task.The counter is cumulative per recording session, and does not decrease once the stitching job has finished or been cancelled on the EDL transcoder side.
-
Disable Story Recorder with the On/Off switch at the top left of the panel.
Pause-Fix-Retake Mode
The standard use of Story Recorder is where you wish to pause an ongoing show recording, make a correction to the production, then resume from the pause.
To record a show with pause-fix-retake
-
Initiate recording as described in the first 4 steps of To record a show as a single clip above.
-
Press PAUSE to interrupt recording as required.
-
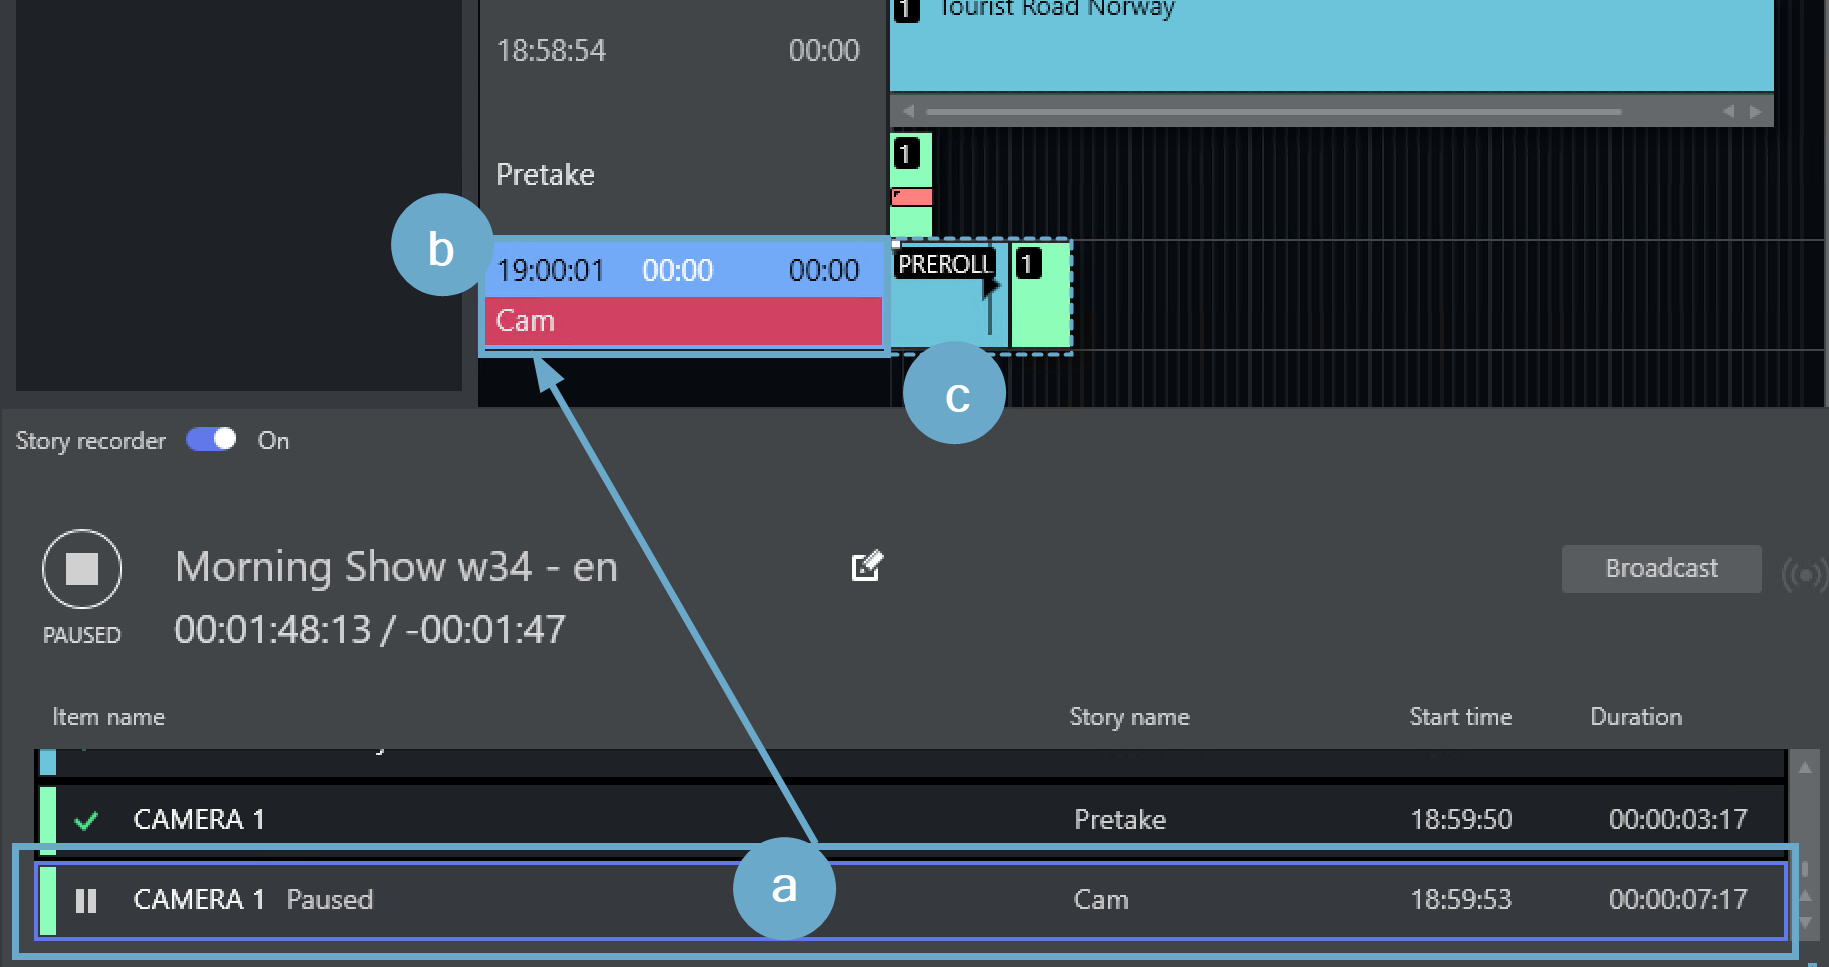
In the Story Recorder panel, the current story item is marked as Paused.
-
In Rundown view above, the corresponding rundown story title is also blue.
-
In the Rundown view, on the story row, a pre-roll template is automatically inserted before the paused story item.
-
-
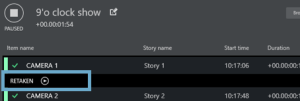
Make required changes and prepare to recommence recording, by clicking the PAUSED button.
A countdown timer cues for retake and recording resumes from the break point.
Continue as above till the last story line, where an information text warns that the show recording will soon be complete.
Reviewing the Cut -
(Optional) When resuming after a pause, approximately 10-15 seconds into the new recording, a snippet featuring the previous cut is available for review.
Click the Play icon to start view. -
When the show is over, an instruction in the last template of the show will automatically pause the recording if configured so (see section Configure template for automatic pause of the show in Story Recorder Mode - Mosart Administrator Guide). Otherwise, click PAUSE button in Story Recorder panel or the Pause keyboard shortcut.
-
(Optional) provide an alternative name for the final clip by changing the pre-populated field in the Story Recorder panel:
Note: The name displayed can be collected from the NRCS, as a characteristic of the first (Break) story. If not, Viz Mosart automatically inserts a name, based on the rundown name.
-
Click the Broadcast button.
A confirmation message and counter indicate that the clip has been sent for stitching.
Note: The counter indicates the total number of stitching tasks started on the EDL transcoder for the current recording session . Each time you click Broadcast, a new task is sent. See also Broadcast below.
If you accidentally order the same stitching operation multiple times (by pressing Broadcast more than once for your required recording), you can cancel the transcoding job by reviewing the job queue on the transcoder. Your System Administrator can assist with this task.The counter is not decreased if the stitching job has finished or this has been cancelled on the EDL transcoder side.
-
Disable Story Recorder with the On/Off switch at the top left of the Story Recorder panel.
Broadcasting an Alternative Version of the Show
Broadcast means generating a show-level EDL, from the list of story rows in the Story Recorder panel.
This EDL is generated into the EDL transcoder (Vantage) watch folder. The EDL transcoder will then pick up the EDL file and start the job of stitching the clips that represent the story rows, into a single show clip. This single clip is used for playout.
-
You can broadcast at any time, during a paused recording, and then continue recording.
This might be when a trailer, or a second language variant of the show, or when in the afternoon you want only to change the last couple of stories from the morning's recording.
-
Similarly, you can append additional rundown rows to a completed, paused show.
Use the Tools > Arrange rundowns menu, as described in the topic Arrange Rundowns.
In these scenarios, you must always create a retake point in the story prior to the change or addition.
Rolling Back in Time at Retake
The smallest rollback is a Viz Mosart primary story item. A story row usually comprises several story items, each item defined with a Viz Mosart primary template.
So for example, if your running show is executing item three of the four primary items that make up the story, then the pause will cause a rollback to the start of item three.
A retake point is always at the start of a primary item, regardless of where the pause was made.

Currently, it is not possible to replace a specific recorded story item. All the recorded story items after the retake point, including the story item set as retake point, must be re-done once the show is restarted after a pause.
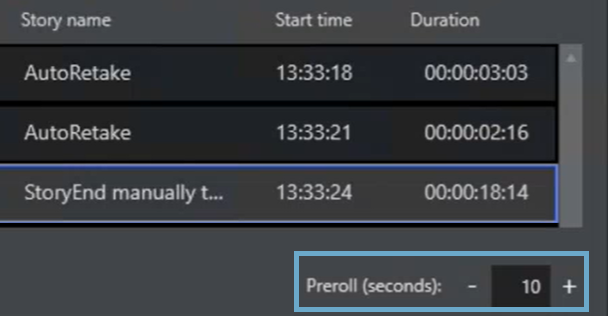
Pre-roll
When you pause a story, Viz Mosart automatically inserts a pre-roll event in the story row, before your paused story item.
The duration of this pre-roll is configurable, usually around 10-15 seconds. The pre-roll period provides the system time to automatically initialize itself back to a stable, known status for all equipment like robotic camera positions, onscreen graphic elements, media clip availability, fader levels. It also provides a cue for the talent to prepare for beginning again.
Critically, the pre-roll period can never be less than the time the video server hardware requires to prepare for recording. This is typically 10-15 seconds.
-
You can configure the pre-roll time from the Story Recorder panel:
Timing Details
The Mosart UI has been extended with support for Story Recorder related time fields.
The Story Recorder panel displays the following new timing details:
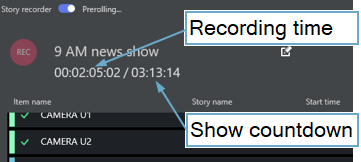
The Recording Time field starts at zero when a Story Recorder session is started, and
-
When the timeline is running, this counter is continuously growing, equal to the sum of the already recorded sections + the duration of the current recording.
-
When timeline is paused, this counter is static, equal to the sum of the recordings prior to the selected Retake Point.
The Show Countdown displays the difference between the planned duration as defined in NRCS and the Recording Time.
-
When the timeline is running, this is counting down.
-
When the timeline is paused, this is static.
If the Recording Time exceeds the Show Planned Duration, this will become negative and will be counting up.
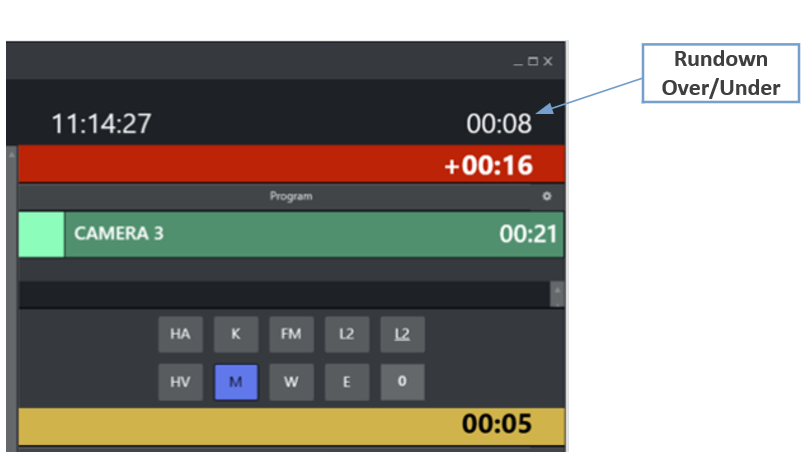
The Rundown over/under field is an existing field in the Viz Mosart UI, and when Story Recorder mode is enabled, it provides an indication of the executed recordings relative to the remaining rundown and the planned duration of the rundown:
-
Under: indicates the number of seconds the show must be extended to meet the planned duration.
-
Over: indicates the number of seconds the show exceeds the planned duration.
All these Story Recorder related time fields are also shown in the Mosart Timing Display and forwarded to the Plura Timing System (using the Time Request Protocol).