Viz World User Guide
Version 17.0 | Published March 11, 2019 ©
Viz Engine/Artist Configuration
This section contains information on how to configure the Viz Artist render engine.
Maps Configuration

-
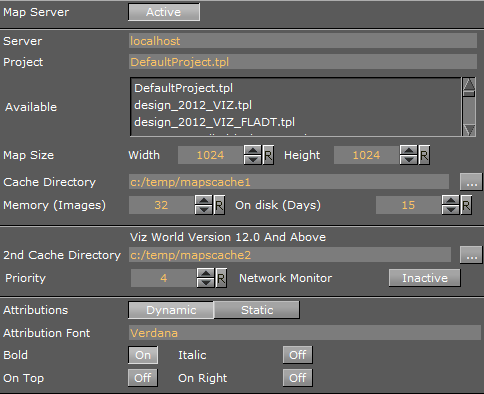
Map Server: Enables or disables Viz World Server (WoS) connection for Viz World Client (WoC).
-
Server: Sets the Viz World Server host.
Note: If a Server Allocator is used, it should point to this location.
-
Project: Sets the default map project that will be opened with the client application.
-
Available: Lists all available Viz World Server projects.
-
Map size: Sets the default map size that will be used with the client application.
-
Cache: Enables caching of maps for faster preview and fetching of maps. Especially useful for journalists and operators using Newsroom Component and Viz Trio respectively.
-
Cache Directory: Sets the cache directory for cached maps which can be a local drive, mapped drive or a Universal Naming Convention (UNC) path.
IMPORTANT! Make sure the Cache Directory folder is configured with read and write access rights.
-
Memory (Images): Sets the number of images to keep in memory.
-
On disk (Days): Sets the number of days to save images on disk.
-
2nd Cache Directory: Enables a second cache (see Cache above). The main purpose of the second cache is to enable redundancy in those cases where a main cache directory is on a different computer and for some reason fails. Another use case is to use it as a local cache to save loading time (e.g. if you load all borders for the entire world you would have 100MB+ of cached files). In order to shorten load time you can copy large static files to the correct local cache folder. In the 3D Map Setting plugin you will also find a Sync Local Cache Folder button which will copy all the needed files to your local cache. Note that the second cache directory settings can only be used by Viz World version 12.0 and later.
-
Priority: Sets the machine’s connection priority to the Viz World Server (WoS). Setting a number, where 1 is the lowest and 100 is the highest you may override connection priorities set by other machines. The configuration interface will allow you to prioritize client connections from Viz Artist and On Air Viz Engine’s used for preview and program output. Viz Engines must be in On Air mode for them to be prioritized. For Viz World’s Map Editor you can set it from the Context Menu. To enable this behavior on the server side you need to enable WoS to prioritize its connections/logins. If the configuration option is not visible, please read how To add the VizWorld.ini file and set the priority.
-
Network Monitor: Enables you to monitor relevant network connections (server and cache folders). If you do not monitor the network and you try to connect over a “disconnected network”, connecting to a server or a UNC path, it will take time before the system reports back (e.g. 30 seconds or more). Enabling network monitoring will avoid such connection issues. Note that the network monitor will only monitor a cache folder that use a UNC path (not mounted/mapped drives). If the configuration option is not visible, please read how To add the VizWorld.ini file.
-
Languages: Sets the current language to be used on labels fetched from Viz World Server. For more information, see the Display section.
-
Attributions: Adds an attribution to the map. Alternatives are; Static and Dynamic.
-
Dynamic: Displays the attribution when a licensed imagery is in view and disappears when the image is out of view.
-
Static: Displays the attribution as long as there is a licensed imagery in the scene.
-
-
Attribution Font: Sets the font for the attribution.
-
Bold: Sets the attribution font to bold.
-
Italic: Sets the attribution font to italic.
-
On Top: Places the attribution image to the top in the screen. Default is bottom.
-
On Right: Places the attribution image to the right in the screen. Default is left.
To add the VizWorld.ini file
-
Create a and save a VizWorld.ini file to the following location:
C:\ProgramData\vizrt\viz3\Maps -
Open the file and enter the following:
Monitor=1Priority=1Language=[my Language ID] -
Save the file and start e.g. Viz Config to see the configurable parameters
Monitor enables network monitoring. See the Network Monitor setting, listed above.
Priority sets Viz’ connection priority to the Viz World Server. See the Priority setting listed above, and the Server Launcher Configuration section on how to enable prioritized connections on the server side.
my Language ID refers to the order of languages in your list of languages (e.g. English = 0, Arabic = 1, Hebrew = 2 and so on). See the Languages setting, listed above.