
Viz Engine Administrator Guide
Version 3.12 | Published October 17, 2019 ©
HP Z800
HP Z800 PCI/PCIe Slot Layout and Usage
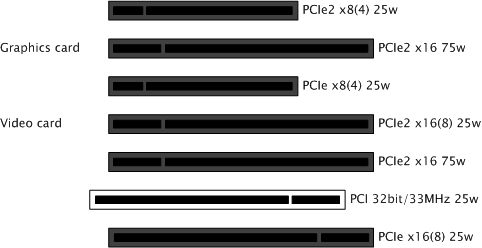
Single GPU setups (one graphics device):
|
Slot # |
Type |
Used for |
|
16 |
PCIe2 x8 |
AES Audio card (if required/used) |
|
17 |
PCIe2 x16 |
Graphics card 1 |
|
18 |
PCIe x8 |
free |
|
19 |
PCIe2 x16 |
Video card (Matrox, DVS or Bluefish) |
|
20 |
PCIe2 x16 |
Radial Aerator (if needed, see note below) |
|
21 |
PCI 32/33 |
free |
|
22 |
PCIe x16 |
free |
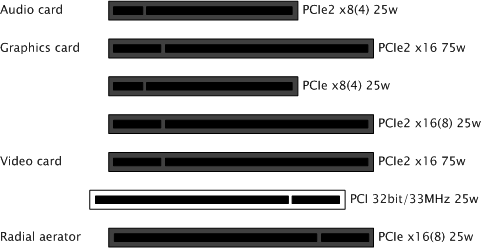
Dual GPU setups (two graphics devices):
|
Slot # |
Type |
Used for |
|
16 |
PCIe2 x8 |
AES Audio card (if required/used) |
|
17 |
PCIe2 x16 |
Graphics card 1 |
|
18 |
PCIe x8 |
free |
|
19 |
PCIe2 x16 |
Video card (Matrox, Bluefish) |
|
20 |
PCIe2 x16 |
Graphics card 2 |
|
21 |
PCI 32/33 |
free |
|
22 |
PCIe x16 |
free |
IMPORTANT! A Radial Aerator is recommended for the Matrox X.mio2 video boards. However, the Radial Aerator is not needed for video cards with an onboard fan, such as the Matrox X.mio3, DVS Atomix or Bluefish Epoch 4K Supernova. The Radial Aerator cannot physically be installed with the Xmio.2 Plus board, in which case the BIOS chassis fan speed setting must be set to maximum to achieve sufficient cooling.
HP Z800
This section describes how to setup a HP Z800 machine with the different cards provided by Vizrt:
To Setup an HP Z800 with a BlueFish444 Epoch Board
PCI-X, PCI and AGP slots, HP Z800
-
Disconnect the power and all other peripherals.
-
Insert the graphics card in the PCIe slot number 2 from the top.
-
Insert the BlueFish444 video board in the PCIe slot number 4 from the top.
To Setup an HP Z800 with a Matrox Board
PCI and PCIe slots, HP Z800
-
Disconnect the power and all other peripherals.
-
Insert the graphics card in PCIe2 slot number 2 from the top.
-
Insert the Matrox video board into the PCIe2 slot number 5 from the top.
-
Insert the radial-aerator into the PCIe slot number 7 from the top.
IMPORTANT! The Matrox video boards can reach very high temperatures when in operation. If a Xmio.2 board is used, a radial-aerator must be installed. If a Xmio.2 Plus board is used a radial-aerator can not, physically, be installed. In this case the chassis fan speed (in BIOS) must be set to maximum to achieve sufficient cooling.
-
Optional: Insert the Matrox video board into the PCIe2 slot number 1 from the top.
-
Optional: Insert the extra slot panel for the X.mio2/44 board in any of the vacant slots, and connect it to the X.mio2 board.
-
Tidy up all cables and close the computer’s casing.
Once the machine is powered up you may verify that the Matrox X.mio board has been correctly installed by looking for the blue OB-light on the (top) backside of the slot panel. A lit light indicates that the board is correctly supplied with power.
To Setup an HP Z800 with Two Graphics Cards
PCI and PCIe slots, HP Z800
IMPORTANT! Before touching any components make sure you use an anti-static wrist strap to prevent electrostatic discharge.
-
Disconnect the power and all other peripherals.
-
Insert the weaker graphics card in PCIe2 slot number 2 from the top.
-
Insert the stronger graphics card in PCIe2 slot number 5 from the top.
-
Insert the Matrox video board in the PCIe2 slot number 4 from the top.
-
Insert the radial-aerator into the PCIe slot number 3 from the top.
-
A radial-aerator is mandatory as the video board reaches high temperatures during operation.
-
-
Optional: Insert the Matrox video board into the PCIe2 slot number 1 from the top.
-
Tidy up all cables and close the computer’s casing.
-
Connect the computer’s monitor to the graphics card in slot 2 from the top.
-
Start the machine and in the BIOS (Advanced: Thermal – Full Fan speed) set all fans to run at full speed.
-
Boot and log on to the machine.
-
Install NVIDIA and Matrox drivers.
-
Open the NVIDIA Control Panel, and click on System Information in the bottom left corner and check that both graphics cards are installed and run at PCIe x16 speed.
-
Open Matrox X.info from the system tray and check that the video board runs at PCIe x8 speed.
Once the machine is powered up you may verify that the Matrox X.mio board has been correctly installed by looking for the blue OB-light on the (top) backside of the slot panel. A lit light indicates that the board is correctly supplied with power.