
Viz Engine Administrator Guide
Version 3.12 | Published October 17, 2019 ©
HP Z8 G4
This section describes how to setup a HP Z8 G4 machine with the different cards provided by Vizrt. The HP Z8 G4 is a high performance workstation that can be configured with two CPUs, has 24 memory slots, multiple storage and PCIe configuration options.
More details about the HP Z8 can be found on HP’s website: HP Z8.
Only newer Matrox Boards like xMio3 and DSX.LE4 are shipped with Z8 workstations. Older videoboards are not tested by Vizrt.
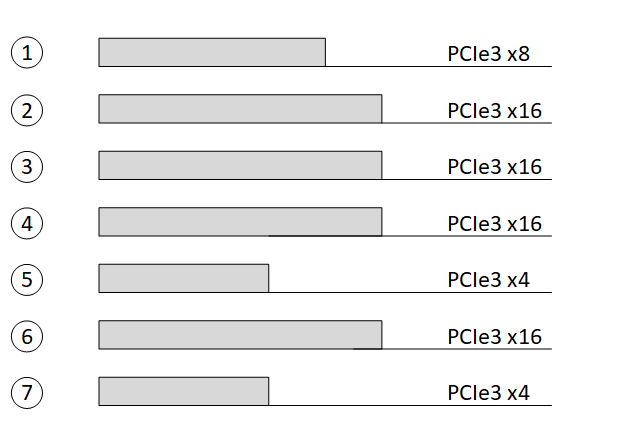
PCI Configuration for Single GPU
|
Slot |
Usage |
|
Slot 1 – PCIe3 x8 |
Matrox AES Audio |
|
Slot 2 – PCIe3 x16 |
Graphics Card (Single / Dual Slot) |
|
Slot 3 – PCIe3 x16 |
Used if Dual Slot GPU is installed |
|
Slot 4 – PCIe3 x16 |
If one Graphic Card is installed, this slot is used for Video Cards (i.e. Matrox Video Boards) |
|
Slot 5 – PCIe3 x4 |
Empty or can be used by Matrox AES Audio if Slot 1 is used |
|
Slot 6 – PCIe3 x16 |
Empty |
|
Slot 7 – PCIe3 x4 |
Empty |
PCI Configuration for dual GPU
|
Slot |
Usage |
|
Slot 1 – PCIe3 x8 |
Video Cards (i.e. Matrox Video Boards) |
|
Slot 2 – PCIe3 x16 |
Matrox AES Audio |
|
Slot 3 – PCIe3 x16 |
Primary Graphics Card (Single / Dual Slot) |
|
Slot 4 – PCIe3 x16 |
Primary Graphics Card (Dual Slot) |
|
Slot 5 – PCIe3 x4 |
Empty or used by Matrox AES Audio if Slot 2 is used by extension card (G-Sync, Blue Storm, etc.) |
|
Slot 6 – PCIe3 x16 |
Secondary Graphics Card (Single / Dual Slot) |
|
Slot 7 – PCIe3 x4 |
Secondary Graphics Card (Dual Slot) |
Default Hardware
-
Tower 5RU
-
CPU: 2x Intel Xeon Silver 4114 (2.2GHz 10-Core)
-
RAM: 48 GB DDR 4 (6x 8GB)
-
SSD1: 256 GB S-ATA (Operating System)
-
SSD2: 512 GB M.2 NVMe (Data and Clips)
-
RAID Controller: Intel SATA/NVMe M.2
-
Power Supply: 1x 1125 W 90% Efficient
BIOS – Configuration
-
During Post, press F10 to access BIOS Setup.
-
Click Advanced Tab > Boot.
-
Enable Fast Boot.
-
-
Go back to Advanced Tab> Secure Boot Configuration.
-
Select: Legacy Support Disable and Secure Boot Enable.
-
-
Go back to Advanced Tab Overview.
-
Click on Build in Device.
-
-
Increase PCIe Idle Fan Speed to: 0050.
-
Go back to Advanced Tab Overview.
-
Click on Performance Options.
-
Set Intel Hyper Threading Technology to DISABLED.
-
-
Press ESC and save Configuration.
Certain third party vendor drivers require secure boot to be disabled to install properly.