
Viz Multichannel
Version 4.0 | Published January 23, 2019 ©
Playout
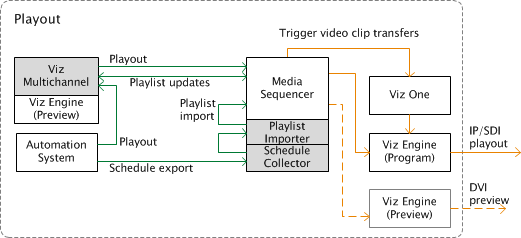
A second Viz Multichannel application is typically installed in the master control room (MCR) for monitoring purposes and manual update of data. It can also be used for manual playout. This installation also includes a local Viz Engine for preview purposes.
Integrated with an automation system, Viz Multichannel can import its schedule(s) and allow the automation system to control the playout of video and graphics without any manual intervention.
The machine in the MCR must have the following software components installed:
-
Viz Multichannel client
-
Viz Engine (local preview)
Viz Multichannel’s Schedule Collector and importer must be installed alongside the Media Sequencer. Note that you may install the Media Sequencer, Schedule Collector and Playlist Importer on the Viz Engine program machine.
The Schedule Collector collects and outputs scheduled events, typically from the automation system, which the Playlist Importer imports into the Media Sequencer for the Viz Multichannel operator in the MCR to see. Final mapping of events into the Vizrt playlist is done using the Viz Multichannel client.
Video clip transfers from Viz One to the Viz Engine program machine are initiated by the Media Sequencer once the playlist is activated.
The following software components are in use:
-
Viz Multichannel’s Schedule Collector (SCC)
-
Viz Multichannel’s Playlist Importer (PLI)
-
Viz Engine (program and preview)
-
Media Sequencer
Note: Collection of events from scheduling systems are currently not supported by the Schedule Collector. This is done using the Viz Multichannel client in scheduling mode.
This section presents:
See Also
Installation of Viz Multichannel
Viz Multichannel in the master control room must be connected to Viz Engines for program and preview output; however, a Viz Engine for local preview is often needed as well. Ensure that you have Viz Engines ready before starting the installation steps below.
A Viz Engine is also used for local preview by the Page Editor, hence, you need to install a VGA version.
IMPORTANT! Ensure that clocks on all machines in the installation are synchronized! It is also recommended to set all date formats on all machines to the same format
To Install the Viz Multichannel client
-
Start the Viz Multichannel installer
-
Click Next
-
Select Complete and click Next
-
Select Custom if a different install path is needed.
-
-
Click Install
-
Click Finish
To Install Viz Engine
-
Start the Viz Artist/Viz Engine installer
-
Click Next
-
Check the I accept the terms in the License Agreement check box and click Next
-
Click VGA
-
Click Next
-
Select features and/or a different install path if needed.
-
-
Click Install
-
Click Finish
Installation of Viz Engine Machines for Playout
It is recommended to install Viz Multichannel’s Schedule Collector, Playlist Importer, and Media Sequencer on the same machine as the Viz Engine defined as your program output channel.
IMPORTANT! Ensure that clocks on all machines in the installation are synchronized! It is also recommended to set all date formats on all machines to the same format.
To Install the Schedule Collector
-
Start the Viz Multichannel Schedule Collector installer
-
Click Next
-
Click Next
-
Select a different install path if you need to.
-
-
Click Install
-
Click Finish
To Install the Playlist Importer
-
Start the Viz Playlist Importer installer
-
Click Next
-
Click Next
-
Select a different install path if you need to.
-
-
Click Install
-
Click Finish
To Install Media Sequencer
-
Start the Media Sequencer installer
-
Click Next
-
Click Next
-
Select features and/or a different install path if needed.
-
-
Click Install
-
Put shortcuts on the desktop if needed.
-
-
Click Finish
To Install Viz Engine (program and preview)
Viz Engines used as your program and preview output channels can easily switch roles, hence, you should always have two Video versions installed.
-
Start the Viz Artist/Viz Engine installer
-
Click Next
-
Check the I accept the terms in the License Agreement check box and click Next
-
Click Video
-
Click Next
-
Select features and/or a different install path if needed.
-
-
Click Install
-
Click Finish
See Also
-
Vizrt’s Documentation Center for more information on setup and configuration of Viz Engine.
Configuration of Channels with channels.ini
For the Master Control Room machine(s) using the MCR-mode of Multichannel to have access to all channels, you must populate its channels.ini file with all channels defined on the Media Sequencer machine(s). If the channel.ini configuration file is not present or incorrectly formatted the Multichannel GUI in MCR-mode will abort startup with an error message.
To Configure channels.ini
-
In Windows Explorer, locate the Viz Multichannel’s directory where the channels.ini is:
-
For Windows XP this would normally be:
-
C:\Documents and Settings\All Users\Application Data\Vizrt\Multichannel\channels.ini
-
For Windows 7 or Windows Server 2008 R2 and higher (64-bit Windows) this would normally be:
-
%ProgramData%\vizrt\Multichannel\channels.ini
-
-
Open the channels.ini file in the text editor of your choice.
-
The file could be empty if not previously configured.
-
-
Enter each channel as a separate line in the text file.
-
The format is: ChannelName=<IP address>or<hostname>
-
Example: If you have two channels named channel1 and channel2 then the content of channels.ini would be (using a random example ip-address):
channel1=10.10.10.10channel2=20.20.20.20
-
-
Save and close the file. Note: The channels.ini is a normal textfile so make sure you save the file as type text.
-
Add -msehost none to your Viz Multichannel shortcut as explained in Startup Parameters.
See Also
Enabling Logging
Logging will help you troubleshoot issues that may occur. Note that the log produced by Viz Multichannel only reflects what the Media Sequencer attempted to play out (as opposed to what was actually played out).
For more information on how to format the output, see the Media Sequencer manual. See also Logging.
To Enable Logging
-
On the Media Sequencer machine, create the following folder path: %ProgramData%\Vizrt\Media Sequencer to generate a Daily Log.
See Also