
Viz Multichannel
Version 4.0 | Published January 23, 2019 ©
Schedule Collector Integrations
DB
This section contains information on how to configure your DB setup for connecting to a Microsoft SQL, MySQL or Oracle database.
For information on how to configure general options, see the General section of Schedule Collector.
To Configure Connection Settings for DB
-
Open Schedule Collector.
-
Set Automation system to DB.
-
Set Heartbeat Interval (default is every 60 seconds) for how often the Schedule Collector should send a heartbeat query.
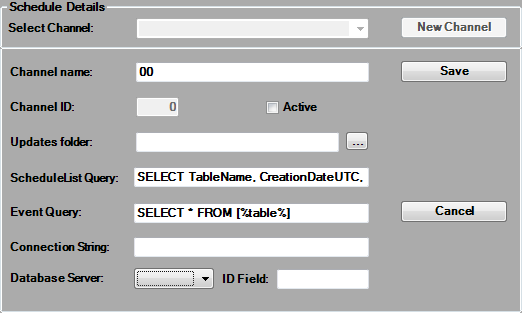
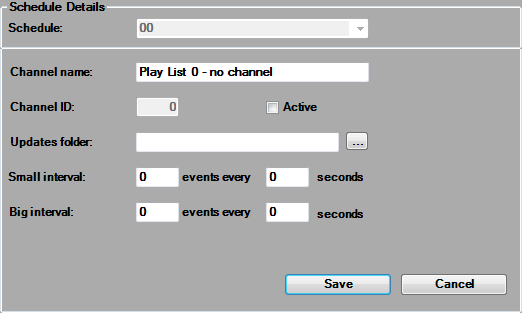
To Configure Schedule Details for DB
-
Open Schedule Collector.
-
Click the New Channel button.
-
Set Channel Name.
Note:Channel ID is automatically set.
-
Set to Active to activate this channel setting.
-
Set the Updates Folder where the Schedule Collector will create its playlists.
-
Enter the ScheduleList Query.
-
This query must query the database for available schedule table names, creation dates and when last modified. The selected table name is then used by the Event Query.
-
Use the following syntax in your SQL statement (e.g. SELECT TableName, CreationDateUTC, LastModificationTimeUTC FROM [table name]).
-
-
Enter the Event Query.
-
This query must query the data from the selected schedule table name provided by the ScheduleList Query.
-
Use the following syntax in your SQL statement (e.g. SELECT * FROM [%table%]), where [%table%] is required.
-
-
Enter the database Connection String.
-
Select a Database Server:
-
Microsoft SQL
-
MySQL
-
Oracle
-
-
Enter the ID Field that stores the schedule table name.
-
Click Save.
Harris
This section contains information on how to configure your D-Series system from Harris Broadcast.
To Configure Connection Settings for Harris
-
Open Schedule Collector.
-
Set Automation system to Harris.
-
Open Schedule Collector’s configuration file
-
Windows XP: %ProgramFiles%\vizrt\Viz Multichannel\Tools\Schedule Collector\ScheduleCollector.config
-
Windows 7: %ProgramData%\Vizrt\Multichannel\ScheduleCollector\ScheduleCollector.config
-
-
Set General.ExtraConfigFiles to Bxf.config.xml.
<add key="General.ExtraConfigFiles"value="Bxf.config.xml"/> -
Save and close the file.
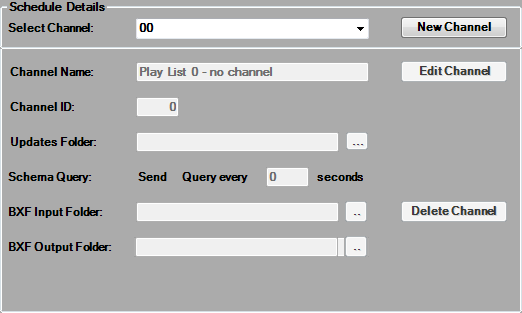
To Configure Schedule Details for Harris
-
Open Schedule Collector.
-
Click the New Channel button.
-
Enter the Channel Name as defined by the Harris automation system.
-
Enter the unique Channel ID for the channel as defined by the Harris automation system.
-
Ensure that Channel ID is identical to Viz Multichannel’s Channel Name in Schedule.
-
-
Enter the Updates Folder path.
-
This is the path where updates will be received. Make sure you select an existing folder as Schedule Collector will not create on for you.
-
-
For the Schema Query, under Query Interval, enter the desired interval in seconds.
-
In the BXF Input Folder field, enter the path for protocol input files. This must be an existing folder, and must match the corresponding folder in the Harris automation system.
-
In the BXF Output Folder field, enter the path for protocol output files. This must be an existing folder, and must match the corresponding folder in the Harris automation system.
-
Click Save.
-
Repeat this procedure for each Harris channel, as required.
Multi DB
This section contains information on how to configure your DB setup for connecting to a Microsoft SQL, MySQL or Oracle database in case you have multiple database instances running on your server (and you do not want to use the default database).
For information on how to configure general options, see the General section of Schedule Collector.
To Configure Connection Settings for Multi DB
-
Open Schedule Collector.
-
Set Automation system to Multi DB.
-
Set Heartbeat Interval (default is every 60 seconds) for how often the Schedule Collector should send a heartbeat query.
To Configure Schedule Details for Multi DB
-
Create an XML file and name it Extra.config.xml.
-
Add the XML file to the SCC folder in your Viz Multichannel installation directory.
-
Use the sample XML below to configure a connection to your multi DB instance. Example:
<MultiDBConfigs><QueryIDField>EventUniqueID</QueryIDField><ConnectionString>Data Source=hostname;Initial Catalog=FLORICAL_SCHEDULES_MAX;User Id=name;Password=123456;</ConnectionString><QueryForOnAirEvent>SELECT * FROM [FLORICAL:ARL:MAX1:2011:02:25]</QueryForOnAirEvent><QueryForEvent>SELECT * FROM [FLORICAL:ARL:MAX1:2011:02:25]</QueryForEvent></MultiDBConfigs> -
Set QueryIDField to be the column name in the database that stores Event IDs.
-
Set ConnectionString to be specify the database instance you are connecting to.
-
Set QueryForOnAirEvent to query for on-air events.
-
Set QueryForEvent to query for a list of events to create the playlist.
-
Open Schedule Collector.
-
Click the New Channel button.
-
Set Channel Name.
Note:Channel ID is automatically set.
-
Set to Active to activate this channel setting.
-
Set the Updates Folder where the Schedule Collector will create its playlists.
-
Enter the database Connection String.
-
Set the Small and Big intervals for how many and how often Schedule Collector should query the database for new or updated events.
-
Select a Database Server:
-
Microsoft SQL
-
MySQL
-
Oracle
-
-
Click Save.
VMC-Omnibus
You can configure your Omnibus systems from Miranda Technologies; Automation can be configured in one of two ways:
Omnibus General Automation
To Configure Connection Settings for Omnibus

-
Open Schedule Collector.
-
Set Automation system to Omnibus.
-
Enter the Omnibus machine’s Host Address.
-
Enter the listener Port number, default is 10540.
-
In the Views List field, enter a comma-separated list of the views defined in the Omnibus Adaptor for the relevant channels.
To Configure Update Settings for Omnibus
-
Open Schedule Collector’s configuration file
-
Windows XP: %ProgramFiles%\vizrt\Viz Multichannel\Tools\Schedule Collector\ScheduleCollector.config
-
Windows 7: %ProgramData%\Vizrt\Multichannel\ScheduleCollector\ScheduleCollector.config
-
-
Set General.OmnibusConnectionMode to IntervalsConnection or ConstantConnection.
-
Constant connection: Schedule Connector stays connected until you choose to disconnect.
-
Intervals connection: Schedule Connector connects, gets the full schedule and disconnects for every interval.
-
-
Set General.CacheIgnoreFields to story/mosExternalMetadata/mosPayLoad/currentTime,story/mosExternalMetadata/mosPayLoad/status.
-
Save and close the file.
To Configure Schedule Details for Omnibus

-
Open Schedule Collector.
-
Click the New Channel button.
-
Enter the Channel Name as defined by the Omnibus Adaptor.
-
Enter the unique Channel and Backup Channel IDs for the channel as defined by the Omnibus Adaptor.
-
Ensure that Channel ID is identical to Viz Multichannel’s Channel Name in Schedule (see the General Settings section).
-
-
Enter the Updates Folder path.
-
This is the path where updates will be received. Make sure you select an existing folder as Schedule Collector will not create on for you.
-
-
Click Save.
Note: Repeat the above procedure for each Omnibus channel, as required.
Omnibus BXF iTX Automation
To Configure Connection Settings for Omnibus BXF

-
Open Schedule Collector.
-
Set Automation system to OmnibusBXF.
-
Enter the link to your Web Service.
-
Enter the number of days to get the playlists for in the LookAhead field.
-
Enter a value to determine the Polling Interval, in seconds, to poll the automation system for changes.
-
Optional: Enable Live Item Update if you want to receive live updates from the your web service.
-
Enter the Date(xPath) path in the XML that defines the event date.
-
Example: /BxfMessage/BxfData/Schedule/ScheduledEvent/ScheduleElements/EventData/StartDateTime/SmpteDateTime/@broadcastDate
-
See Playlist Structure for a more complete XML example.
-
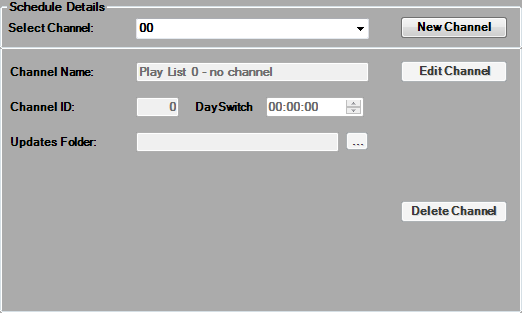
To Configure Schedule Details for Omnibus BXF
-
Click the New Channel button.
-
Enter the Channel Name as defined by the Omnibus Adaptor.
-
Enter the unique Channel ID for the channel as defined by the Omnibus Adaptor.
-
Ensure that Channel ID is identical to Viz Multichannel’s Channel Name in Schedule.
-
-
In the *Day Switch *field, enter the day switch as defined in the Day Switch Options.
-
Enter the Updates Folder path.
-
This is the path where updates will be received. Make sure you select an existing folder as Schedule Collector will not create on for you.
-
-
Click Save.
-
Repeat this procedure for each Omnibus BXF channel, as required.
Playlist Structure
<BxfMessagae> <BxfData> <Schedules> <Channel><Name>AChannel</Name></Channel> <Scheduled> <EventData> <EventId>id</EventId> … (other info) </EventData> </Scheduled> </Schedules> </BxfData></BxfMessagae>Channel name and event ID are highlighted, and checked by the Schedule Collector. All the rest of the event information and is checked in Viz Multichannel according to the mapping.
Another alternative is to use different field names instead of the Schedules/Scheduled/EventData is Schedule/ScheduledElements/EventData. However, it is worthwhile to run tests with examples to verify first. Sample structures can be found in Harris documentation.
An example of the second type with primary/secondary events:
<BxfMessagae><BxfData> <Schedule> <Channel><Name>AChannel</Name></Channel> <ScheduledEvent> <ScheduleElements> <EventData eventType=”Primary-ProgramHeader”> //Primary event <EventId> <EventId>id</EventId> </EventId> //GUID <PrimaryEvent> <ProgramEvent> <SegmentNumber>1</SegmentNumber> <ProgramName>Eve News</ProgramName> //Title </ProgramEvent> </PrimaryEvent> <StartDateTime></StartDateTime> //Smpte date-time format <LengthOption> <Duration></Duration> //Smpte time format </LengthOption> <StartMode>Fixed</StartMode> <EndMode>Duration</EndMode> <PrivateInformation></PrivateInformation> //Custom data area. E.g. you can place reconcilekey or anything you like </EventData> <Content></Content> //SOM, Duration, and other info </ScheduleElements><ScheduledElements> <EventData eventType=”NonPrimary”> //Secondary event <NonPrimaryEvent></NonPrimaryEvent> //Similar to primary – holds id, offset details, other info </EventData> </SceduledElements></ScheduledEvent> </Schedule></BxfData></BxfMessagae>An example for the SMPTE date-time format:
<StartDateTime nominalFlag="false"> <SmpteDateTime broadcastDate="2006-10-01"> <SmpteTimeCode>15:52:30:00</SmpteTimeCode> </SmpteDateTime></StartDateTime>PBS
To Configure Connection Settings for PBS

-
Open Schedule Collector.
-
Set Automation system to PBS.
-
Enter the PBS machine’s Host.
Note: The host machine will always be given priority in connections.
-
Enter the listener Port number, default is 10600.
-
Enter the Heartbeat Interval time, in seconds.
-
This allows the Schedule Collector to indicate to the PBS automation system it is still “alive”, even if no updates have been requested.
-
-
Enter the PBS backup machine’s Backup host.
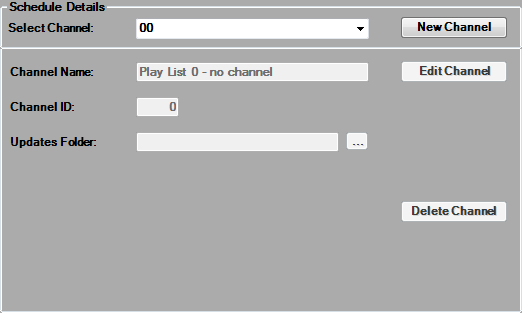
To Configure Schedule Details for PBS
From the Schedule drop-list, select a schedule.
-
Click Edit Channel.
-
Enter the Channel name as defined by the PBS automation system.
-
Enter the unique Channel ID for the channel as defined by the PBS automation system.
-
Ensure that Channel ID is identical to Viz Multichannel’s Channel Name in Schedule.
-
-
Optional: Enable Active.
-
This will enable automatic updates.
-
-
Enter the Updates folder path.
-
This is the path where updates will be received. Make sure you select an existing folder as Schedule Collector will not create on for you.
-
-
For minor but frequent updates, under Small interval, enter the number of events to be received within an indicated time frame. Zero events and/or zero seconds disables this update option.
-
For major but infrequent updates, under Big interval, enter the number of events to be received within an indicated time frame. If also updating minor events, ensure that the Big Interval is greater than the Small Interval. Zero events and/or zero seconds disables this update option.
-
Click Save.
Note: Repeat the above procedure for each PBS channel, as required.
SGT
To Configure Connection Settings for SGT
-
Open Schedule Collector.
-
Set Automation system to SGT.
-
Enter the link to your Web Service.
-
Enter the Client ID.
To Configure Schedule Details for SGT

-
Open Schedule Collector.
-
Click the New Channel button.
-
Enter the Channel Name as defined by the SGT automation system.
-
Enter the unique Channel ID for the channel as defined by the SGT automation system.
-
Ensure that Channel ID is identical to Viz Multichannel’s Channel Name in Schedule.
-
-
Enter the Updates Folder path.
-
This is the path where updates will be received. Make sure you select an existing folder as Schedule Collector will not create on for you.
-
-
Click Save.
BXF Support
All messages come with root tag of <bxfmessage>. This root message comes with various information, like origin m+target machine, user name and others. Viz Multichannel supports these fields, and rejects messages aimed to other machines, but does not require them.Viz Multichannel can also check that this info matches the bxf file name (also according to the spec) but this is also not a requirement.
One important field is messageType. Viz Multichannel identifies Heartbeat/Information/Reply/Acknowledgement/ from it. If the message is Heartbeat/Reply/Acknowledgement then the field originId must match an ID of a Heartbeat/Query that Viz Multichannel has sent to the automation. When Viz Multichannel replies to such messages, it also includes the correct originId in the reply.
In short, every message (from both sides) is automatically answered by Acknowledge. Viz Multichannel receives information messages, or sends a Query and receives a Reply (both with playlist updates). Viz Multichannel also handle Heartbeats.
The following types of messages are handled:
-
Viz Multichannel receives Hearbeat -> Viz Multichannel returns Acknowledge.
-
Viz Multichannel sends Heartbeat -> Viz Multichannel accepts its Acknowledge.
-
Viz Multichannel sends Query for update -> Viz Multichannel accepts Acknowledge for it.
-
Viz Multichannel receives Information with playlist -> Viz Multichannel sends Acknowledge for it (and processes the playlist).
-
Viz Multichannel receives Reply with playlist (answer to Query Viz Multichannel sent) - > Viz Multichannel sends Acknowledge for it (and processes the playlist).
-
Viz Multichannel receives Query -> Viz Multichannel sends Acknowledge (reject).
-
Viz Multichannel receive any other message -> Viz Multichannel sends Acknowledge (reject).