
Viz Multichannel
Version 4.0 | Published January 23, 2019 ©
Schedule Collector
The Schedule Collector and Playlist Importer are both installed with Viz Multichannel.
The Schedule Collector communicates with the scheduling or the automation system, queries the current running automation-system’s schedule, and checks if anything is different from the last time queried. If a change is found, it creates an updated file for the Playlist Importer to update Viz Multichannel. The Schedule Collector then triggers the Playlist Importer to ingest the actual schedule.
Optionally, Viz Multichannel can be down and the live update functionality still runs (Media Sequencer and the Schedule Collector are prerequisites in this scenario).
There are minor configuration differences between one automation system and the next. In most cases, configuration can be done directly from the application. There are a few exceptions, where parameters can only be changed in the .config file.
Configuration is usually done only once, allowing the Schedule Collector to simply work in the background afterwards; however, if you need to do changes simply stop it, configure it, and then start it again. The procedures for respective automation system are described in the section .
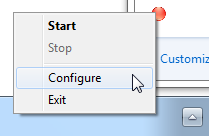
Note: The Schedule Collector runs as a service. To start, stop, and configure the service use the system tray icon.
Installation and Startup
Viz Multichannel’s Schedule Collector is a separate installer that installs itself as a service, and once installed is available from the system tray. To see the tray icon you need To run Schedule Collector once.
Note: The Playlist Importer is part of the Viz Multichannel client installer.
To Install Schedule Collector
-
Double-click the installer: VizMultichannel_SCC<version>.msi (For example: VizMultichannel_SCC<XXX>.<bbbb>.msi where <XXX> is the release number and <bbbb> is the build number).
-
Click Next.
-
Optional: Change the default installation path.
-
Windows XP: %Program Files%\vizrt\Viz Multichannel\Tools\Schedule Collector
-
Windows 7: %ProgramData%\Vizrt\Multichannel\ScheduleCollector
-
-
Click Next.
-
Click Install.
-
Click Finish.
To Run Schedule Collector
-
Open the Windows Start menu.
-
Run Viz Multichannel - Schedule Collector Monitor found under Vizrt -> Viz Multichannel.
General Configuration
This section describes how to start configuring the Schedule Collector, and how to configure general options that apply to all automation systems.
To Configure Schedule Collector
-
From the system tray, right-click the Schedule Collector icon and from the appearing context menu select Stop and then Configure.
To Configure General Options for Omnibus
-
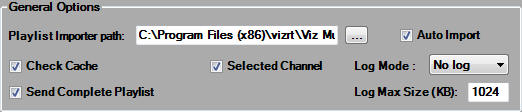
Optional: Enter the Playlist Importer Path if Auto Import will be enabled.
-
Enter the path on the Viz Multichannel machine (i.e. usually the master control room client) where the Playlist Importer application is located.
-
-
Optional: Enable Check Cache.
-
This will improve performance by updating changes only.
-
-
Optional: From the Log Mode drop-list, select if logs should be generated.
-
No log: No log is created (default).
-
Basic log: Logs basic activities.
-
Full log: Logs sent and received message contents. This option should only be used for troubleshooting. Deactivate once no longer needed.
-
-
Optional: Enable Selected Channel.
-
This will import only for the selected channel (defined in the Schedule Details section).
-
To import for all channels, uncheck it.
-
-
Optional: Enable Send Complete Playlist (OmnibusBXF only).
If working in MCR mode (see Master Control Workflow), in the ScheduleCollector.exe.config file add the value -msehost none to General.ImporterParameters.
<add key="General.ImporterParameters" value="-msehost none" />Integrating to Schedule Collector
See the section Schedule Collector Integrations for details of the additional configuration of the respective connections: