
Viz Multichannel
Version 4.0 | Published January 23, 2019 ©
Working with Video Clips
Viz Multichannel integrates with Viz One which allows you to add video clips to your graphics, and conversely. Graphics with video clips can be added to the playlist as secondary events.
Note that video clips as primary events can only be imported to the playlist from the schedule. Video clips as secondary events may be manually added to the playlist; however, it is more common to import them from the schedule.
In order to preview video clips locally you need to install and configure the relevant codecs (see Video Preview Configuration). In order to work with graphics and video clips together you also need to have a Preview Server configured and running.
This section contains information on the following topics:
Preview of Video Clips
Preview of a video clip inside Viz Multichannel is based on a low-resolution proxy version streamed from Viz One.
Note that in order to preview video clips locally you need to install and configure the relevant codecs (see Video Preview Configuration).
Video Clips in Playlists
Note that video clips as secondary events may be manually added to the playlist; however, it is more common to import them from the schedule.
To Add Video Clips to the Playlist
-
Select your channel.
-
Click the Playlists button and open your playlist.
-
Click the Video Clips button.
-
Search for a video.
-
Drag and drop your video placing it as a secondary event.
-
Double-click the video to preview it in the Timeline Editor.
Video Clips and Graphics
Viz Multichannel supports two ways of combining graphics and video. You can either add graphics on top of a video clip, or you can add video to graphics.
Note that in order to work with graphics and video clips together you also need to have a Preview Server configured and running.
To Add Graphics to Video Clips
-
Select your channel
-
Click the Playlists button and open your playlist.

-
Add a video clip as a secondary event (see how To add video clips to the playlist).
-
Add a page to the video clip (see how To manually add a page to the playlist).
-
This will add the page as sub element of the video clip, grouping them together.
-
If the page does not have a default duration set, you can set one by editing the page’s Duration column.
-
-
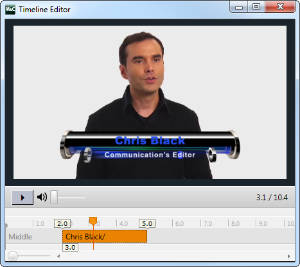
Double-click the video clip to open the Timeline Editor.
-
This will allow you to adjust the offset and duration of the graphics.
-
To Add Video Clips to Graphics
-
Select your channel.
-
Click the Templates and Pages button.
-
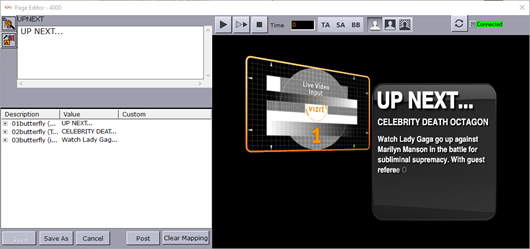
Open your template or page to open the Page Editor.
-
Select the tab field that will hold the video.
-
This will open the video search frame.
-
-
Search for and select (e.g. double-click) a video.
-
If the clip channel is set to automatically play the video you should be able to see a low-resolution version of the video.
-
-
Click Save As and enter a new page name.
See Also