
Viz Multichannel
Version 4.0 | Published January 23, 2019 ©
Scheduling
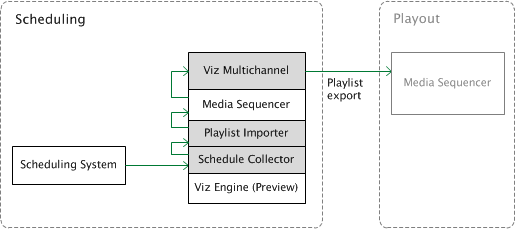
A typical installation includes one Viz Multichannel and a local Viz Engine. In addition you typically install Viz Multichannel’s Schedule Collector (SCC) and Playlist Importer (PLI) in order to collect and import playlists through mapping settings into Viz Multichannel.
Viz Engine is used for preview and is typically a VGA version without SDI out capabilities. This setup allows the Scheduling Center to prepare and preview playlists before sending them to playout by the program Viz Engine(s).
The following software components are in use:
-
Viz Multichannel client
-
Viz Multichannel’s Schedule Collector (SCC)
-
Viz Multichannel’s Playlist Importer (PLI)
-
Viz Engine (local preview)
-
Media Sequencer
Installation for Scheduling
The machine in the Scheduling must have the following software components installed:
-
Viz Multichannel client
-
Viz Multichannel’s Schedule Collector
-
Viz Multichannel’s Playlist Importer
-
Media Sequencer
-
Viz Engine (preview)
IMPORTANT! Ensure that clocks on all machines in the installation are synchronized! It is also recommended to set all date formats on all machines to the same format.
To Install Viz Multichannel Client
-
Start the Viz Multichannel installer
-
Click Next
-
Select Complete and click Next
-
Select Custom if a different install path is needed.
-
-
Click Install
-
Click Finish
To Install Media Sequencer
-
Start the Media Sequencer installer
-
Click Next
-
Click Next
-
Select features and/or a different install path if needed.
-
-
Click Install
-
Put shortcuts on the desktop if needed.
-
-
Click Finish
To Install Viz Engine
Viz Engine is used for local preview, hence, you only need to install a VGA version.
-
Start the Viz Artist/Viz Engine installer
-
Click Next
-
Check the I accept the terms in the License Agreement check box and click Next
-
Click VGA
-
Click Next
-
Select features and/or a different install path if needed.
-
-
Click Install
-
Click Finish
See Also
-
Vizrt’s Documentation Center