
Graphic Hub Administrator Guide
Version 3.1 | Published July 11, 2018 ©
Preferences
The Preferences window, located under Tools > Edit Preferences, shows all the system preferences and is divided into the following panes:
General
The General preferences consist of:
-
Login
-
Login Profiles
-
Timeouts and Buffer Settings
-
Deploy Direct Copy
-
Startup
-
Look
Login
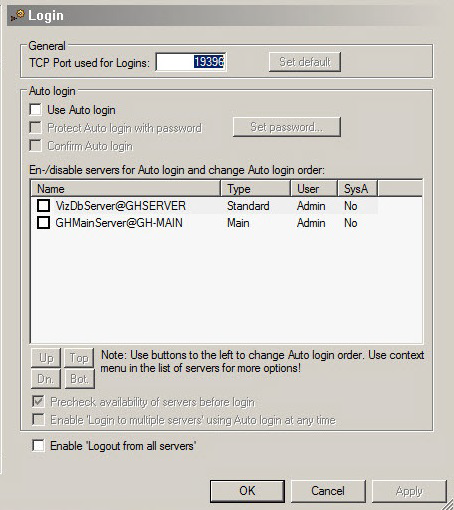
In the Login panel, set the Start-up and Login preferences.
-
TCP Port used for Logins: Sets a TCP port to be used for Log-ins. Click Set default to set the TCP Port back to its default value (19396)
-
Auto Login:
-
Use Auto Login: Enables Auto Login when box is checked.
-
Protect Auto Login with Password: Sets a master password for auto Login.
-
Confirm Auto Login: Checks to require login confirmation for the Graphic Hubs which are part of the Auto Log-in list.
Note: This option is not available if Protect Auto Login with Password is enabled. When Protect Auto Login with Password is checked, automatic login is disabled.
-
-
En-/disable servers for Auto login and change Auto login order: Selects which servers to use Auto Login.
-
Up/Dn./Top/Bot.: Changes the Auto login order of available servers.
-
Pre-check availability of servers before login: Contacts servers designated for Auto login before actual login when selected. If they cannot be contacted, they will automatically be unchecked for Login and diagnostic info will show in the according line of the server in the login window.
-
Enable 'Login to multiple servers' using Auto login at any time: Provides the option Login > to multiple servers in the main menu, under Server when selected.
-
Enable 'Logout for all Servers': Provides the option Logout > from all servers in the main menu, under Server when selected.
Note: Complete automatic login to Graphic Hubs will only be available if Auto login is not protected with a (master) password, if a Login profile does not exist and if Confirm Auto log-in is not checked. And even if all those conditions apply, automatic login will not be started if Precheck availability of servers before login is ticked and not all of the servers seem to be available for some reason.
Login Profiles
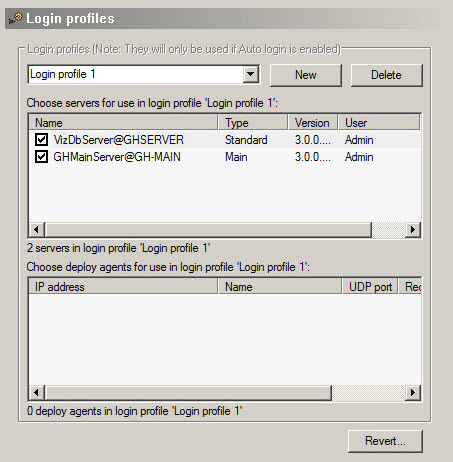
Click this tab to configure different Login Profiles for use with Auto Login. Use Login Profiles to configure which servers and associated Deploy Agents should be logged onto by Auto Login.
-
Login profiles: Selects, creates or deletes login profiles.
-
Choose servers for use in login profile <login profile>: Selects which servers to include with the login profile.
-
Choose deploy agents for use in login profile <login profile>: Selects which Deploy Agents to include with the login profile. If no Deploy Agents are selected for the Login Profile, Deploy Agent configuration and deploy tasks will be unavailable for the duration of session. If no Deploy Agent is configured in the Agents section, this list will be empty.
-
Revert: Reverts settings before Apply or OK is clicked, if required.
Timeouts and Buffer Settings
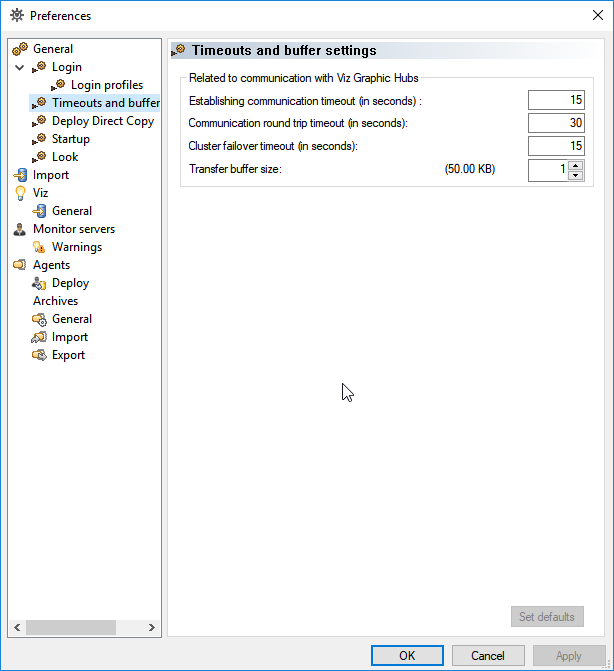
From this panel it is possible to define various timeout values related to communication with Graphic Hubs. Changing the values of the timeout settings may have a significant impact on how the Deploy Agent works. The default values should only be changed if the Deploy Agent has problems with servers connected through a slow or congested network, or that have an unusually high server load. Increasing the timeout values may solve the problems in such cases. Decreasing the values will not improve the general performance of the agent, and is not recommended.
-
Related to communication with Graphic Hubs:
-
Establishing communication timeout (in seconds): Sets the maximum amount of time for a Deploy Agent to connect to a server. If the server does not respond in this set time, due to network characteristics or server load, it will be considered as offline.
-
Communication round trip timeout (in seconds): Sets the maximum amount of time for the Deploy Agent to wait for a reply from the server. If the server does not respond in this set time, due to network characteristics or server load, the affected task may be paused by the Deploy Agent.
-
Cluster failover timeout (in seconds): Specifies the period that a task is waiting for a notification from the failover server to switch over if a main server becomes unavailable. If this time exceeds, the agent will manually try to connect to the failover server. This option is relevant for Deploy Agents that operate in a setting with a failover server.
-
Deploy Direct Copy
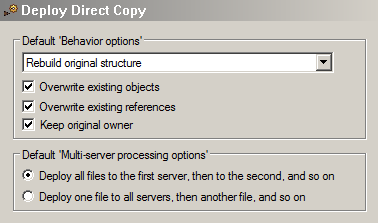
In the Deploy Direct Copy panel set the Direct Deploy Copy defaults.
-
Default Behavior options: Set the defaults for Deploy Direct Copy:
-
Rebuilds original structure,
-
Rebuilds structure under target folder,
-
Copies to target folder only.
-
-
Overwrite existing objects: Overwrites files with the same name existing in the target folder.
-
Overwrite existing references: Overwrites the file references if the same file name exists in the target folder.
-
Keep original owner: Keeps the original owner of deployed files when selected. If the file existed already on the server, the owner of the pre-existing file will be kept.
-
Default Multi-server processing options:
-
Deploys all files to the first server, then to the second, and so on.
-
Deploys one file to all servers, then another file and so on.
-
Startup
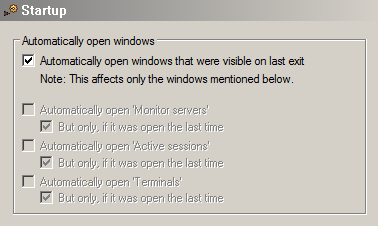
In the Startup panel, specify if the listed windows should automatically open on a new start of the Graphic Hub Manager. Also, specify if this should depend on if those windows were open when the Graphic Hub Manager was last exited.
-
Automatically open windows that were visible on last exit: Opens all windows listed below, if they were open on the last exit when selected. If not ticked select which windows to open from the list below:
-
Automatically open 'Monitor servers' / 'Active sessions' / 'Terminals': Opens a window on start-up when selected.
-
But only if it was open the last time: Opens the window at start up only if it was open on last exit.
-
Look
In Look panel set the style of the User interface.

-
Visual Style: Sets the user interface style from the drop-down list
-
Docking Tab Colors: Assigns tab colors in the GUI
Import
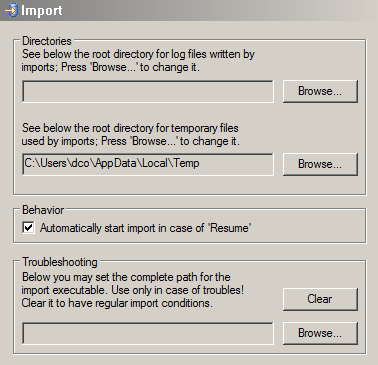
In the Import panel, set the data directory for log files and temporary files used for the import of Viz 2.x data and archives (see Import Viz 2.x Data and Archives).
It is also possible to disable the auto-import when an import resumes after a canceled or crashed import procedure.
-
Directories: Shows the root directories for log and temporary files. Select Browse to change the directories if required.
-
Behavior: Starts import automatically if the system is resumed when selected.
-
Troubleshooting: Shows the location of an alternate import executable ( 'viz_import.exe') if there are problems with the Graphic Hub Manager.This field normally should be empty.
Note: This alternate import executable could either be an older one than the one that came with the installation or a newer/updated one sent out by Vizrt.
Viz
General
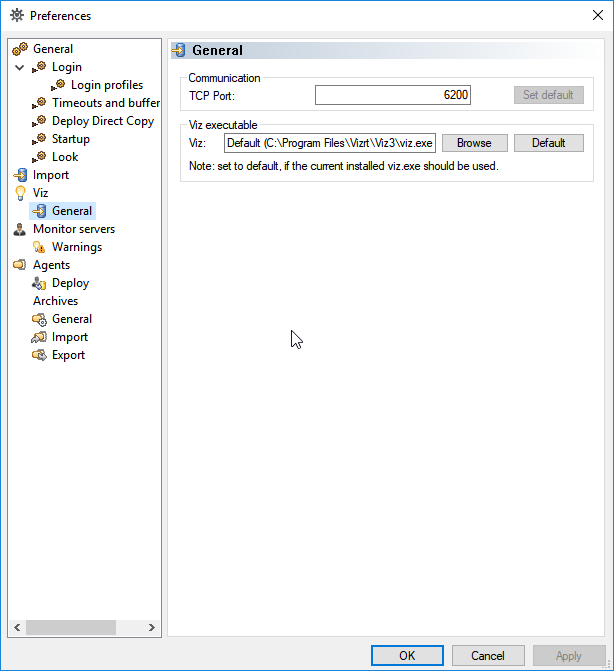
In the Viz panel, define the TCP port and Viz executable to use within the "Re-save with viz..." dialogue in the files, folder or search results view. This enables Graphic Hub Manager to send transfer control protocol commands to the viz executable to re-save files and folders.
Monitor Servers
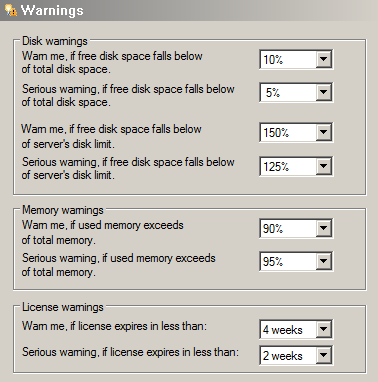
In the Monitor Servers panel, define various disk and memory warnings, related to free disk space/memory. It is also possible to define warnings when the license expiration date approaches.
Warnings
Agents
The Agents panel is used to set the preferences for automatic updates on running Deploy Agents.
Deploy
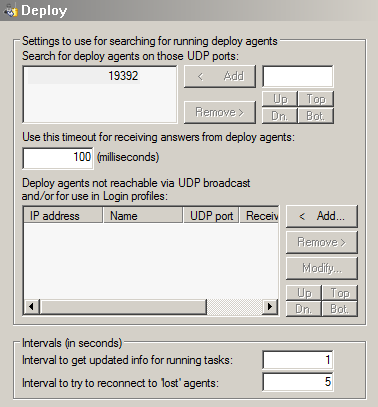
-
Search for deploy agents on these UDP ports: Enter the UDP port where to search for available Deploy Agents. Deploy agents are configured to listen on port 19392, by default. If they are configured to listen on another port, this port should be added here
Note: With a UDP search, the Graphic Hub Manager will only find Deploy Agents which listen on the ports which are added here, and only those which are running on machines within the same subnet as the machine running the Graphic Hub Manager itself.
-
Use this timeout for receiving answers from deploy agents: Sets the timeout (milliseconds) for a Deploy Agent search. Default is 100 ms.
Tip: If there are problems with the network condition, try to increase the default value.
-
Deploy agents not reachable via UDP broadcast and/or for use in Login Profiles: Manages Deploy Agents (Add, Remove, Modify or change the order of listed Agents) that are running on a machine, which is outside the subnet of the machine on which the Graphic Hub Manager is running.
If Deploy Agents are to be used in Login Profiles, they must be added here even if they are on the same subnet.
When Add or Modify is clicked it opens the Deploy Agent window: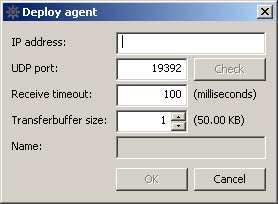
-
IP address: Enter an IP address or host name.
-
UDP port: Enter the UDP port number.
-
Received timeout: If the Deploy Agent does not answer in the given timeout or does so only sometimes, you may increase this timeout value here to make sure that the Graphic Hub Manager can always contact the Deploy Agent.
-
Name: Name of the host/machine (auto filled).
-
-
Intervals (in seconds): Timeouts for answers from Deploy Agents:
-
Interval to get updated info for running tasks: Sets the interval, in seconds, in which updated information about tasks executed by the Deploy Agents should be requested.
-
Interval to try to reconnect to lost agents: Sets the interval, in seconds, in which the Graphic Hub Manager should try to recontact Deploy Agents for which communication with them was broken.
Archives
In the Archives panel set the preferences for the import and export of Archives as well as some general preferences.
General Preferences
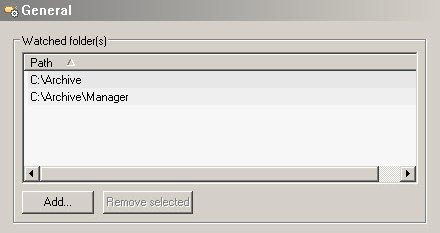
-
Watched folders: Lists all Watched folders.
Note: The Archives view will automatically list all (Viz 3.x) archives (extension 'via') which it finds in any of the given watched folders. Sub-folders of watched folders are not automatically watched, make sure to specify each single folder, as required.
-
Add...: Adds a new Watched folder.
Tip: If a folder shows as yellow, there are no Viz Archives in that folder. If a folder shows as red, it currently is not accessible or does not exist.
-
Remove selected: Removes a Watched Folder (this removes the folder as a Watched folder, but the folder will stay in the Graphic Hub Manager Customization).
Import Preferences
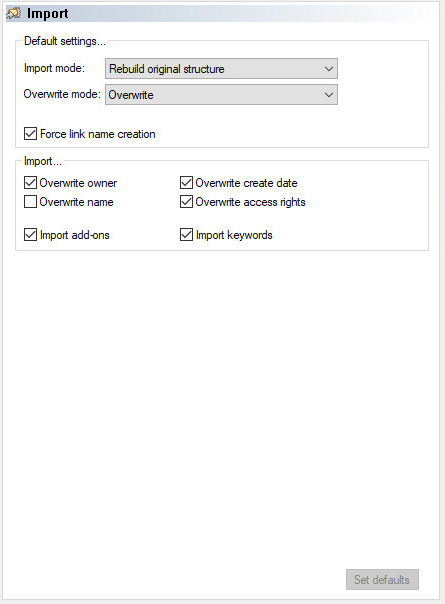
Default settings...
-
Import mode: Sets the import mode:
-
Rebuilds original structure.
-
Rebuilds structure under target folder.
-
Copies to target folder only.
-
-
Overwrite mode: Sets the overwrite mode:
-
Overwrite: Overwrites all files on import. Files will not be overwritten if the destination file has exactly the same content.
-
Duplicate: Imports with a new file name if a file with the same name exists.
-
Skip: Does not import if a file already exists.
-
Force link name creation: Creates links to all links from the original and imported file if the file to be imported has the same data, but has different file links.
Overwrite options (Overwrite owner, name, create date, access rights): Defining whether the previous owner, name, create date or access rights of the file should be overwritten with the current owner, name, create date, access rights after a successful import. If the file already existed on the target server the parameters of the existing file are kept and not overwritten. The file parameters on the target server are overwritten if a successful import did happen and the file was newly created on this server.
-
Select which data from the source file will be applied at import:
-
Overwrite owner.
-
Overwrite name.
-
Overwrite create date.
-
Overwrite access rights.
-
Import add-ons.
-
Import keywords.
-
As these settings are under the import section, they change the parameters of the file being imported.
For example, if a file has a Owner = Owner1 and Creation Date = yesterday and you import it to another server today, then:
-
If the settings Overwrite Owner and Overwrite Creation Date are set, the Owner is changed to Owner2 and Creation Date is changed to today at successful import.
The overwrite is not file-based, it is based on the file parameters selected at import.
Export Preferences
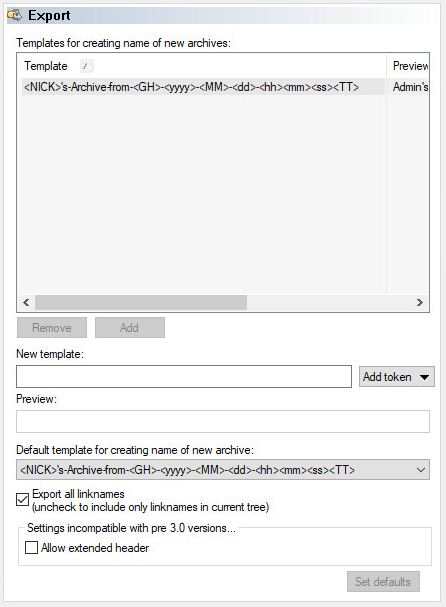
In the Archives Export panel, create new and view Archive export Templates.
-
Templates for creating name of new archives: Selects a template from the list.
-
Remove: Removes a selected template.
-
Add: Adds a new template. First create the new template in New Template.
-
-
New template: Creates a new template. Select tokens to add from the Add token drop-down (use separators as required between the tokens).
-
Preview: Shows a preview of the new template.
-
Default template for creating name of new archive: Selects a default Template from the list of Templates.
-
Export all linknames: Enables an export of all linknames when checked. Unchecking this exports only the linknames from the folder/project, the file is dragged from.
-
Allow extended header: Enables / disables extended header functionality for archive creation.
IMPORTANT: Enable this for a system with all clients at least version 3.0.0. The extended header flag generates incompatible archives for pre 3.0.0 versions.
See Also