
Viz Ticker User Guide
Version 3.1 | Published May 27, 2020 ©
Scrolling Carousels
What characterizes a scrolling carousel is that objects, most often text messages, enter the screen from one side, scroll through the screen, and then exit on the other side. A scrolling carousel scene contains both the design for the background and the templates that are used to create content for the ticker.
Scrolling carousel scenes must contain one or more Scroller plug-ins with belonging directors and stop points.
Tip: If you do not want to perform these steps, scrolling carousel example scenes can be imported by following the instructions in To Import Viz Artist 3 Example Scenes. Note that the design in the example scenes are slightly different from the scene created here, so the name of the scenes, carousels, templates, and so on may vary.
This section contains information on the following topics:
Creating a Scrolling Carousel Scene in Viz Artist
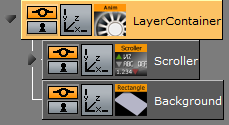
When the tasks in this section have been carried through, this scrolling carousel scene includes a background, a scroller with a text message template, and state transitions for animating the carousel in and out.
Getting Started
Tip: Remember to save scenes in Viz Artist regularly.
-
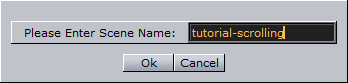
In Viz Artist, create a new scene named tutorial-scrolling.
-
Open the new scene.
-
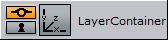
Add a group and rename the group container to LayerContainer.
-
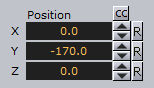
In the Transformation Editor, Position the new group to Y= -170 (note the minus sign).
Adding a Background
To Add a Rectangle
The rectangle functions as the background for the scrolling ticker. The background can be any object, for example a circle, cube, sphere, and so on.
-
Go to Built Ins > Geom Plugins > Default.
-
Add a Rectangle as a subcontainer of the LayerContainer.
-
Rename the rectangle container to Background.
-
Open the Background container’s Transformation Editor and set the Position to Y= -10.
-
Set the Scaling type to S (so that each axis can be scaled by itself).
-
Set the Scaling to X= 8, Y= 0.5, and Z= 1.
To Add Color
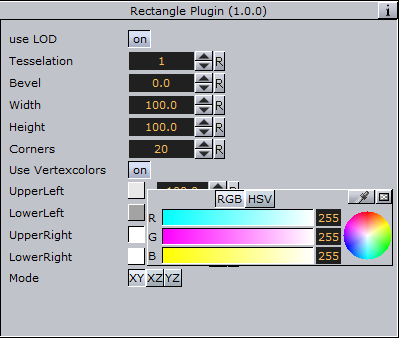
-
Open the Rectangle Editor and enable Use Vertexcolors.
-
Add the following colors:
-
UpperLeft: RGB= 232 .
-
LowerLeft: RGB= 163 .
-
UpperRight: RGB= 255 (default value).
-
LowerRight: RGB= 255 (default value).
-
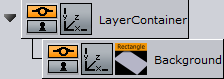
The background then has the following appearance:

To Add the Scroller Plug-in
-
Go to Built Ins > Geom Plugins > Ticker.
-
Add a Scroller plug-in as a subcontainer of the LayerContainer.
Note: The Scroller plug-in is a Viz Artist geometry that generates a dynamic line of scrolling elements, where each element is an instance of a template.
Note: The scroller container name must be different from the Element source in the Scroller Editor.
-
Open the Scroller container’s Transformation Editor and set the Position to Z= 1. This positions the scroller slightly in front of the background to make sure that the scroller content becomes visible on screen.
-
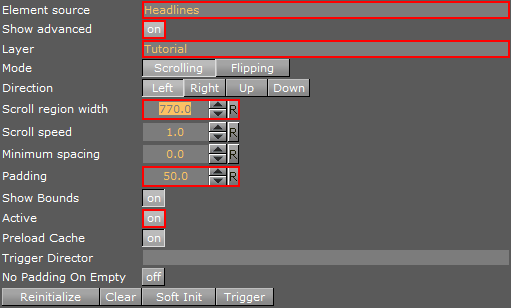
Open the Scroller Editor, and set the following:
-
Element source: Headlines. (Note that the Element source must be identical to the in state stop point of the layer director (not created yet)).
Tip: The element source should consist of alphanumeric characters only. For more details, see Global Conventions .
-
Show advanced: On (enabled).
-
Layer: Tutorial. (Note that the Layer name must be identical to the name of the layer director (not created yet)).
Tip: The layer name should consist of alphanumeric characters only. For more details, see Global Conventions .
-
Scroll region width: 770 . (For output format 16:9, a scroll region width of 770 puts the scroller bounds outside the screen area. This maintains the illusion of a constantly running scroller. For output format 4:3, the scroll region width should be at least 600).
-
Padding: 50 (adds space between messages).
-
Active: On (enabled - activates the scroller).
-
To Add a Director
-
From the Main menu, click Stage.
-
In the Stage Editor that appears, add a Director and name it Tutorial.
The name of the director is identical to the Layer name in the Scroller Editor.Tip: The director name should consist of alphanumeric characters only. For more details, see Global Conventions .
To Add a Stop Point
The director must have at least two stop points, one for the in state (shown on screen) and one for the out state (hidden from screen). Viz Ticker Client creates control buttons based on these stop points. The On button, based on the in state stop point, takes the carousel on air. The Off button, based on the out state stop point, takes the carousel off air.
To equip the director with two stop points, perform the following steps:
-
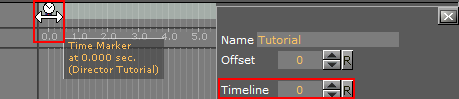
Make sure that the Tutorial director is selected, and the Timeline is set to 0.
-
Click the Add Stop button.

-
Select this stop point in the Stage Editor,
-
In the Name field in the Stop Point editor enter the letter O (capitalized - this is a standard design convention for the out state).
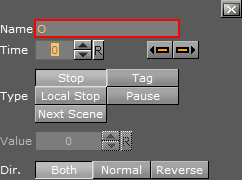
To Add Another Stop Point
-
Select the Tutorial director, and set the Timeline to 50.

-
Click the Add Stop button again, and name the new stop point Headlines. As the O stop point is automatically the out state of the scene, this new stop point is the in state.
Note: The in state stop point name is identical to the Element source in the Scroller editor seen above.
To Add an Animation
To create a simple in/out animation, perform the following steps:
-
Select the LayerContainer in the Scene tree.
-
Make sure the Timeline is at position 50.
-
Click the Set key frame button in the Animation bar.

-
Open the LayerContainer’s Transformation Editor and set the Position to Y= -240 (note the minus sign).
-
Set the Timeline to 0, and click the Set key frame button again.
In the Stage Editor, a new animation has appeared, and the animation can be played.
-
Click the Start and Continue buttons to reset the scene to its out state, and to run the scene to its in state. If the previous tasks have been carried out correctly, a horizontally oblong rectangle object slides upwards into the screen’s lower area.
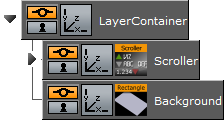
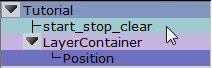
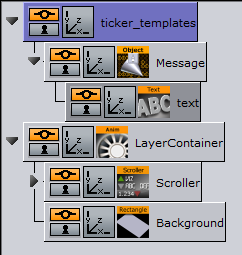
At this point, the scene tree should have the following appearance:
Stopping, Starting, and Clearing the Carousel
When taking a scrolling carousel off air, for example at a commercial break, the messages in the carousel should stop scrolling.
To Add an Action
-
In the Stage Editor select the Tutorial director.
-
Click the Add Action button and name the new action start_stop_clear.
To Add a Keyframe
-
Select the new action in the director tree.
-
Set the timeline to 1, and click the Add a key frame button in the Stage Editor.

A new keyframe is then created close to the time of the scroller’s out state. The action that is performed on this keyframe is not visible On Air as it is only one field away from the out state. This keyframe makes sure that the carousel is stopped when it is taken off air, so that the next message in the carousel after the break is the correct one. If the carousel is not stopped, the carousel continues to run during the break, and then the first message after the break is a random one, according to how long the break has lasted.
-
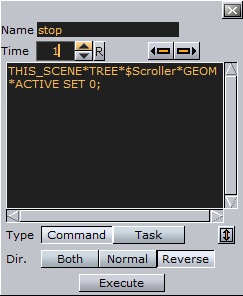
In the Keyframe Editor, change the Name of the new keyframe to stop.
-
Make sure the Time is set to 1.
-
In the big text field, type: THIS_SCENE*TREE*$Scroller*GEOM*ACTIVE SET 0; This command disables the Active option in the Scroller Editor and stops the scroller.
-
Click the Reverse button. This option disables the Active option in the Scroller Editor only when the timer slides leftward.
To Add Another Keyframe
-
Set the timeline to 2.
-
Select the start_stop_clear action in the director tree.
-
Click the Add a key frame button. Another keyframe is created close to the time of the scroller out state. This keyframe makes sure that the carousel is started when it is taken On Air.
-
In the Keyframe Editor that appears, type a Name, for example start_clear.
-
In the big text field, add: THIS_SCENE*TREE*$Scroller*GEOM*ACTIVE SET 1; This command enables the Active option in the Scroller Editor and starts the scroller.
-
In the big text field, also add: THIS_SCENE*TREE*$Scroller*GEOM*clear INVOKE. This command invokes the Clear option in the Scroller Editor, and clears all current messages in the scroller.
-
Click the Normal button. This option enables the Active option in the Scroller editor only when the timer slides rightward. The background is now finished.
Adding a Template
The tasks in this paragraph create a template for messages that should be put on the scroller.
To Add a Group
-
Add a new Group to the scene tree root, at the top of the scene tree.
-
Rename the new group to ticker_templates.
Note: All template containers must be subcontainers of this template root container. It is important to position the ticker_templates container at the top of the scene tree, above the LayerContainer, as the Scroller plug-in caches design. When the scroller needs to cache new design, it searches through the scene tree from the top and downward, and selects the first match it finds. By making sure that all the templates are located above the cache, it is assured that the copied design is originally from a template, and not from a design that is already in the cache.
To Add Another Group
-
Add a new Group as a subcontainer of the ticker_templates container.
-
Rename the new group to Message.
To Add the ControlObject Plug-in
-
Go to Built Ins > Container Plugins > Control.
-
Drag the ControlObject plug-in to the Message container.
Any template that should be edited in Viz Ticker must be equipped with a ControlObject function on the template root container. As the scroller in this scene example rolls text messages across the screen, the template must be equipped with a control function, or else the text would be identical each time a new instance of the template was put on the scroller. -
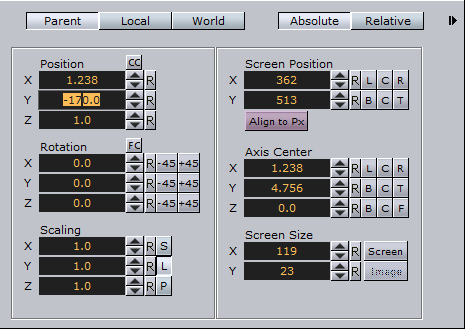
Open the Message container’s Transformation Editor and set the Position to Y= -170 (note the minus sign), Z= 1. When this scene is played in Viz Engine, the template is positioned on the scroller independently of the template’s actual position. The template position is only set here to provide an indication of what the finished scene is going to look like. As the template’s origin is positioned at the right end of the scroller’s x-axis, it is only necessary to set the Z and Y coordinates identically to the scroller coordinates to see how it appears.
The scene tree should now have the following appearance:
To Add a Font
-
From the Main menu, click Server > F (font).
-
Add a font as a subcontainer of Message.
-
Rename the new font container to Text.
-
Open the Text container’s Transformation Editor and set the Scaling to X,Y,Z= 0.33.
To Add a Material
-
From the Main menu, click Server > M (material).
-
Add a material, for example orange R= 255, G= 102, B= 0 , to the Text container.
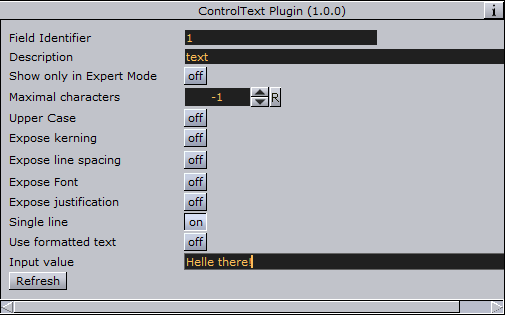
To Add the ControlText Plug-in
-
Go to Built Ins > Container Plugins > Control.
-
Drag the ControlText plug-in to the Text container.
Note: A font template container must hold the ControlText function.
-
In the ControlText Editor:
-
Disable Expose kerning.
-
Disable Use formatted text.
-
Type Hello there! in the Input value text box.
-
To Reposition the Text
The text message is not placed correctly on the scroller. Reposition it by performing the following steps:
-
Open the Message container’s Transformation Editor and set
-
Axis Center Y= C.
-
Position Y= -170.
-
Axis Center X= L.
-
As this template enters the scroller from the right and exits on the left side, it is now accurately left centered.
Note: Leftward scrolling should be left centered (X=L button), rightward scrolling should be right centered (X=R button), upward scrolling should be top centered (Y=T button), and downward scrolling should be bottom centered (Y=B button).
To Hide the Template
-
Click the eye symbol
 on the ticker_templates container. The symbol shows a closed eye
  , which represents a hidden template. If the template had not been hidden, it would appear on the screen in its default shape (with the “Hello there!” text) during playout.
Saving the Scene
The scrolling carousel scene is now finished.
-
Set the scene Timeline to 0.
-
Click the Save button.