
Viz Trio User Guide
Version 3.2 | Published June 29, 2021 ©
Output
To view the Output configuration settings, click Output in the Trio Configuration.
Output Configuration Settings
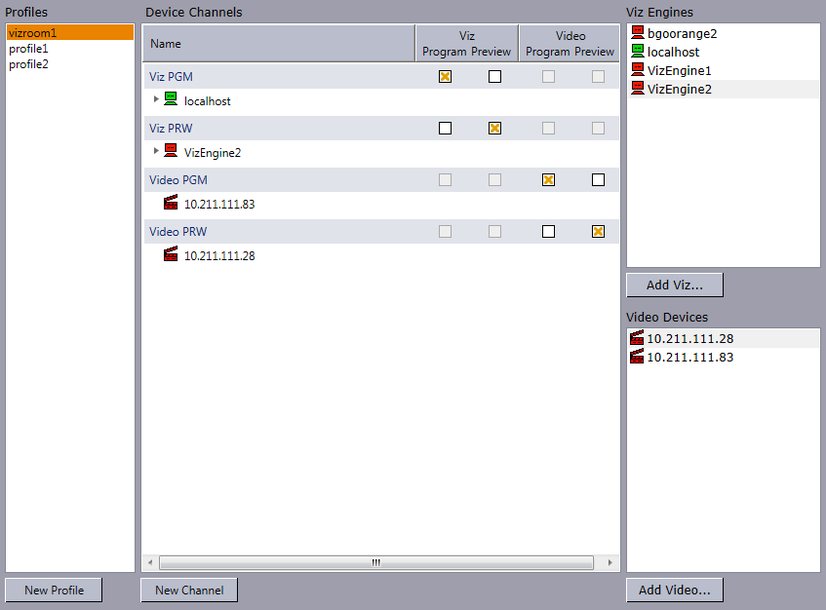
An important part of the output configuration is to create profiles for different purposes. For example; Profile Setups can be created where different channels have the program and preview function. This makes it fast and easy to switch between different output settings.
In the Output channels section, profiles can be defined with different program and preview channels. The most common step is to define a studio with channels mapped to renderer machines (Viz Engine hosts).
Viz Trio setups with more than one Graphical Processing Unit (GPU) may run both preview and program channels locally. The first time Viz Trio starts, and detects more than one GPU, it will automatically add a Viz Engine host named LocalProgramChannel with host localhost:6800. See Viz Trio OneBox Configuration.
Note: The LocalProgramChannel host will only be set once unless the Media Sequencer is reset.
Viz Trio supports four methods of resolving the local program channel. If an unsupported method is used, the Connection Status button will not appear in the Status Bar. Consequently, the operator will not be able to control the local program channel status.
Valid Methods for Resolving the Local Program Channel Name
|
Method |
Comment |
|
localhost |
For the program channel remember to add the port 6800. |
|
127.*.*.* |
Not only 127.0.0.1 refers to localhost. |
|
Hostname |
Name of computer without domain. |
|
IP |
The computer’s IP. If the computer has multiple IPs (e.g. it has multiple network cards), it may still fail. |
IMPORTANT! The computer may have several names (for example in /etc/hosts), but only the NetBIOS name can be used ( the name obtained when running the "hostname" command). The domain name cannot be used (for example: <hostname>.domain.internal).
This section covers the following topics:
Program and Preview Channels
Local preview is Viz Trio’s embedded render window. It is placed in the lower right corner and always shows the last read page. It displays the graphics in a true WYSIWYG manner (what you see is what you get) when editing a page. Text and images are updated immediately when text and images are added to the page. Select which elements to edit by pointing and clicking on them with your cursor directly in the render window.
External preview (optional) is a separate Viz Engine renderer with its own reference monitor that displays a true preview. It shows how the program channel will look like before the page is taken to air.
Program is a separate Viz Engine renderer that renders the content that is taken on-air.
Profile Setups
|
Profile |
Program |
Preview |
|
Main |
A (Viz 1) |
B (Viz 2) |
|
Backup |
B (Viz 2) |
A typical profile setup is a two-channel setup, program and preview, with one render engine assigned to each channel. A more advanced setup is the use of forked execution. As the term suggests, forked execution is a way to configure a single output channel to contain multiple render engines.
Profiles are used to create different setups. An example for when it makes sense to use different setups would be in a backup configuration where a switch from a main renderer to a backup is needed. For example if two output renderers are named A and B, where A is program and B is preview, a profile named "Main" will then have channel A=program and channel B=preview.
A profile named "Backup" could, if the renderer that is acting as program (A) in the "Main" profile fails, have channel B=Program.
The playout can also be controlled through a General Purpose Input (GPI), for instance through hardware such as a vision mixer.
When GPI is enabled, the external cursor (the GPI system’s cursor) will be displayed/shown in any client that is using the same profile as the external system. A typical setup would be that one Viz Trio client is in the same profile as the GPI system, and functions as a "prepare station" for the producer sitting at the vision mixer desk. Data elements are then made ready and displayed on a preview visible to the producer, and then the elements are triggered from the vision mixer. This configuration needs a separate "GPI" profile that is not used by other control application clients. Other clients can be in other profiles and produce content to the same output channels. However, they need to be on other transition layers or on another Viz layer so that they will not interfere with the graphics controlled by the external system.
A channel can be designated as a Program or Preview channel by selecting the check box in the appropriate columns (Program or Preview). The program and preview channels are reciprocally exclusive - only one channel can be set to program, and only one channel can be set to preview. If for example A is set to program and B is set to preview, and then C is set to program, A will no longer be set as program.
When configured to use video in graphics from a video server (for example Viz One), it is currently recommended to use IP addresses for both the Viz and Video channels in order to visualize the transfer progress correctly; hence, a hostname on the Viz channel will work, but not on the Video channel. They must also match the video configuration for both program and preview.
The Video device configuration is used when configured to trigger video elements in a video server setup.
IMPORTANT! Current limitations require both the graphics and video channels to use an IP address.
Forked Execution
Forked execution can be used with standalone and transition logic scenes. It also replaces the execution of visible containers.
Standalone Scenes
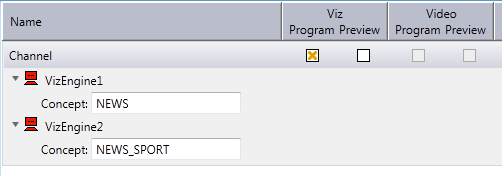
Forked execution supports standalone scenes by executing the same graphics with different concepts on two or more render engines. Concepts are defined per channel when Working With the Profile Configuration tool.
You can also use this setup to handle fail situations by having the same graphics concept rendered on both engines.
Transition Logic Scenes
As with Standalone scenes, forked execution supports setting concepts for Transition Logic scenes. In addition, by defining channels with different render engine setups, Transition Logic scenes can show different states of the same scene on a per-engine basis. All states are synchronized for all engines (at all times) in order to achieve an artifact-free and smooth morphing of the graphics from one state to another.
For example, if you have three render engines you can set up a range of channels with different combinations of render engines per channel.
|
Channel |
Viz Engines |
|
A |
1,2,3 |
|
B |
1,3 |
|
C |
1 |
|
D |
2,3 |
|
E |
2 |
If you have a scene with four layers, each layer can be controlled separately from the other layers (see table below). By setting a state per layer you can achieve a varied output depending on the channel used and how that channel is configured in terms of render engines (see table above).
-
Layer 1: Shows and hides a geometry (e.g. a cube)
-
Layer 2: Shows and hides some text
-
Layer 3: Positions the geometries
-
Layer 4. Animates the layer 1 geometry by showing the next image or a logo
|
Layer 1 States |
Layer 2 States |
Layer 3 States |
Layer 4 States |
|
Show cube |
Show text |
Position left |
Next image |
|
Hide cube |
Hide text |
Position right |
Show logo |
|
<ignore> |
<ignore> |
Position center |
<ignore> |
|
|
|
<ignore> |
|
The scene layers and configured channels above provide the following output on each of the three engines:
|
Channel |
Layer state |
Output on Viz Engine 1, 2 and 3 |
|
Channel C(Viz 1) |
Show cubePos leftShow textShow logo |
|
|
Channel D(Viz 2,3) |
Show cubePos rightShow TextShow Logo |
|
|
Channel E(Viz 2) |
Pos centerHide text |
|
|
Channel A(Viz 1,2,3) |
Next image |
|
|
Channel A(Viz 1,2,3) |
Next image |
|
|
Channel A(Viz 1,2,3) |
Show textNext image |
|
|
Channel A(Viz 1,2,3) |
Show logo |
|
|
Channel B(Viz 1,3) |
Hide cube |
|
|
Channel E(Viz 2) |
Hide cube |
|


Visible Containers
Viz Trio still support, though it is considered deprecated, a behavior similar to that of forked execution. By designing a standalone scene where each root container is a variant of the other, you can configure each render engine to render specific containers (by name). In effect a scene with two or more root containers can have one or several containers assigned and rendered visible by one render engine.
Due to potential performance issues when using large textures (e.g. HD) this option is no longer recommended. Concept and variant design of standalone and transition logic scenes is therefore the recommended design convention.
Working With the Profile Configuration
This section covers the following topics:
Profile Configuration
Opening Profile Configuration
-
Click the Config button (upper left), and then select Output.
-
Right-click the profile on the status bar (lower-left) and select Profile Configuration... from the appearing context menu.
Adding a New Profile

-
In the Profile Configuration window click the New profile button, and in the appearing text field enter a new unique profile name, and press ENTER.
Renaming a Profile
-
Right-click the profile and from the appearing context menu select Edit Profile Name, or double-click it and enter the new name.
-
When finished editing the name, press ENTER or click the cursor outside the Profiles list.
Deleting a Profile
-
Right-click the profile and from the appearing context menu select Delete Profile, or select it and press the DELETE button.
Channel Configuration
Adding an Output Channel to the Channels List

-
Click the New channel button, or drag and drop a Viz Engine or video device to the Channels list.
Renaming an Output Channel in the Channels List
-
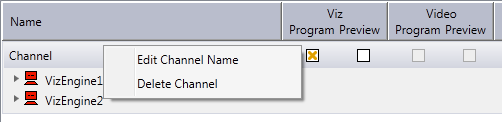
Right-click the channel and select Edit Channel Name from the context menu, or double-click the name.
Removing an Output Channel from the Channels List
-
Right-click the channel entry and select Delete Channel from the context menu, or select the channel and press the DELETE button.
Adding a Concept Override for a Channel Output Device
-
Expand the channel’s output device and append the concept name. This overrides any concepts set elsewhere.
-
Click OK.
Caution: Note that concept names are case sensitive.
Output Device Configuration
Adding a Viz Engine
-
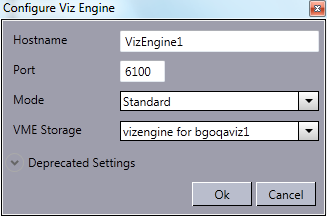
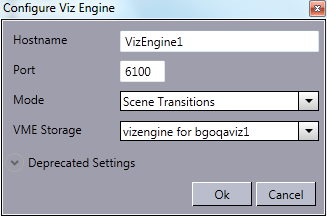
Click the Add Viz... button in the Profile Setups window to open the Configure Viz Engine dialog box.
-
Enter the Hostname.
-
Default port for Viz Engine is 6100.
-
Optional: Select Mode.
-
Optional: Select an Asset Storage location. Asset Storage lists available Viz Engine storage for clip transfer and playout.
-
Click Ok.
-
A status indicator will show if the renderer is On Air.
-
Adding a Video Device
-
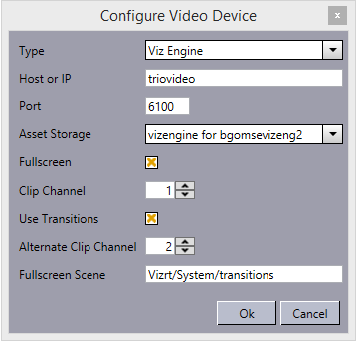
Click the Add Video... button in the Profile Setups window to open the Configure Video Device dialog box.
-
Select the video server Type.
-
Type the Host or IP address.
-
Enter the Port number (optional).
-
Select a publishing point from the Asset Storage list, so that stand-alone clips and clips used in pages or data elements are transferred to the right location (the specified Viz Engine) for playout.
-
If the Fullscreen check box is selected, you can define additional values (Use Transitions and Fullscreen Scene) to provide transition effects from one video to another.
Note: The fullscreen values are only available for Viz Engines, not MVCP video devices.
IMPORTANT! Trio by default sets the "Fullscreen Scene" in Media Sequencer to "Vizrt/System/transitions" when you switch on "Use Transitions". Using this default, clip channel must be 1 and the alternate clip channel must be 2. These settings can only be changed when using other transition scenes.
-
Select the Clip Channel to use.
Note: Viz Engine 3.6 and above supports up to 16 clip channels for playout. A clip channel might be unavailable if it's configured to be inactive in Viz Config or the license only covers a limited number of clip channels., for example. Note that Media Sequencer prior to version 2.0.1 imposed some restrictions, see note below.
-
Alternate Clip Channel: When using videoclip transitions the clip from "Clip Channel" will transition to the clip from "Alternate Clip Channel" and the next clip will transition from "Alternate Clip Channel" back to the "Clip Channel". The transition clip channel is enabled in the configuration window only if Use Transitions is enabled.
-
Click OK.
-
A status indicator will show if the video device is online.
IMPORTANT! Media Sequencer up to and including version 2.0.0 imposes the following limitations: Clip channels 3-16 not supported when using fullscreen clips. Clip channels 2-16 not supported when using transitions. Using alternate clip channel setting not supported. These restrictions are lifted starting with Media Sequencer version 2.0.1 and higher.
Tip: If you to transfer video from Vizrt’s MAM systems you can use the default profile (unless you configure a profile manually in both systems yourself).
-
Editing a Viz Engine or Video Device
-
Right-click the device and select Edit from the context menu, or double-click it.
Deleting a Viz Engine or Video Device
-
Right-click the device and select Delete from the context menu, or select it and press the DELETE button.
Adding an Output Device to the Channels List
-
Drag and drop a Viz Engine or video device onto the channel in the Channels list, or select it and select Add to profile (creating a new channel) or Add to selected channel from the context menu.
Removing an Output Device from the Channels List
-
Right-click the Viz Engine or video device and from the context menu select Delete Output, or select it and press DELETE.
Enabling Scene Transitions
-
Configure the Viz Engine settings as seen in how Adding a Viz Engine.
-
Set the Mode to Scene Transitions.
-
Scene Transitions: Allows the renderer to copy (or snapshot) the scenes to create a transition effect between them.
-
-
Open the Show Properties, and set the Transition Path.
-
See also Transition Effects.
-
-
Click Ok.
-
Add the program renderer to the program channel.
Note: To see the effects, the program channel must be configured and on-air.
Enabling Still Preview

-
Create two channels, one for program and one for preview.
-
Configure the same render engine twice as seen in how To add a Viz Engine.
-
For the second render engine set the Mode to Still Preview.
-
Still Preview: Allows you to use the program output to get a still preview. To achieve this the Media Sequencer creates a copy of the scene being read and sends commands to your program output renderer asking for a snapshot of the scene while the current scene on air is being rendered. Note that the port used for still preview is 6100.
-
-
Click Ok.
-
Add the program renderer to the program channel and the still preview renderer to the preview channel.
Warning: This setup requires sufficient ring buffer on the program renderer in order for the rendered still preview not to cause the scene on air to drop frames; hence, this setting is deprecated.
Rendering Specific Scene Containers
-
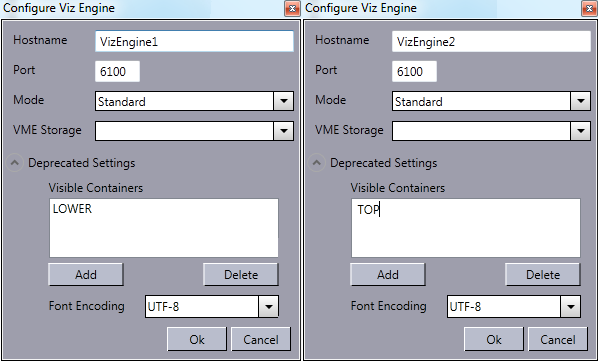
Configure the Viz Engine settings as seen in how To add a Viz Engine.
-
Click the Deprecated settings button to expand the editor.
-
Enter the scene’s container name(s) that should be rendered visible to the Visible containers field.
-
Optional: Press Enter to add another container name.
-
Click Ok.
Changing Font Encoding
-
Configure the Viz Engine settings as seen in how To add a Viz Engine.
-
Click the Deprecated settings button to expand the editor.
-
Select the Font encoding.
-
Font encoding: Sets the font encoding of the Viz Engine. The encoding can either be set to UTF-8 or ISO-8859-1. Default is UTF-8.
-
-
Click Ok.
Upgrading Old Profiles
If you are running Viz Trio versions prior to 2.10.1, and you want to reuse your current profile setup you need to be aware of the following facts:
When Viz Trio starts, it makes copies of the old profiles and give them a new name using the old name with a tag appended at the end:
<profile name> (Upgraded)The old profile name will be kept as is, and can only be used by Viz Trio versions older than 2.10.1.
-
Old profiles from older versions are disabled in the new profile configuration; however, you can delete them.
-
Old profiles will not show up in the profile selector on the status bar, the intelligent interface configuration or the VDCP configuration.
-
Old profiles have a tool tip with the name of the upgraded profile.
The new profile name (with the Upgraded tag) should be used by Viz Trio 2.10.1 and later. -
New profiles can be renamed without any problems.
-
New profiles (both the upgraded ones and manually created ones) will be usable from old clients, but changes done will not have any effect.
Tip: When you have upgraded all clients, the old profiles can be deleted.