
Viz Trio User Guide
Version 3.2 | Published June 29, 2021 ©
Page List
The Page List contains a list of accessible pages. Pages are created from templates. Templates are, in turn, normally created by importing scenes created with Viz Artist. You can think of a template as a blueprint while pages are instances or real objects created from templates. You can create as many pages as you like from one template, and each of the pages you create is unique with its own page ID.
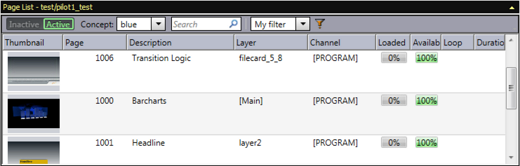
A page can be played out from a page list or from a show playlist. The page list can play its pages one by one. A show playlist has the option of creating a carousel, playing the items like a scheduled playlist. It can also be looped.
Pages are edited using the Page Editor Controls and its available editors. Most page editors are made available to the operator by the scene designer through exposed scene properties within the scene. Others, like a database connection, are made available through the Show Properties window or by using more advanced features such as Macro Commands and Events.
This chapter contains the following sections:
Page Content Filling
Filling a page with content is a central operation in Viz Trio. In order to create a page, the user must first create a show and import scenes to that show. A template is then converted into a page, and once the page is created it can be populated with media from Viz One.
To create a page and fill it with content, follow this procedure:
-
Create a show under Show Directories from File > Open Show. Alternatively, access the Show Directories menu by clicking the Change Show icon.
-
From here, you can import a show. If there is no show to import, click the Create show icon
-
A field opens in the Shows panel. Give the new show a title and click OK.
-
From the drop down menu in the Page Editor, select Import Scenes. Select the desired scenes from the Graphic Hub and import them by clicking Import at the bottom of the panel.
-
The scene now appears in the Template List
-
Now save the template as a page element. Double click the desired template in the Template List.
-
In the Page Editor, click Save As (the icon with two floppy disks)
-
The page number title field is highlighted. Accept the title or edit it and press Enter.
The new page now appears in the Page list. Pages can be searched for and filtered by page number from the Page list. From here, fill up the page with, for example, images and video by dragging and dropping media from Viz One into the Page Editor. It's also possible to take the element in a page to air from the Page list, or add pages to different playlists.
Note: Composite elements cannot be displayed from the page list.
Page List Context Menu
Right-clicking an element in the page list activates the context menu. Select a menu item to perform an action or define a setting for a page. Clicking an image icon will open a drop-list of available template variants.
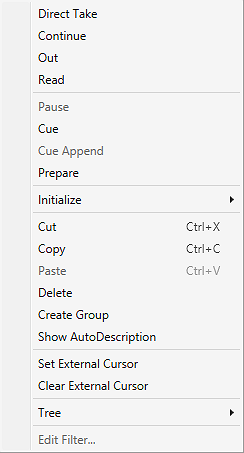
Note: The menu options Create Combo Page and Script are part of the Template List’s context menu.
-
Direct Take: Performs a direct take on the selected page.
-
Continue: Continues the animation on the selected page, or any that is loaded in the same transition logic layer as the selected page.
-
Out: Takes out the selected page, or any that is loaded in the same transition logic layer as the selected page.
-
Read: Performs a read on the selected template or page.
-
Pause: Pauses the current element.
-
Cue: Prepares the clip for playout so the first frame is ready in the player.
-
Cue Append: Prepares the clip for playout. The clip will start automatically when the current clip ends.
-
Prepare: Prepares the clip in the pending player without affecting the current clip, so it is ready to be played out. The clip will not start automatically after the current clip. Requires Viz Engine 3.3 or above.
-
Initialize: Loads the selected page(s) on the program and preview renderer.
-
Cut: Cuts an element to the pasteboard (shortcut: Ctrl+x)
-
Copy: Copies an element to the pasteboard (shortcut: Ctrl+c)
-
Paste: Pastes in the current pasteboard element (shortcut: Ctrl+v)
-
Delete: Deletes the current selected element.
-
Create Group: Creates a new group.
-
Show AutoDescription: Switch. Shows the Auto Description for item.
-
Set external cursor: Sets the global cursor to the selected template or page. This setting is related to GPI or Automation setups.
-
Clear external cursor: Clears the current global cursor.
-
Tree: The Tree option contains sub-menus for selecting, expanding, collapsing, and moving data elements.
-
Select All: Selects all data elements in the playlist.
-
Select None: Removes all selections.
-
Expand All: Expands all nodes in the tree, revealing the grouped data elements.
-
Collapse All: Collapses all nodes in the tree, hiding the grouped data elements.
-
Hide Empty Groups: Hides empty groups. This setting only affects the current playlist. In order to make this setting global for all playlists, enable the Store as Default option in the playlist column context menu.
-
Wrap Text: Wraps all text properties of the element, adjusting the row height accordingly.
-
Font...: Opens the Font Chooser to set a different font for the playlist.
-
Show Row Lines: Switch. Select to show Row Lines.
-
Show Alternating Row Colors: Switch to show alternating row colors.
-
-
Edit Filter: If using a filter, select this to display the Edit Filter menu window where you can edit a filter.
Page List Columns
Select the columns that should be visible in the page list. Right-click one of the existing page list columns, and the Page List columns context menu appears:
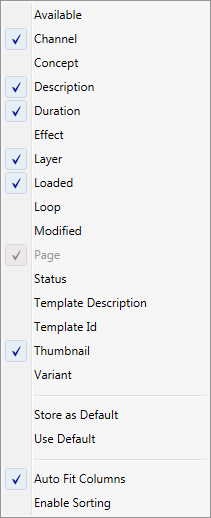
Choose the columns to add or remove.
-
Available: Shows the availability of the element as a percentage.
-
Channel: Selects the playout channel on which the graphics will be rendered.
-
Concept: Shows which concepts are associated with. the data element.
-
Description: Shows by default the text entered in the editable tab fields (or the element name, if the element is a stand-alone media file). Can be edited inline. Only a page’s Description field can be changed.
-
Duration: Shows the duration of the element.
-
Effect: Opens the Choose Effect dialog when clicking the browse button.
Note: Transition effects cannot be used for transition logic scenes.
-
Layer: Shows the layer information. This can be [FRONT], [MAIN] and [BACK].
-
Loaded: Shows (in percent) load status of the element
-
Loop: Loop enables a loop mode for scenes or a full screen video clip on the video channel. Note that a full screen video clip will play once by default; however, video clips in graphics loop by default. A complete playlist (see control bar) or video clip may be looped; however, it is of course not recommended to set more than one of these modes to loop at once. Looping in a page list is aligned with the looping in a timeline editor. However, when “Reload the current page if it is changed in the MSE” is disabled from Configuration>>General then looping between page list and timeline editor is asynchronous.
-
Modified: Displays the time when the element (graphic, still image, or video) was modified/created. This feature is mostly used for sorting, and note that sorting must be enabled in the page list context menu in order for this to work.
-
Page: Shows the page ID that usually is a numeric callup code. Can be edited inline.
-
Status: Shows the status of the selected page. Page status indicators are Finished, Unfinished and None. None means: no certain page status indicated. Trio handles these pages regularly. Finished means: the page content is edited to completion and page should not be changed. Trio prohibits editing pages with this status in the page editor. Unfinished means the page needs further editing before playout. This is a simple reminder to the journalist to finish editing the page before playout. Also see the macro commands page in the Macro Commands and Events section.
-
Template Description: Shows the template’s description; usually what kind of template it is, for example lower third, bug and full screen. Descriptions are predefined by the scene designer.
-
Template id: A page references a template, thus showing the template’s ID. The ID is usually a numeric callup code.
Note: Template and Page IDs are usually numeric. However, Alphanumeric IDs can be allowed. You must then enable Allow Alphanumeric Imports, see the General section.
-
Thumbnail: Shows a thumbnail image of the graphics.
-
Variant: Shows the template variant text. To view a list of variants with thumbnails, left-click the text field.
-
Store as Default: Stores the current selected column values as Defaults.
-
Use Default: Uses the stored column Defaults.
-
Auto Fit Columns: sizes columns automatically.
-
Enable Sorting: disabled by default. The sort feature is specific per playlist, so if sorting is enabled on one playlist or show, it can still be disabled for another Playlist or show.
Templates and Groups
This section covers the following topics:
Change Template
For standalone scene templates, it's possible to change a template that a page is using without having to retype its content. This works under the following conditions:
-
The tab fields in the original, and the new template, must be of the same type. If tab field 1 is of type text in the original template, the changed template must have text in tab field 1 as well. This also applies images.
-
Be aware of restrictions or differences between the two templates such as character limits. A property exposed on the source template might not be exposed in the target. As a general rule, the templates should be similar in their logical structure.
-
The total number of tab-fields should be the same:
-
If the source template has three bullet points (exposed as three tab-fields) and the target has four, for instance, the first three will be filled with existing values and the fourth will have a default value.
-
If the source template has four bullet points and the target only has three, the last bullet will not be shown. If no new text has been saved or added, it is possible to change back and the original template will be restored.
-
Changing a Template
-
Select the pages for which a template is to be changed (use CTRL or SHIFT to multi-select).
-
Right-click the page(s), and select Change template... from the context menu.
-
Enter the new template name/number.
Note: The name of the template is case sensitive.
-
Click OK.
Changing a Template Using a Macro Command
-
Assign the macro command page:change_template (string templateName) to a keyboard shortcut.
-
Press the keyboard shortcut assigned to the change_template command to perform the change.
Note: The name of the template is case sensitive.
-
Click OK.
Creating Groups
It's possible to create groups in a page list to organize pages. To create a group, right click in the page list and select Create group. A new group appears with the default name new_group. Click on the name once to edit, or right click and choose edit/name.
To add pages to the group, drag and drop elements onto the right side of the group element. A page added to a group is added as a child node of the group when it is dropped onto the group. To move pages out of a group, drag and drop it outside the group.
Note: Pages cannot act as groups for other pages.
Note: Stories imported from an Avid NewStar newsroom system will automatically appear as groups (one group per story). This is similar to a MOS playlist, and is built using the traditional show type. Hence, it has no support for context switching (concept and variants).
Copying and Pasting Groups
It's possible to copy groups using the copy (CTRL + C) and paste (CTRL + V) commands in the same show. The pages within the pasted group are given new unique names.
Manually Sorting Pages
Disable sorting in the page list to move pages up and down by drag and drop. This can be used to create a sequenced playlist, for example.
Channel Not Found
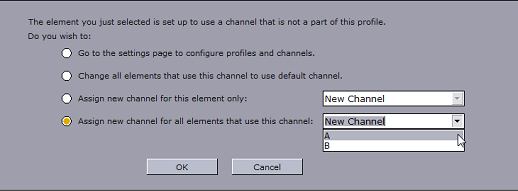
The channel not found dialog box opens if a channel has been set for a page (or template) that does not exist in the current profile. This occurs if a page has been configured to use a specific channel (e.g. C) and that channel has been deleted, for example.
The easiest way to avoid this scenario is to always use the default assignment [PROGRAM] as this refers to the status of the channel, and not the channel name.
Time Codes
A time code reader is a handler that reads time-codes from a given source, and prepares and executes elements by comparing the received time-codes with the begin time-codes specified on the elements. How the time-code reader receives the time-codes will vary between different time-code readers, but in most cases will utilize specific hardware for decoding time-code signals embedded in video signals.
Viz Trio supports the use of time code reader hardware. A card named PCL PCI D from Alpermann+Velte Electronic Engineering GmbH is currently supported.
Contact Vizrt for instructions on how to configure Viz Trio to work with the card. The card can be used as a timing handler for a show. The card enables start times on the pages to be set. The time code from the video system will trigger the pages on-air.
Arm and Fire
With the Arm and Fire feature it is possible to play out two or more different elements on two different channels simultaneously. By using the commands page:arm and page:arm_current several elements can be cued up on their respective channel before firing them: channel A, C and D - take. The commands page:fire and page:fire_all execute actions (take, continue, out, and so on) on all relevant channels that are armed. page:unarm, page:unarm_all and page:unarm_current clears channels from being executed.
This section describes the following related functionalities:
Reading a Page
-
Select a page from the page list
-
Double-click the page in the page list, or
-
Right-click the Page and from the appearing context menu select Read, or
-
Press the Read key on the Cherry Keyboard.
Note: When reading the page it will be displayed in the preview window and opened for editing in the Page Editor.
Taking Pages On-air
-
Select a page from the page list.
-
Read the page.
-
Click the OnAir button in the upper right corner to set Viz Trio in on-air mode.
-
Click the Take button or the Take key on the keyboard.
-
Click the Continue button to continue the animation if the scene has stop-points.
-
Click the Take Out button or Take Out key on the keyboard to take the page off air.
Deleting a Page
-
Select and right-click a page from the page list and from the appearing context menu select Delete page, or
-
Press the DELETE key on the keyboard.
Note: You can multi-select pages by holding in the SHIFT or CTRL button and selecting the range or individual pages to be deleted.
Saving to XML
To save a page to an XML-file on disk, use File > Export Selected Pages Archive...
For more information about this option, see Export Selected Pages Profile.
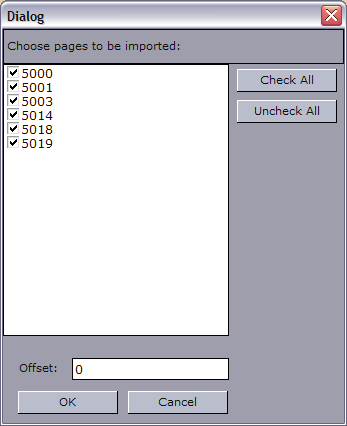
Loading from XML
-
From the main menu click Page > Load from XML... option.
-
Choose the pages to be imported from the list.
-
Click Check All to select all pages.
-
Click Uncheck All to deselect all pages.
-
-
Optional: Set an Offset for the imported page numbers such that the imports do not conflict with existing page numbers.
Selecting a Variant from the Page List
-
Right-click the Scene Icon column and select the variant from the drop-down.
Adding Transition Effects Using the Page List
-
Right-click a show’s page list column header, and from the appearing context menu select Effect and Effect Icon (the latter is for visual reference only). This displays the Effect and Effect Icon columns.
-
Click the ellipse button in the Effect column and from the appearing dialog box select a transition effect.
See Also