Viz World Plug-ins Guide
Version 17.0 | Published January 10, 2019 ©
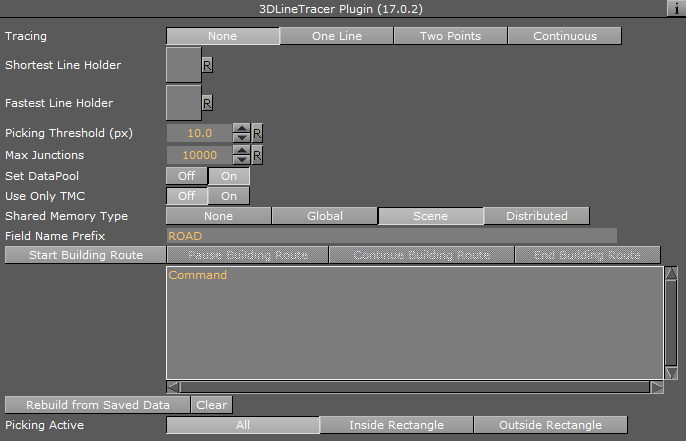
3D Line Tracer
![]()
The 3D Line Tracer plug-in works in conjunction with the 3D Line Manager, it allows to trace lines, build Routes of one point or two points, when the Data Source is in Flow and Routing and you have the correct shape file (TomTom TMC Data).
Note: This plug-in is located in: Built Ins -> Container plug-ins -> Maps_Adv
3D Line Tracer Properties
-
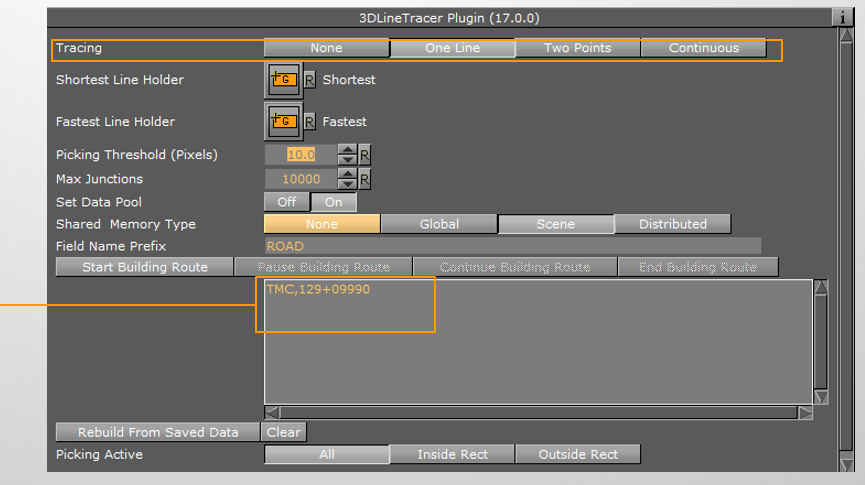
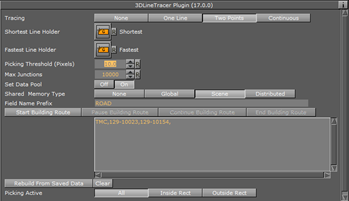
Tracing
-
None: No tracing.
-
One Line: Traces one line. A mouse click selects a line.
-
Two Points: Traces two points. The first mouse click starts and the second mouse click ends.
-
Continuous: Traces continuously. Hold down mouse button and drag.
-
-
Shortest Line Holder: Container holding 3D Line to show the shortest route.
-
Fastest Line Holder: Container holding 3D Line to show the fastest route.
-
Picking Threshold (px): Determines the distance (in pixels) from line for picking to capture.
-
Max Junctions: Determines the maximum number of junctions to pass when calculating shortest route before giving up (due to performance).
-
Set Data Pool: Sends output to DataPool.
-
Use Only TMC: Uses TomTom shape file data only.
-
Shared Memory Type: Selects the shared memory area to update. Click either None, Global, Scene, or Distributed.
-
Field Name Prefix: Determines the shared memory field name to use with DataPool.
-
Start Building Route: Starts building (and recording) a route with many clicks for better control on the selected route.
-
Pause Building Route: Pauses building (for example, to move the map) the route.
-
Continue Building Route: Continues building the route.
-
End Building Route: Stops building the route.
-
Rebuild from Saved Data: Rebuilds the line form the data saved in the command box above.
-
Clear: Clears the contents of the line tracer.
-
Picking Active: Specifies the place on the screen where can routes can be selected. There are three options:
-
All: Allows selecting routes anywhere on the screen.
-
Inside Rectangle: Allows selecting routes anywhere inside the rectangle.
-
Outside Rectangle: Allows selecting routes anywhere outside the rectangle.
-
How to Create a Scene Showing Flow and Routing
-
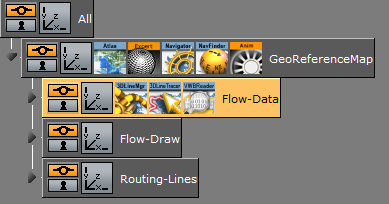
Create a base map using the Atlas plug-in, add a Navigator plug-in.
-
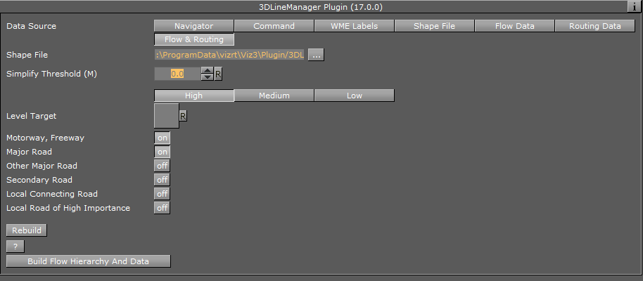
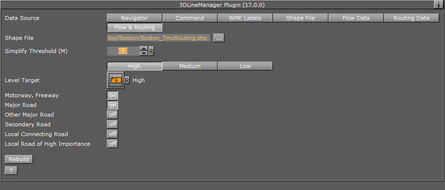
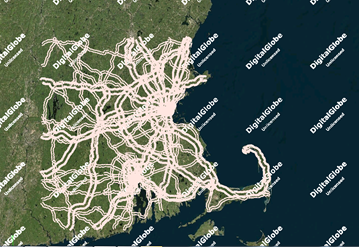
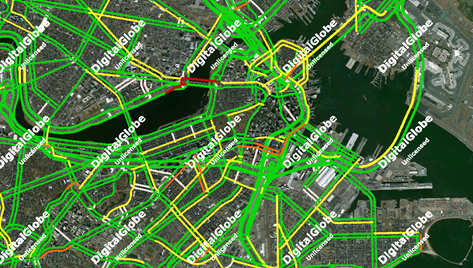
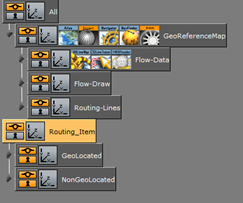
Add a 3D Line Manager to the Hierarchy. Set the Data Source to be Flow and Routing, Load the correct Shape File (TomTom TMC Data) and Click Build Flow Hierarchy, Viz builds the data for Routing.
-
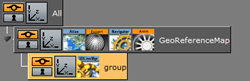
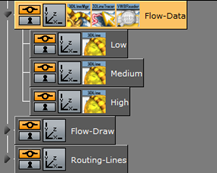
After Building this adds three containers: Flow-Data, Flow-Draw and Routing-Lines.
-
Flow - Data: The 3DLine Tracer plug-in and the .VWBReader vmaps are added to the container. Underneath it adds three containers with three types of Roads: Low, Medium and High.
-
In the 3D Line Manager plug-in, you can set the types of Roads that enter in each group, you can change the Roads according to your selection.
-
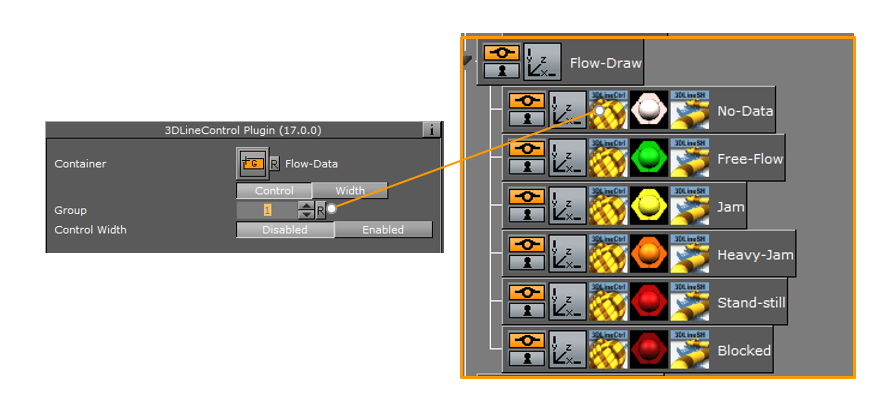
In the Flow-Draw container: This are the painters that draw the data.
-
When there is no data, all the lines are in Group number 1 and has a light pink color.
How to Load the Traffic Data
-
In the .VWBReader vmaps plug-in, c hange the data type to Custom, Load the VWB File (file that is created with the Feedstreemer -this file is updated constantly with the traffic) and Click Build.


-
It draws all the data: Free flow to green, Jam to Yellow, Heavy Jam to Orange ...
How to Trace the Lines Using the 3D Line Tracer Plug-in
-
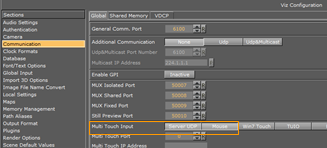
To make a selection with the mouse the Viz configuration should be Communication - Multi Touch input - Mouse.
-
Enter the 3D Line Tracer plug-in. Select the Tracing mode: One Line : One Segment.

-
When one of the segments is selected you can see the name and ID number.
How to Show the Route Information
-
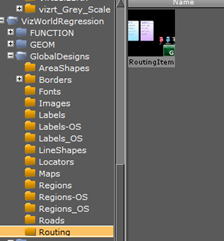
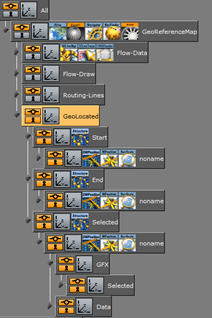
Add the Routing Item object to the yourscene, y ou can find it in the server under: Global Designs.
-
Routing folder. You find two Routing items:
- GeoLocated.
- Non GeoLocated.
-
Drop the Geolocated under the Map so it gets all the geo-information.
Works with Datapool plug-ins.
-
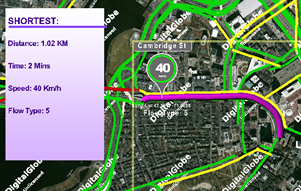
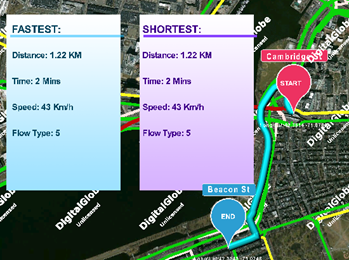
By selecting a segment, it updates the Shortest panel showing the distance, the time, the speed and the flow type.
Tracing Two Points
-
Change the Tracing to Two Points, s elect one Point on the Map. That is the s tart point and select another point to be the e nd point.
-
It gives you two routes: One Fastest and another Shortest.
Continuous Tracing
You can use this option to select a Route by dragging and hold the mouse

How to Build a Specific Route
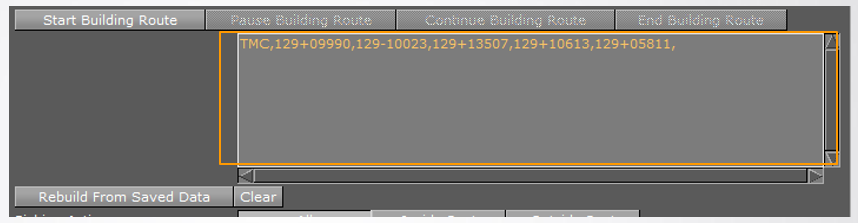
Click Start Building Route, s elect the Route in the Map.
Note : Every click selects a segment of the Road.

Here you can see the route information. It can be saved into a text document and then you can send the information. The Clear option is to Clear from the Scene and the Rebuild option rebuilds the route from saved data.
The Picking Active option specifies the place on the screen where can routes can be selected. There are three options:
-
All : All Screen.
-
Inside Rect: Inside the Rectangle.
-
Outside: Outside the Rectangle.
