Viz World Plug-ins Guide
Version 17.0 | Published January 10, 2019 ©
Label Manager
![]()
The Label Manager plug-in retrieves label information from Viz World Server and control the label’s appearance when working in an automatic label mode. The Label Manager generates labels, based on the defined label designs, according to parameters defined in the Navigator plug-in, Label It objects and 2D Label objects in the label designs.
For the Label Manager to resolve conflicts, it needs different presets to work with. The more presets and the bigger difference between them, the better chance overlaps are resolved. When working with Label Manager, pay attention to and check all presets it uses to make sure that they are acceptable for the plug-in. Do not create a preset where the label is under the marker if you do not want to see it. Labels without markers (e.g. country) can have presets as well, which means their position can change slightly.
Label Manger basically has two ways of detecting conflicts:
-
Based on the marker (zero size) labels (bounding box) and the line between them. You set this for the 2DLabel (see Special section, Collision Mode = Tip Based) and when used with good and different presets it solves almost any problem, but if a you have a big marker there is always a chance of a marker overlap.
-
Based on the bounding box, the entire (square) bounding box is calculated and used. In this case, there is less chance of resolving conflicts, but it has no overlaps.
This section contains information on the Label Manager plug-in properties:
Note: This plug-in is located in: Built Ins -> Scene plug-ins -> Maps
Label Manager Properties
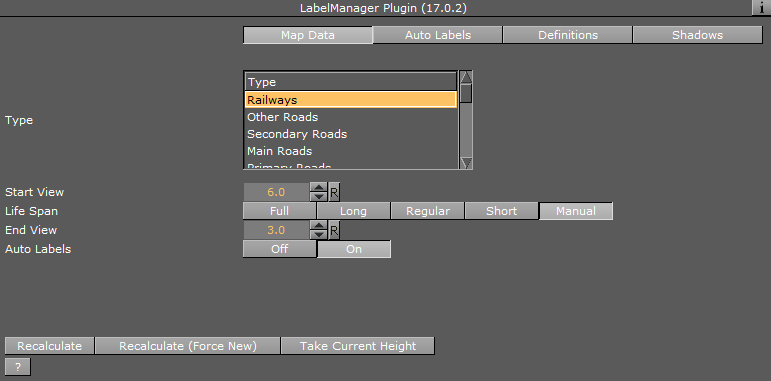
Map Data
The Map Data tab defines settings for the label types received from the Viz World Server (WoS). These settings are used when calculating label appearance in automatic mode. For every type of label selected in the list, set the required parameters.
-
Type: Sets the type of labels data to display.
-
Start View: Defines the map size from which the labels of the selected type appears during the Navigator animation. Parameter units are defined in the Definitions tab’s Units parameter.
-
Life Span: Defines the duration of the label appearance on screen. Note that this setting is most useful for country and region types.
-
Full: Displays the label at the defined Start View and remains on screen throughout the entire animation.
-
Long: Displays the label on screen for a long period of time.
-
Regular: Displays the label on screen for a medium period of time.
-
Short: Displays the label on screen for a short period of time.
-
Manual: Displays the label on screen until the defined End View value is reached.
-
-
End View: Defines the map size at which the labels of the selected type disappears. This parameter is only enabled if the Life Span is set to Manual. Parameter units are defined in the Definitions tab’s Units parameter.
Note: The Label Manager plug-in controls and manages the automatic labels appearance, using various parameters from different plug-ins. The Life span and Auto Label parameters vary between labels during the animation (hop), to optimize labels display.
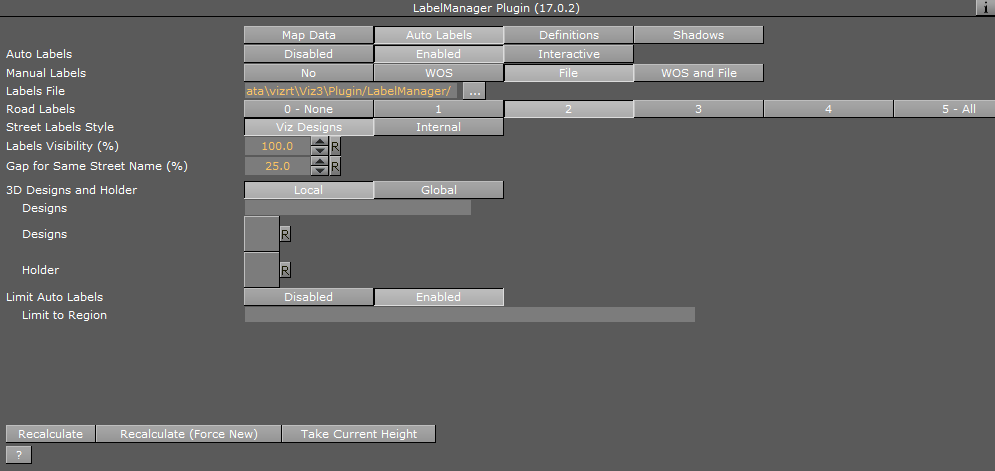
Auto Labels
The Auto Labels tab defines whether automatic labeling is enabled and the label designs used for automatic labeling.
Auto Labels can be limited to specified countries and/or regions. The format of valid input is:
-
A semi-colon (;) between locations.
-
A backslash (/) or slash (\) to specify the path to the regions.
Note: Abbreviations can be used (after defining such list in the WoS)
Some examples:
-
USA;Mexico
-
USA\TX;Mexico;Canada
-
United States of America\Florida;United States of America\Georgia;USA\NY
-
Auto Labels: Sets the auto labels mode to disabled, enabled or interactive.
-
Disabled: Does not use automatic labeling in the scene.
-
Enabled: Uses automatic labeling in the scene based on the defined designs and labels holder container.
-
Interactive: Enables the Auto Labels Quantity.
-
-
Auto Labels Quantity: Allows you to set the amount of labels that should be shown. Few show approximately 75 labels (or less), Average 100 labels (or less) and Many 150 labels (or less). Manual sets the distance where the labels should appear (see Start View under Map Data) providing a consistent behavior (e.g. Town 1K always appears/disappears at the same distance).
-
Manual Labels: Defines whether manual labels, defined for the map, are displayed with the auto labels. When Enabled is set, the Select Manual Labels button appear at the bottom of the editor. When clicked, WME opens, enabling the user to set manual labels.
-
Road Labels: Defines the level (number) of road labels that are displayed. Select the required option, ranging from 0-None to 5-All.
-
Street Labels Style: Defines the label style of the scene. Options are Viz Design and Internal (Open GL) labels.
-
Viz Design: Allows user definition of Viz labels. Note that this limits the number of labels that can be used in Viz. Depending on your system, 300-500 labels may cause Viz Engine to not render in real time. Using Viz Design also gives the option to set other parameters such as the visibility of the label and local and global placeholders for the label design (see 3D Designs & Holder).
-
Internal (Open GL): Allows using up to 100.000 labels; however, this limits design options to the font used and relative position and scale. When used with the Street Labels plug-in, this setting only works for Navigator scenes.
-
-
Labels Visibility (%): Used when calculating size of street labels for the final map.
-
Gap for Same Street Name (%): Used when calculating the minimum distance between two street labels of the same name.
-
3D Designs and Holder:
-
Designs (text field): Defines a path in Viz’s objects database that contains label designs. Automatic label designs are based on 2D Label and Label It plug-ins.
-
Designs (place holder): Displays the selected (drag and drop) top container holding the label designs.
-
Holder (place holder): Displays the selected (drag and drop) container that resides under the map. This container is used by the Label Manager plug-in to store the scene’s generated labels.
-
-
Limit Auto Labels: Defines whether the auto labels are limited to a defined region/s or not. When enabled, the Limit To Region text field is enabled.
-
Limit to Region: Defines the region to which the auto labels are generated.
Definitions
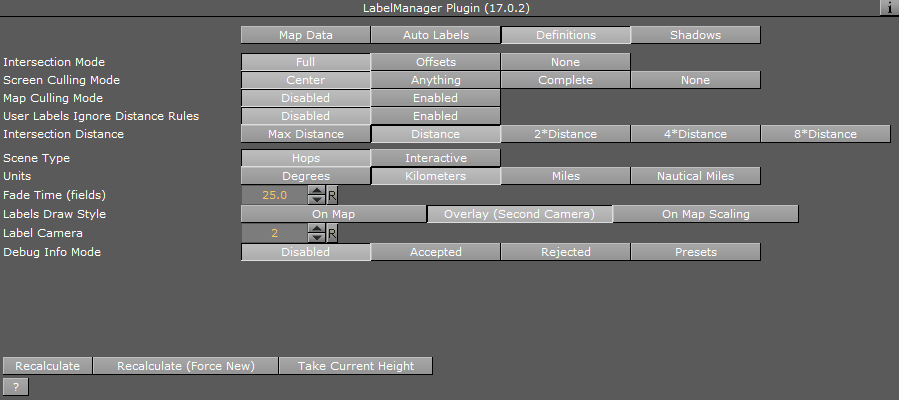
The Definitions tab is used to set general parameters for Label Manager behavior.
-
Intersection Mode:
-
Full: Selects the best preset for each label and when labels intersect, one of them is turned off.
-
Offsets: Selects the best preset for each label.
-
None: Creates auto labels only. No intersections are calculated.
-
-
Screen Culling Mode: Defines whether a label is drawn when it is outside the Viz renderer’s scope/view.
-
Center: Fades out the label object when the center of the object is outside the Viz renderer’s scope/view.
-
Anything: Fades out the label object when any part of the object is outside the Viz renderer’s scope/view.
-
Complete: Fades out the label object when the entire object is outside the Viz renderer’s scope/view.
-
None: Does not use culling. The labels are drawn according to the map data parameters only.
-
-
Map Culling Mode: Defines whether a label is drawn when it is outside the map area but inside Viz renderer’s scope/view.
-
User Labels Ignore Distance Rules: Ignores the distance rules that apply to labels associated with a hop when enabled.
-
Intersection Distance: Determines the distance to be used when calculating the best label setup to be used to avoid collision:
-
Max distance: Calculates labels at the max distance defined for the label type.
-
Distance: Uses the final hop position.
-
2/4/8*Distance: Uses the hop position area multiplied by the selected value.
-
-
Scene Type: Determines which algorithm to use for a scene. Label Manager uses different algorithms for an interactive scene or a regular one. User should declare the scene type to get best results.
-
Units: Defines the units used to calculate map size for the Start View and End View parameters. Available options are Degrees, Kilometers, Miles and Nautical Miles, where the default measurement unit is Kilometer. Note that this setting is also affected by the Units option in the 3D Map Setting plug-in (see General).
-
Fade Time (fields): Defines the label’s fade duration in fields.
-
Labels Draw Style: Determines where labels are drawn.
-
On map: Draws on the map layer.
-
Overlay: Draws on a different layer (dynamic image/layer).
-
On map scaling: Draws on the map layer, but maintains the same size (avoid NavScale plug-in).
-
-
Label Camera: Defines the camera that is used to draw the labels (normally camera two).
-
Debug Info Mode: Shows different levels of debug information regarding the auto layout.
Shadows
-
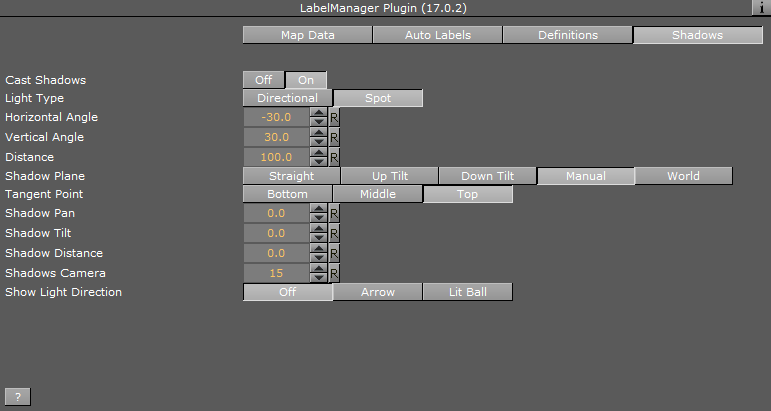
Cast Shadows: Turns option to cast label shadows on/off.
-
Light Type: Simulates different light types to cast the shadows.
-
Horizontal Angle: Defines the horizontal angle position of the light.
-
Vertical Angle: Defines the vertical angle position of the light.
-
Distance: Defines light distance.
-
Shadow Plane: Casts planar shadows on an imaginary plane and this option defines the spatial rotation of such a plane. Select one of the options:
-
Straight: Casts the plane parallel to the screen.
-
Up Tilt: Tilts the casted plane 45 degrees up from the screen.
-
Down Tilt: Tilts the casted plane 45 degrees down from the screen.
-
Manual: Allows the pan and tilt values of the casted plane to be set manually.
-
World: Casts the plane tangent to the world.
-
-
Tangent Point: Sets the pivot point for connection shadow to the object.
-
Shadow Pan: Determines a manual Shadow Pan.
-
Shadow Tilt: Determines a manual Shadow Tilt.
-
Shadow Distance: Determines the distance of the shadow plane from the object.
-
Shadows Camera: Selects a camera for rendering the shadows. Since shadows are done by first rendering objects in a distant place and then overlaying their black silhouettes on the screen, this option defines the camera that looks at such distant place where objects are rendered. (Actually this camera is used for overlay).
-
Show Light Direction: Visualizes light direction on screen. The light direction is visualized by showing a lit ball or an arrow.