Viz World Plug-ins Guide
Version 17.0 | Published January 10, 2019 ©
3D Models
![]()
The 3D Models plug-in adds 3D models to a graphics scene. As the models also contain geographical referencing, you may also place the model on a map.
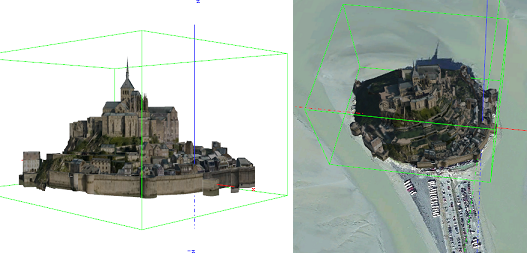
The images above show a 3D model of Mont Saint-Michel in Normandy, France. The model was downloaded from http://sketchup.google.com/3dwarehouse and then placed on a satellite image from Digital Globe.
Note: This plug-in is located in: Built Ins -> Geometry plug-ins -> Maps
3D Models Properties
General

-
File: Selects the file to load. Capable of loading files in Collada format with the *.dae extension or *.kml/*.kmz extension (which has geographic information for the model and a link to a *.dae file inside).
-
Fill Mode: Selects the rendering mode; solid, wireframe or dotted.
-
One Size: Recalls the loaded model to a fixed size. Useful in non-georeferenced mode.
-
Automatic Fetch: Enables fetching pieces of the city as you move around the map (Interactive) or animate (Streaming). Used when loading 3D Cities rather than single models.
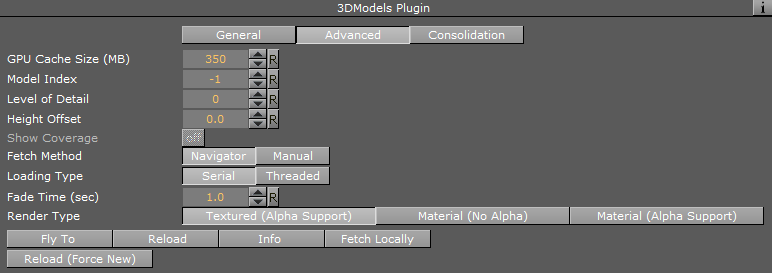
Advanced
The Advanced tab is more suitable for a streaming mode of the plug-in, when the plug-in loads/streams data out of a large data bank which cannot be loaded entirely due to its size.
-
GPU Cache Size: Limits the amount of data that is loaded to the GPU (loaded data may consume more size than expected on GPU).
-
Model Index: Enables to run through loaded models (mostly for debug purposes) when multiple models are loaded. When a specific index is set, the model is in focus, so the bounding box is shown and Fly To and Info buttons can be used on that model.
-
Level of Detail: Defines how many of the largest levels of the texture pyramid (.dxt format) can be neglected during loading. May be useful in cases where the texture data is heavy and presents a higher resolution than that required to be shown.
-
Height Offset: Height offset during fetch of the models.
-
Show Coverage: Shows the total available geo coverage in green color and currently loaded coverage in orange when models are loaded/streamed from the large database.
-
Fetch Method: Attempts to load as much data around the fetch point as possible (the amount is limited by the GPU Cache Size parameter) when models are fetched either by pressing the Fetch Locally button or in streaming mode.
-
Navigator: Defines the fetch point as the current Navigator position.
-
Manual: Enables manual definition of the fetch point.
-
-
Loading Type: Determines how to load multiple models. The Serial mode may be preferred for recording (using Viz Post), when you have to be sure that all the models were loaded up until the next frame.
-
Fade Time (sec): Defines the time period during which a new model fades from transparent to opaque, to create a more pleasant looking effect on load.
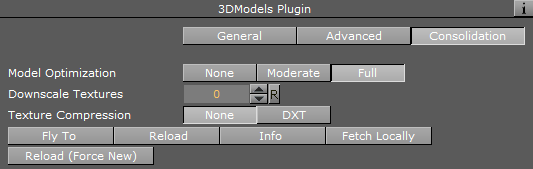
Consolidation
The Consolidation tab is used for compiling a binary format of the plug-in out of Collada files.
-
Model Optimization: Defines the level of optimization for the model while the model is loading. More optimization may increase loading time while improving rendering performance in some models.
-
Downscale Textures: Defines how much the first levels of a texture pyramid may be skipped.
Buttons
-
Fly To: Used to take the camera to the model, if it is georeferenced (i.e. if the original Collada file had *.kml or *.kmz files containing the geolocation). Requires the presence of the NavFinder plug-in on the container in order to work.
-
Reload: Reloads the model.
-
Info: Prints information about the model to the console. It prints information about the dataset in the case when more than one model is loaded, and prints information regarding a specific model if only one model is loaded or when the Model index parameter is not zero.
-
Fetch Locally: Fetches models around the fetch point (defined manually with Fetch Method parameter). The number of models that are fetched is limited either by dataset or by the GPU Cache Size parameter.
Working with 3D Models
This section provides a quick introduction on how to add a 3D model to your scene, and also how to place the model on a map or satellite imagery.
Tip: Download models for testing from http://sketchup.google.com/3dwarehouse.
To Add 3D Models to a Scene
-
Start Viz Artist.
-
Add the 3D models plug-in to an empty scene tree.
-
Open the 3D models plug-in editor and load a KMZ file.
To Add 3D Models to a Map
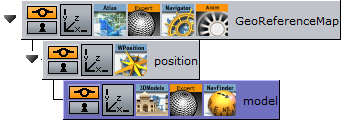
-
Start Viz Artist.
-
Add the Navigator to an empty scene tree.
-
Add the Atlas plug-in to the GeoReferenceMap container.
-
Open the Atlas editor and set it to use Mercator projection.
-
Add a new group as a sub-container of the first container and name it position.
-
Add the World Position plug-in to the position group.
-
Add a new group as a sub-container of the position group and name it model.
-
Add the 3D models, Expert and NavFinder plug-in to the model group.
-
Open the 3D models plug-in editor and load a KMZ file (e.g. Tower Bridge in London).
-
Click Go To Model. This should bring the model into view.
-
Open the Navigator editor, select Advanced, and then enable (On) the Pan and Tilt Animation option.
-
Open the 3D models plug-in editor again and click Go To Model.
-
Open the transformation editor for the model container.
-
Open the NavFinder editor in order to adjust the distance, pan and tilt of the map.
Tip: Press Shift+CTRL while adjusting the Distance, and Shift while adjusting the Pan and Tilt.
See Also
-
Viz Artist User Guide for information on the Expert plug-in.