
Viz Artist User Guide
Version 3.12 | Published October 17, 2019 ©
Clipper
![]()
The Clipper plug-in is an alternative to the mask function. Objects with the clipper plug-in attached that are placed behind the clipper plane and are masked/clipped. If an object is only partially behind a clipper plane, only the parts of the object that are behind the plane are clipped out, since the clipping is done in true 3D space. The function uses the OpenGL clipping planes. Up to six of them may be used. To define a clipper plane use the Properties Panel (see Modify Container Properties).
All the containers that you want to be affected by the clipping plane, you must have the clipper plug-in applied and thereafter in the editor specify which of the clipping plane is to mask out/clip the container. It is possible to let a container be affected by multiple clipping planes.
The clipper plug-in can replace mask in many situations. Some of the advantages are compared to normal mask are:
-
Clipping is done in true 3D space, while masking is done in 2D (although the 2D mask is created by a 3D object).
-
There is no performance hit. In fact there is even a performance gain if parts of the object are clipped. Regular masks have a quite high performance cost.
Note: This plug-in is located in: Built Ins -> Container plug-ins -> Global
This page contains the following topics and procedures:
Clipper Properties

-
Planes: Enables the planes. By default 1 is enabled.
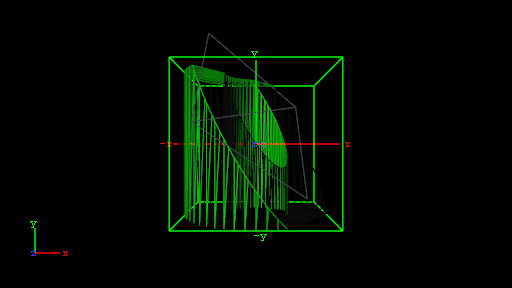
To Create a Clipping Plane Effect

-
Add two group containers to the scene tree (same level) and name them Cylinder and ClipperRectangle.
-
Add the following to the Cylinder container:
-
Cylinder geometry plug-in
-
Clipper container plug-in
-
Material
-
Optional: Expert container plug-in
-
-
Add the following to the ClipperRectangle container:
-
Rectangle geometry plug-in
-
Material
-
Optional: Expert container plug-in
-
-
Open the editor for the Cylinder container and set Scaling (locked) to 2.0.
-
Open the Cylinder editor and set Hole to 45.0.
-
Open the Clipper editor and enable Plane 1 (enabled by default).
-
Optional: Open the Expert editor(s) and enable Back Face (On) and Twosided Lighting.
-
Open the editor for the ClipperRectangle and set the following parameters for the following properties:
-
Set Position Y to 45.0.
-
Set Rotation X to -45.0.
-
Set Rotation Y to 45.0.
-
Set Scaling (locked) to 2.0.
-
-
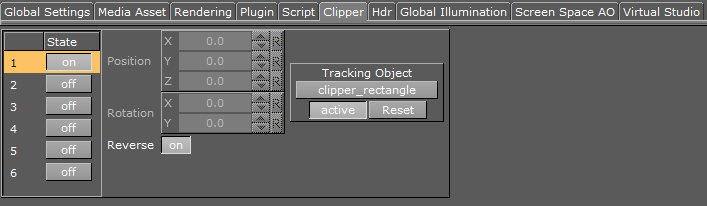
Open Scene Settings, and select the Clipper Panel tab.
-
Enable State 1, and Reverse.

plugins_container_clipper_scene_result.png -
Drag and drop the ClipperRectangle container onto the Tracking Object drop zone.
plugins_container_clipper_scene_result_notenabled.png -
Optional: Open the Expert editor(s) and enable the Wireframe mode to see rendering result, and the effect clipping has on the polygons.
See Also