
Viz Artist User Guide
Version 3.12 | Published October 17, 2019 ©
Containers
A Container combines a set of properties to one block used in the Scene (a Scene can contain many Containers). Containers can also be multi selected to modify or move many Containers at once.
This section contains information on these topics:
Container Names
You can rename containers to ease identification of their role(s) in your scene design. Container names can be any combination of uppercase and lowercase letters, or numbers. However, they cannot contain any of the following special characters:
-
$ (dollar sign)
-
/ (slash mark)
-
\ (backslash)
-
@ (at sign)
-
* (asterisk)
-
? (question mark)
-
% (percent)
-
" (quotation mark)
-
{ } (curly brackets)
Container Icons
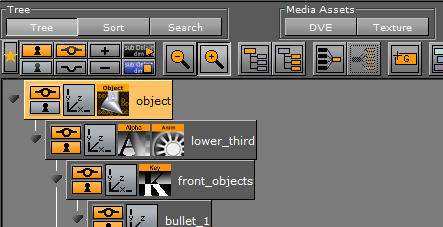
![]()
Every Container is shown with a name and three basic icons:
-
 Show/Hide: Shows if the Container and all its Sub-Containers are visible/invisible in the Scene Editor. Click the icon to change the state.
 -
 Locked/Unlocked: Shows if the Container is locked so that properties cannot be manipulated in the Scene Editor, or unlocked so that properties can be manipulated. Click the icon to change the state.
 Example: An unlocked item can be resized and repositioned in the Scene Editor.
-
 Transformation Editor: Opens the Transformation Editor in the Container view.
A Container that has Sub-Containers is marked with a black arrow to the left of the Container.
-
 Collapse/Expand: If the arrow points to the right, the Container is collapsed and the Sub-Containers are not shown in the Scene Tree. If the arrow points downwards, the Container is expanded and the Sub-Containers are shown in the Scene Tree. Click the icon to change the state.
The following icons are only available if the respective items are applied to the Container:
Note: Materials and geometries can be dragged from a Container to the Database area. This creates new independent instances of these items in the database. Dragging an image from a Container to the Database area only creates a linked item.

-
Geometry items: Shows the geometry held by the Container (e.g. a merged or imported geometry). The thumbnail icon reflects the geometry.

-
Material items: Shows that a material has been applied to the Container. The color of the icon reflects the color of the material and its properties. If there is no material icon, a standard white base color is used for the Container. Click the icon to open the Material Editor (see also Working with Material and Material Advanced Items).
Note: A Sub-Container can inherit color from a parent Container.

-
Image items: Shows that an image has been applied to the Container. The thumbnail on the icon reflects the image. There are two ways to apply an image to a Container. If the Container holds geometry, the image is used for texturing the geometry. Click the icon to open the Image Editor.

-
Font items: Shows that a font has been applied to the Container. Click the icon to open the Text Editor.
The following icons are only available if the respective plug-ins are applied to the Container:
![]()
-
Geometry Built Ins: Shows the geometry held by the Container. The icon reflects the built-in Geometry Plug-ins, in this example a cone.

-
Container Built Ins: Shows that the Container holds a Container function. The icon reflects the Container Plug-ins, in this example an alpha.

-
Media Assets: Shows that the Container holds a Media Asset. The icon reflects the Media Assets, in this example a Clip Channel.

-
Animation: Shows that the Container contains animated items (see Create Animations).
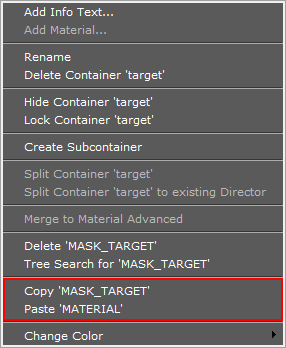
Container Context Menu
A right-click on a Container in the Scene Tree opens a Container context menu.
Right-click on a Container Name
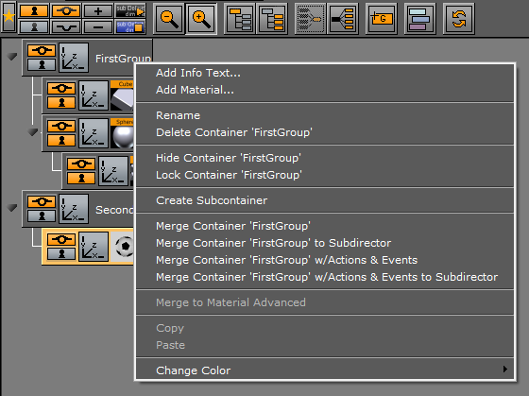
Right-click on the Container name to show these context menu options (dependent on the Container contents):
-
Add Info Text: Makes it possible to add text-based information on a Container. Also available as a plug-in by clicking Built Ins and then double-clicking the Container plug-ins tab.
-
Add Material: Adds a Material to the selected Container. See also Working with Material and Material Advanced Items.
-
Rename: Makes it possible to change the name of the selected Container.
-
Delete Container: Deletes the selected Container.
-
Show/Hide Container: Indicates if the selected Container and all its Sub-Containers are visible/invisible in the Scene Editor.
-
Lock/Unlock Container: Disables or enables the ability to modify the transformation of the selected Container in the Scene Editor.
-
Create Sub Container: Creates a new empty Sub-Container for the selected Container.
-
Merge Container: Merges the selected Container and all its Sub-Containers into one compound object, or extracts an already merged object.
-
Merge Container to Sub Container: Merges the selected Container(s) and all the respective Sub-Containers into one compound object and creates a new sub director for the merged animation.
-
Merge Container w/ Actions & Events to Sub Director: Merges the selected Container(s) and all the respective Sub-Containers into one compound object, including actions and events and creates a new sub director for the merged animation.
-
Merge Container w/ Actions & Events to Sub Container: Merges the selected Container(s) and all the respective Sub-Containers into one compound object, including actions and events.
-
Merge to Material Advanced: Merges multiple objects to one, creating advanced material(s). See Working with Material and Material Advanced Items.
-
Change Color: Applies a color to the selected Container. Colorized Containers make the Scene Tree more organized. For example, all font Containers can be colored red, while all Containers that hold images can be colored blue. Four active colors are configured by default.
Tip: To modify the color of multiple containers, multi select the required Containers and click on
 in the tree .
Right-click on a Container Property
Right-click on a Container property to show these additional menu options:

-
Delete property: Deletes the property from the Container.
-
Tree Search for property: Selects the Search Button, and searches the Scene Tree for instances of this property.
-
Database Search for property: Searches for the property in the database, and shows the result in the Server Panel.
Note: This menu option is only available for images.
-
Reference Search for property: Searches for the property in the Graphic Hub database, and shows the result in the Search window.
Note: This menu option is only available for images.
Right-click on a Container Media Asset Property
Do a right-click on a Container Media Asset property, to show these additional menu options:
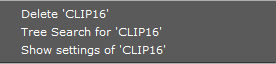
-
Delete <Media Asset>: Deletes the Media Asset from the Container.
-
Tree Search for <Media Asset>: Selects the Search button, and searches the Scene Tree for instances of this property.
-
Show settings of <Media Asset>: Opens the Texture View (Media Asset Manager) and the Media Assets tab of the Scene Settings in the Property panel (see Media Asset Workflow).
Add Containers to a Scene
Containers can be added to the Scene by dragging an item onto the Scene Tree, Scene Editor or Property Editor.
By dragging an item to the Scene Editor, the Container is added at the top of the Scene Tree.
Tip: items can be added to a Scene by dragging them from the result window after a database search.
By selecting multiple items from the Server Panel and dragging them onto the Scene Tree, all of them are added.
To Add Root or Sub-Containers
items that are dragged onto the Scene Tree can be positioned in various ways, and create either root or Sub-Containers.
-
 Sub-Container: Dropping an item at the right side of a Container in the Scene Tree creates a Sub-Container.
 -
 Root Container Below/Above: Dropping the item at the left side of a Container in the Scene Tree creates a root Container at the same hierarchy level, either below or above the selected Container.
To Add Empty Containers

Clicking the Create Group button (Ctrl+Insert) adds an empty Container above the selected Container. If a Container is not selected, it adds the new Container to the root level. The Create Group button is only available if Basic is selected from the Scene Tree menu.
To Add an Empty Container
-
Click the Create Group button from the Display area.
To Add a Container at a Specific Location in the Scene Tree
-
Drag the Create Group icon and place it as a above or below of an existing Container, or as a Sub-Container.
Select Multiple Containers
More than one Container can be selected in the Scene Tree.
When multiple Containers are selected in the Scene tree, properties can be applied to all the selected items. This multiple selection feature is global.
To Select Multiple Containers
-
Press Ctrl and click on each Container.
To Select All Containers
-
With the cursor over the Scene Tree, press Ctrl+A.
To Select a Range of Containers
-
Click on a Container.
-
Press Shift and click the last required Container.
All Containers in between are selected.
Copy Containers
To Copy a Container within a Scene
-
Hold Ctrl and drag the Container to its new position, or
-
Use Ctrl+C and Ctrl+V to copy and paste the Container. Copied Containers are placed as Sub-Containers of the selected Container.
Note: When copying a Container with Sub-Containers, all Sub-Containers are copied as part of the same operation.
To Copy Multiple Containers at Once
-
Hold Ctrl and the left mouse button and drag the Containers to their new position, and then click the right mouse button to release.
Move Containers
To Move a Container within a Scene
-
Drag it to the new position, or
-
Use Ctrl+X and Ctrl+V to cut and paste the Container(s) to the new position.
To Retain Transformation Properties While Moving a Container within a Scene
Pressing the Alt button while moving a Container (or group of Containers) within the Scene retains the transformation properties. This lets a Container, which is part of a Group, to be moved to another group while the absolute transformation of the Container does not change, although the parent Containers (Groups) have different transformations.
For example:

-
Group 1: The Group position is X 100.0 and Y 100.0. The Container position is X 0.0 and Y 0.0.
-
Group 2: The Group position is X 0.0 and Y 0.0.
When a Container is moved from Group 1 to Group 2, while pressing the Alt button, the moved Container inherits its former Group’s position values (i.e. X 100.0 and Y 100.0), so its absolute transformation stays the same.
Moving it back, while holding the Alt button, its transformation properties are readjusted. Meaning, if you adjust the moved Container’s position X to 200.0, before moving it back to its original Group, its position X is 100.0 and position Y 0.0 after the move.
-
Add two group Containers to the Scene Tree.
-
Rename the groups to Group 1 and Group 2.
-
Open Group 1’s transformation editor and set Position X and Y to 100.0.
-
Add a geometry (e.g. Cylinder) as a Sub-Container of Group 1.
-
Add material to the Cylinder.
-
Press and hold the Alt button and place the Cylinder as a Sub-Container of Group 2. When the Container is moved a letter R shows in the drag and drop window.
-
Release the Alt button.
-
Open the Cylinder Container’s transformation editor and set Position X to 200.0.
-
Press and hold the Alt button and place the Cylinder as a Sub-Container of Group 1 and check that the transformation properties are:
-
Group 1: Position X 100.0 and Y 100.0.
-
Cylinder: Position X 100.0 and Y 0.0.
-
Rename Containers
To Rename a Container
-
Double-click the Container name, or
-
Right-click a Container. Click on Rename in the Container context menu.
To Rename Multiple Containers
-
Multi select the required containers.
-
Rename one of the selected containers and add # to the end of the text:
-
Example 1: Container#
-
Example 2: group#
-
-
Press Enter.
-
All selected Containers are renamed.
-
Example 1: Container1, Container2, Container3, etc.
-
Example 2: group1, group2, group3, etc.

-
Edit Container Properties
To Edit the Properties of a Container
-
Select the Container in the Scene Tree, or in the Scene Editor. Its editor shows in the Properties Panel (see Modify Container Properties).
To Copy a Property from One Container to Another
-
Drag the property from the source Container to the target Container, or use the context menu.
Delete Containers
To Delete a Container from a Scene
-
Drag a Container to the trash can, or
-
Right-click the Container, and in the context menu select Delete Container [Name], or
-
Use the shortcut keys Ctrl+Delete.
Note: If deleting a parent Container, all Sub-Containers are deleted too.
Merge Containers
Containers can be merged into compound objects and saved as reusable components to the Graphic Hub database. Any animations are also merged and added to the new compound object’s Container.
A saved compound object can be used in other Scenes have an active reference between the stored object and all Scenes where it has been used by default. Through use of stored objects with active references, changes can be applied to many Scenes at once, which is typically a meaningful way to work when designing a set of Scenes that share many design items.
Note: The geometry of a compound object cannot be edited. A compound object must be split for the geometry to be edited again. Splitting a referenced compound object disables the reference.
Sometimes, when opening a Scene with merged objects, the message “Old merge style, convert to new merge style” shows. This is a known issue when combining the Autofollow plug-in with merged objects.
In merged objects the ordering of Containers is reversed which leads to broken autofollow functionality (for first and next reference modes); hence, this merge-style conversion corrects the ordering. Designers that worked around this problem in their Scenes do not need to convert; hence, the conversion is not automated.
This behavior is not backward compatible because older versions assume reversed sort order. Ungrouping and grouping with older Viz versions on new Scenes does not solve this issue.
To overcome this issue, it is recommended to update all Viz Artist/Engine versions to the official 3.2.2 release and later by opening the Scene and converting it to the new merge style.
To Merge Containers into a Compound Object
-
Select a Container which contains Sub-Containers.
-
Merge the Container with all its Sub-Containers:
-
Click the Merge button, or
-
Press Ctrl+M,
-
or right-click the Container and select Merge Container from the context menu.
Note: The Merge button is only available if Tree is selected from the Scene Tree menu.
-
To Split a Merged Compound Object
-
Select a merged Container.
-
Split the Container:
-
Click the Split button, or
-
Press Ctrl+Shift+M, or
-
Right-click the merged Container and select Split Container from the context menu,
Note: The Split button is only available if Basic is selected from the Scene Tree menu.
-
To Save a Compound Object to a Graphic Hub
-
Right-click a Container (with or without Sub-Containers),
-
In the context menu select Merge Container.
-
Drag the compound object’s icon from the property editor or Scene Tree and drop it onto a folder/project in the Server Panel.
-
Type a descriptive name for the object in the dialog box
-
Click Ok. The object is now visible in under the Server Objects tab.
Tip: Any animations or scripts used within the object are kept when saving.
Note: Make sure to drag only the object icon, not the whole Container.
Group Containers
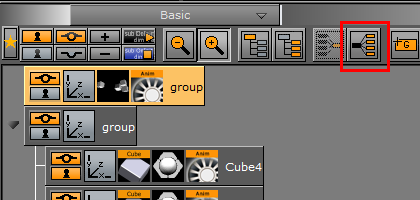
Containers in the Scene Tree can be organized in a hierarchy and grouped in logical divisions. The hierarchy depth is practically unlimited. Grouping Containers can be compared to creating a parent/child hierarchy. Such a hierarchy provides a better overview, especially in complex Scenes, and is very practical since changing the properties of the group (for example adding a new material) also applies the changes to all the Sub-Containers.
Note: Changing the properties of one of the Sub-Containers (for example adding a material) overrides the settings for this particular Sub-Container.
Moving one group is also much easier than moving a lot of single Containers.
A parent Container, that has Sub-Containers, is marked with a black arrow to the left of the Container. If the arrow points to the right (  ), the Container is collapsed and the Sub-Containers are not shown in the Scene Tree. If the arrow points downwards (
  ), the Container is expanded and the next level of Sub-Containers are shown.
Any Container can basically be used as parent, although group Containers (that hold transformation only) are best suited.
To Group Existing Containers

-
Select the Containers to be grouped.
-
Click the Group (Ctrl+G) button from the Display area.
This adds an empty group Container one level higher than the original Containers.Note: The Group button is only available if Basic is selected from the Scene Tree menu.
To Ungroup Containers

-
Select the parent Container
-
Click the Ungroup (Ctrl+Shift+G) button from the Display area.
Note: The Ungroup button is only available if Basic is selected from the Scene Tree menu. Also, tree structure further down in the hierarchy remains.
To Detach a Single Container From a Group
-
Drag it from the group and place it somewhere in the Scene Tree.
See Also
-
For more information about setting default merge and split behaviors, see the User Interface page in the Configuring Viz section of the Viz Engine Administrator Guide.
-
For more information about how to configure colors, see the Colors page in the Configuring Viz section of the Viz Engine Administrator Guide.