
Viz Artist User Guide
Version 3.12 | Published October 17, 2019 ©
RFxSmoke
![]()
RFxSmoke is the baseline plug-in within the RealFX plug-in set, which creates realistic visualization of smoke, fire, explosions and much more (the level of creative skill is the only limitation).
The basic function of the object is that it emits particles from a point and moves them in some direction until they die or fade away. With the use of different texture mappings and settings, many effects can be achieved.
Note: This plug-in is located in: Built Ins -> Geom plug-ins -> RealFX
This page contains the following topics:
RFxSmoke Properties
-
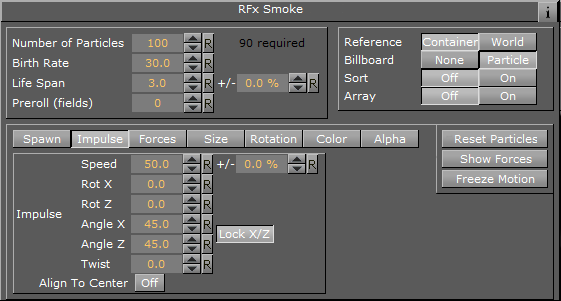
Number of particles: Sets the number of particles to be active at the same time. The number of required particles is calculated by the Birth Rate multiplied by the Life Span. If this is lower or equal, the number of particles present is a constant flow of particles, otherwise the plug-in collects particles until the minimum number of particles has been reached and then spawns them.
-
Birth Rate: Sets the birth rate of particles per second.
-
Life Span: Sets the life span of the objects in seconds. In the field to the right of Life Span, set a percentage over which the life span of the particles varies. If Life Span is set to three and the variation to 50%, the life span of particles vary randomly between 1,5 and 4,5 seconds. This creates more realism, since particles in real smoke or fire does not have equal life span.
-
Preroll (fields): Sets the amount of fields to calculate before RFxSmoke goes On Air.
-
Reference: Sets the particles reference to either Container or World. If Container is selected, after emitted the particles relate their position to the containers position. If the emitter object is moved, the particles alter their position correspondingly. If World is chosen, the particles maintain their position and path even if the emitter is moved, they have their own world coordinates.
-
Billboard: If Particle is selected, the particles maintain a frontal position against the camera when the camera moves.
-
Sort: Enables/disables sorting.
-
Array: Enables/disables the use of array.
-
Reset Particles: Removes all already emitted particles.
-
Show Forces: Show help lines that show the forced settings of some of the parameters.
-
Freeze Motion: Halts the emitting process.
Spawn
Spawn parameters are related to the position of the smoke emitter. In the Spawn panel define the shape and size of the area in which the emitter should emit the particles.
-
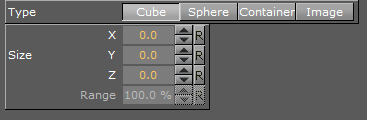
Type: Defines the shape or type of spawn area. Click Cube, Sphere, Container and Image to set if the spawn area should be shaped as a Cube or a Sphere, or if a container or image should be used.
-
Size: Sets the size, selected from the X, Y and Z values. If Sphere is selected and only the X value is set, the emitter creates particles while it moves randomly along a line. If a Y value is also set, the emitter moves within a circle. If a Z value is set, the emitter moves within a sphere. If Cube is selected the same applies, but the stages would then be a line, a rectangle and a Cube.
-
Spawn Range: Sets the range, within the Sphere or Cube, the emitter should use to distribute the particles. Default is 100%, where it uses the whole spawn area. If the value is reduced, a section, which starts from the middle of the spawn area where no particles are being emitted, increases correspondingly. If the value is set to 1%, the emitter only emits particles at the outer edge or surface of the cube or sphere.
Tip: Container is especially valuable when animating a Scene, as the smoke is emitted from the outline of an animated Container. To set the Container, which the smoke should emit from, drag the Container from the Scene Tree onto the drop zone.
Note: A Container must be 2D, such as a rectangle, circle, square, etc.
Impulse
In the Impulse panel set the parameters for how particles are emitted.
-
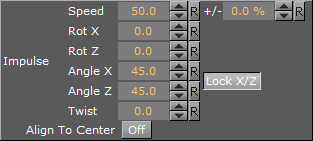
Speed: Sets the speed the particles have when they are emitted. In the field to the right of Speed, set a percentage over which the particle speed varies.
-
Rot X: Sets the X axis angle of the opening in the emitter, the emitter hole.
-
Rot Z: Sets the Z axis angle of the opening in the emitter, the emitter hole.
-
Angle X: Sets the X axis opening angle of the emitter hole. It can be done locked with the Z axis, or independently. Click Lock X/Y to The button to the right of the value field to lock or unlock the axes.
-
Angle Z: Sets the Z axis opening angle of the emitter hole.
-
Twist: Creates a twist of the opening angels of the emitter hole. It can also be described as a rotation of the emitter around the Y axis.
-
Align to Center: Disables all the above impulse parameters and aligns the particles above the emitter.
Forces
In the Forces panel are the parameters to create environmental effects, like wind, gravity and air resistance.
-
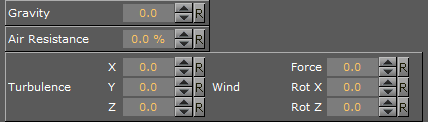
Gravity: Sets the degree of gravity, which affects the path of the particles. If set high, the smoke moves downwards. With a negative gravity, the particles rise faster.
-
Air Resistance: Sets the degree of air resistance to creates a force that prevents the particles from rising.
-
Turbulence X, Y and Z: Defines a simulation of turbulence on the particles as they rise. The turbulence effect is achieved through a jittering of the particles. The X, Y and Z values set the axis of the jittering movement.
-
Wind:
-
Force: Sets a level cross wind. A positive value blows from the left to towards the right, a negative the other way around. For example: If a horizontal wind force is not required, use the two next parameters to adjust the angle of the wind.
-
Rot X/Z: Sets the rotation of the wind force on the X and Z axis. Modify these values to change the direction of the wind defined in the Wind Force.
-
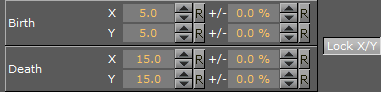
Size
In the Size panel are the parameters to the size of the particles at the moment of their birth and death. Between the time of birth and death, the size is a product of a linear interpolation.
-
Birth X/Y: Sets the size of each particle at the time it is being emitted.
-
Death X/Y: Sets the size of each of the particle at the time it fades away and dies.
-
Lock X/Y: Locks or unlocks the axes.
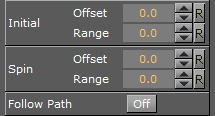
Rotation
In the Rotation panel, you can define a static rotated position or a spin of the particles. Both the static rotated position and the spin can either be set as an offset equal on all particles or as a range where the particles are rotated or span randomly. To see the effect, set the number of particles to a very low value and alter the rotation parameters.
-
Initial
-
Offset: Sets the degree of rotation the particles should have. This rotated position is static and remains throughout the life of each particle.
-
Range: Sets a degree range of rotation the particles should have. This rotated position is static and remains throughout the life of each particle. If for example the value is set to 30, the static rotated position of the particles varies randomly between 30° and -30°.
-
-
Spin
-
Offset: Sets the degree of spin each particle should have throughout its life time. The higher the value, the higher the number of spins. A positive value creates an counterclockwise rotation, a negative creates a clockwise.
-
Range: Sets a spin degree range for the particles. They spin randomly between the parameter value and the same value mirrored through zero.
-
-
Follow Path: If the RFxSmoke object is animated, enable this option to make the particles align their position to the animation path in the same way as is the case with the follow path option in the transformation editor.
Color
In the Color panel set the color of the particles throughout their life cycle. The particles can be set to change their color through stages from their birth to their death by the addition of more Key Frames (single click the color stage).
The left side of the color stage is at birth time and the right is at death time. By default there are two color Key Frames at each end, that can be clicked on, to set their color. The color range between two Key Frames is an interpolated transformation. More Key Frames can be added to create a more complex color transformation between particles birth and death.
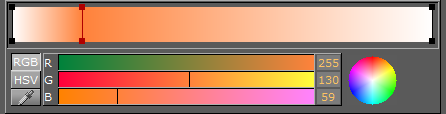
To delete color Key Frames, select them and press Delete or Backspace, on the keyboard.
Alpha
In the Alpha panel set the alpha values of the particles throughout their life cycle. The alpha editor contains a curve with points that can be moved, in both X and Y directions, to change the form of the curve. The X axis is the life time of the particles and the Y axis is the alpha value.
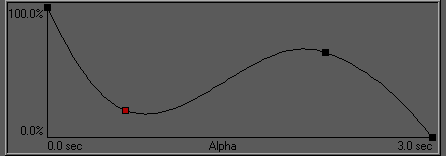
To select a point, or create a new one, left-click on the graph and drag the point to the required X and Y position. To delete a point, select it and press Delete on the keyboard.
See Also