
Viz Artist User Guide
Version 3.12 | Published October 17, 2019 ©
Polygon
![]()
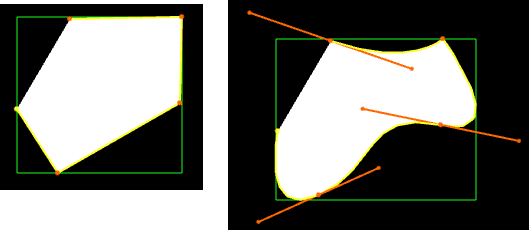
The Polygon Geometry plug-in enables the creation of user defined polygon shapes. The polygons are drawn and edited directly in the Scene Editor. Created Polygons can also be rotated to create a 3D object (see Revolve: Spline Rotation in 3D).
To create a Polygon, add the Polygon plug-in to a container and start drawing by clicking in the Scene Editor to create polygon nodes. A click, hold and drag converts the node into a spline handle for drawing curves. If an existing node is clicked on it removes the node, and if a line or spline is clicked on, between two nodes, it inserts a new node at this location. There are several Polygon Plug-in Editor Shortcuts. If more than one polygon is created, in the same container, and if they overlap each other, they act as masks.
Instead of drawing polygons manually, they can be imported as Adobe Illustrator files (*.ai) as well.
Note: Only Adobe Illustrator AI 88 format files are supported.
Note: This plug-in is located in: Built Ins -> Geom plug-ins -> Default
This page contains the following topics and procedures:
Polygon Properties
To toggle between the Polygon and Container properties:
-
Click the Polygon or Transformation icon in the:
-
Scene Tree Container, or
-
The Properties panel
-
-
In the Scene Editor:
-
Outside the polygon bounding box: Right click and select Properties > Geometry.
-
Inside the polygon bounding box: Right click and select Edit container.
-
-
Precision: Sets the precision of the spline calculation.
-
Import: Imports Adobe illustrator files. Opens a window to select a file and import. Only Adobe Illustrator AI 88 format files are supported.
-
Revolve: See Revolve: Spline Rotation in 3D.
-
Storage: Creates a Spline with coordinates. Press Enter to apply.

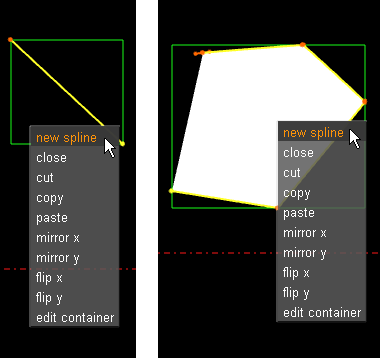
Polygon Scene Editor Context Menu
Right-click, and hold, in the polygon green bounding box, in the Scene Editor, to open the polygon context menu. To select a menu option see To Select an Option from the Context Menu.
Note: The right-click must be inside the created polygon shape box. If a click is outside the bounding box then the standard Scene Editor menu is shown.
-
New spline: Creates a new polygon in the same container.
-
Close/Open: Opens or closes a polygon.
-
Cut: Cuts the selected polygon or spline nodes.
-
Copy: Copies the selected polygon or spline nodes.
-
Paste: Pastes the selected polygon or spline nodes.
-
Mirror X/Mirror Y: Mirrors the created shape in the X or Y axis.
-
Flip x/Flip y: Flips the created shape in the X or Y axis.
-
Edit container: Opens the Container editor and exit polygon edit mode. To edit the polygon again, click on the polygon icon in the properties editor or the Scene Tree.
To Select an Option from the Context Menu
-
Right-click and hold.
-
Move the cursor to the required option.
-
Release to select.
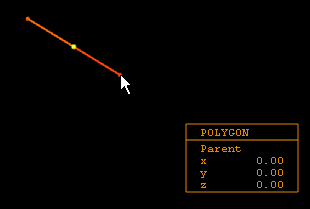
Create a Polygon
This section contains the following procedures:
To Create a Simple Spline
-
Create a Container.
-
Add the Polygon plug-in.
-
Click on the Polygon icon (in the Container or the Properties editor).
-
The polygon splines are created by each click in the Scene Editor:
-
Click in the Scene Editor to create a spline point
-
Click and drag in the Scene Editor to create a spline node, complete with handles (continue the drag to increase the length of the handles)
-
-
While the polygon plug-in is active, each click in the Scene Editor creates more polygon points, and creates the polygon shape.
Tip: At any time press and release Delete to remove the last created point. Press and hold Delete to remove more than one spline, or remove the whole polygon.
Once the spline has been created it can be modified, as required, with various shortcuts (see Polygon Plug-in Editor Shortcuts). List below are some common examples:
To Draw a New Spline
-
Right-click in an existing spline.
-
Click New Spline.
-
Add intersections as detailed in To Create a Simple Spline.
To Move a Spline
-
Select the spline to be moved:
-
Press S and click on a spline.
-
-
Press Alt and drag.
Tip: If there is only one spline in the Container, press Alt and drag.
To Move More Than One Spline
-
Select the splines to be moved:
-
Press S and drag around the splines.
-
-
Press Alt+S and drag.
To Add or Delete a Spline Point
-
Click anywhere on a spline to add another spline point.
-
Click on a spline point to delete it
To Move Spline Points
-
Press and hold Ctrl.
-
Click on a spline point and drag.
When Ctrl is pressed move any spline points as required.
To Create or Delete a Spline Point Handle
-
Press Shift:
-
Create: Click on a spline point and drag.
-
Delete: Click on a spline point with a handle.
-
To Resize a Spline Point Left or Right Handle
-
Press Shift.
-
Click on a spline point handle and drag. Only the selected handle moves.
To Resize a Spline Point Handle
-
Press Ctrl.
-
Click on a spline point handle and drag. The left and right handles move as one handle.
Note: The handle clicked on can be lengthened as required. The other handle remains the same length.
Note: If either the left or right handle has been moved individually, this sets the two handles together again.
To Mirror Spline Sections
-
Right-click on a spline, or select particular nodes of it with S.
-
Select either:
-
Mirror X: Mirrors whole spline along the X axis.
-
Mirror y: Mirrors whole spline along Y axis.
-
To Flip a Spline
-
Right-click on a spline.
-
Select either:
-
Flip x: Flips whole spline over X-axis.
-
Flip y: Flips whole spline over Y-axis.
-
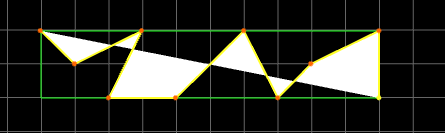
Scene Editor Grid
The Scene Editor Grid Tool-bar can be used as a great tool to help draw polygons. Together with the grid snap option polygon points can positioned, simply and accurately, in the 3D space.
Make sure that the polygon is aligned with the grid for the grid snap to work.
To Create a Spline in the Scene Editor Grid Snap
-
In the Scene Editor click
 (Grid).
 -
Click
 (Plane Type).
 -
Click
 (Free Grid).
 -
Click
 (Snap to Grid).
 -
Create a spline. Each spline point snaps to the nearest cross hairs on the grid.
To Move a Spline in the Grid with Snap
-
In the Scene Editor click
(Grid). -
Click
(Plane Type). -
Click
 (Free Grid).
 -
Click on
 (Move Object to Plane).
 -
Press Alt.
-
Click on the Spline and drag.
Note: If there is more than one Spline to be moved see To Move More Than One Spline.
The Spline snaps to the next set of cross hairs, and so on, as it is dragged.
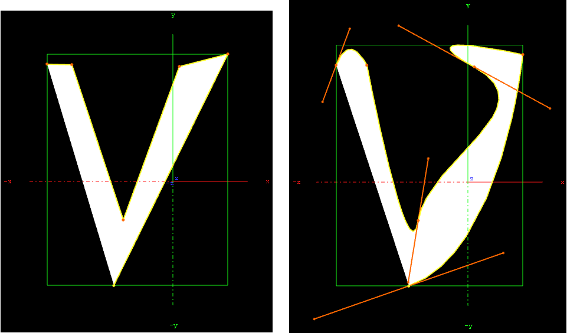
Revolve: Spline Rotation in 3D
The Spline rotation creates a 3D mesh by rotating the created spline.
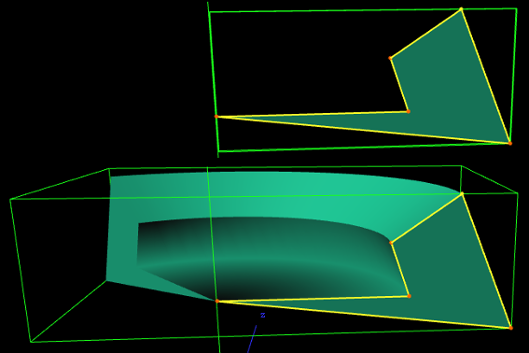
Use the Polygon Revolve Properties panel to modify the Spline as required.
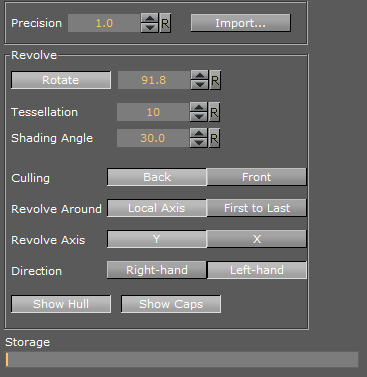
Polygon Revolve Properties
The Polygon Revolve properties are available after the first spline point has been added to the Scene Editor. Click on Rotate to activate.
-
Precision: Sets the precision of the spline calculation.
-
Import: Imports Adobe illustrator files. Opens a window to select a file and import. Only Adobe Illustrator AI 88 format files are supported.
-
Rotate: Creates the revolve mesh and activate all its settings.
-
Rotate in degrees box: Sets the degree of rotation.
-
-
Tessellation: Sets the degree of detail for the mesh.
-
Shading Angle: Defines how the shading normal are aligned on the revolve object surface.
-
Culling: Sets which side of the spline to view:
-
Back: View the back side of the spline.
-
Front: View the front side of the spline.
Note: To view both sides at the same time, add the Expert plug-in to the Container and active Back Face.
-
-
Revolve Around: Sets the axis to rotate the spline around.
-
Local Axis: Calculates the rotation around the Container axis when the Rotation angle is changed.
-
First to Last: Rotates around the first and last spline point (Revolve Axis is grayed out) when the Rotation angle is changed.
-
-
Revolve Axis: Sets which axis to rotate around:
-
Y: Rotates around the Y axis.
-
X: Rotates around the X axis.
-
-
Direction: Sets which direction to view the rotation:
-
Right-hand: View from the right hand side.
-
Left-hand: View from the left hand side.
-
-
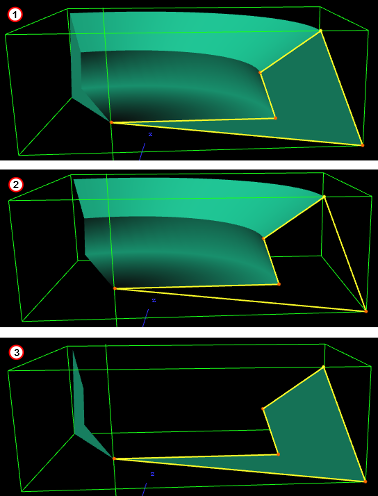
Show Hull: Shows the rotated shape (1 and 2).
-
Show Caps: Shows the original polygon shape at the beginning and end of the rotation (1 and 3).
To Rotate a Spline
-
Create a spline.
-
Click on Rotate.
-
Modify the created 3D object with the Polygon Revolve Properties.
See Also