
Viz Artist User Guide
Version 3.12 | Published October 17, 2019 ©
Global Settings Panel
This section contains information on the following topics and procedures:
Global Settings Properties
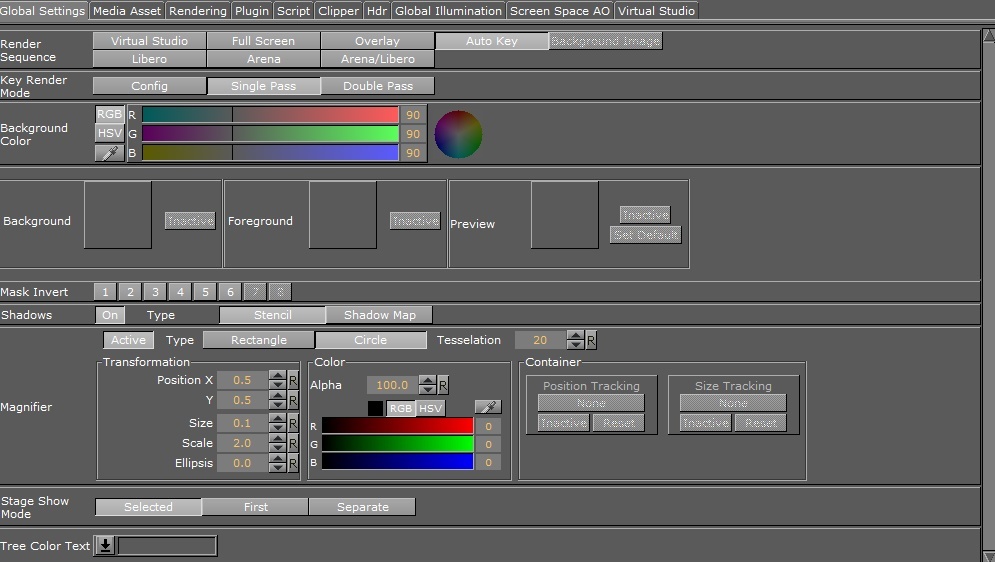
In the Global Settings panel, the basic parameters for a Scene can be modified:
-
Render Sequence: Defines how the alpha key signal should be generated (default is Overlay):

-
Virtual Studio: Switches from Overlay to Full Screen when the control mode of the current camera switches from Remote to Editor (see Camera Editor). In a Virtual Studio set, to do a camera flight with the virtual camera, when the real camera is stationary, the graphics must be set to Full Screen to avoid a situation where the virtual and the real camera have different position values. When the camera is switched from Remote to Editor (to do the flight) the keyed graphics automatically switch from Overlay to Full Screen.
This option is relevant only in combination with Viz Virtual Studio.
-
Full Screen: Enables downstream compositing and generates a full screen key that outputs a non-transparent key signal when Render Sequence is set to Full Screen. This means everything without a Key plug-in is treated as background graphics and appear behind DVEs on the output. Everything with a Key plug-in is rendered in front of DVEs. For setups using a Matrox X.mio video board, the key preview is all black, instead of all white, while show key is enabled in the Scene Editor. This allows the designer to work with containers with Key plug-ins during scene design.
-
Overlay: Sets as key signal only those Containers that have a Key function applied. Only Containers in the Scene Tree with a Key function applied are rendered into the key signal. Use this mode to correctly blend graphics and DVEs.
-
Auto Key: Generates the key signal automatically from the Containers in the Scene Tree, it does not require the application of Key functions to the Container. This function provides a worry-free overlay. This is the preferred mode for overlay graphics.
-
Background Image: Uses the alpha values of the background image as a key signal and Containers with a Key function applied and rendered on top. This option is only applicable if a background image with an alpha layer is added.
-
Libero: The render sequence for a Viz Engine used in with Viz Libero (see Viz Libero and Viz Arena Render Sequences).
-
Arena: The render sequence for a Viz Arena/multi-zone keying setup (see Viz Libero and Viz Arena Render Sequences).
-
Arena/Libero: The render sequence if the tracked camera is a Viz Arena image tracker (see Viz Libero and Viz Arena Render Sequences).
-
-
Key Render Mode:

-
Config: Renders the key according to the settings in the Viz Configuration (see the Configuring Viz section of the Viz Engine Administrator Guide).
-
Single Pass: Uses one rendering step. Use this for all new scenes and for scenes imported from version 2.8, as it is much faster.
-
Double Pass: Uses two rendering steps. Use for backward compatibility in scenes created in Viz Artist versions 3.0 to 3.3.
-
-
Background Color: Sets the color of the background.

-
Image and Media Asset Placement:

-
Background: Adds an image or Media Asset as the Scene background.
-
Foreground: Adds an image or Media Asset as the Scene foreground.
Note: If the foreground image or Media Asset has alpha, the Scene can be shown through the image or Media Asset.
-
Preview: Adds a fixed layout to the Scene. This visualizes how the total preview (camera picture and/or graphics/Media Asset) looks. To set the image as global default, click the Set Default button.
Tip: It is possible to drag results from a database search onto the Background, Foreground, and Preview drop zones.
-
-
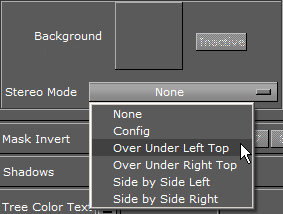
Stereo Mode: (license required) Selects the correct stereo mode for the inserted image (not available if Stereo Mode is set to Off in the Viz Configuration (see the Camera page in the Configuring Viz section of the Viz Engine Administrator Guide):
-
None: No Stereo mode.
-
Config: Images are drawn as set in the Viz Configuration (see the Camera page in the Configuring Viz section of the Viz Engine Administrator Guide).
-
Over Under Left Top or Over Under Right Top: Two images are stored, one over (top) and the other under (bottom), left or right eye (top) first. The image height is halved, providing half resolution.
-
Side by Side Left or Side by Side Right: Two images are stored, side by side, left or right eye first. The image width is halved, providing half resolution.
-
-
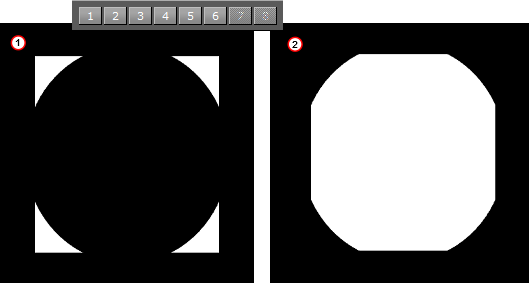
Mask Invert: Makes it possible to set one or more of the mask layers in a Scene to be inverted. With no mask inverted (1), the mask cuts out a hole where it covers the mask target object. With mask invert enabled (2), the mask target is only visible where the mask covers it:
-
Shadows: Enables or disables the shadow function in a Scene. The shadow function uses two layers from the mask function. With shadows enabled, there are only six layers available for the mask function (see Mask Source and Mask Target). In a scene where more than six mask layers are needed, shadows can be disabled (only very complex mask configurations need more than six layers). The Stencil shadow type is the least resource-demanding way to render shadows in scenes. For more advanced and better-looking shadows, cascaded shadow maps can be enabled. For more in-depth information on shadows in Viz Artist, please refer to Shadow Maps and Shadow Caster and Shadow Receiver.

Note: The Shadows On/Off button is only available when shadow type is set to Stencil, as Shadow Mapping is not affected by this setting.
-
Magnifier: Acts on the last rendered surface. It can be either a rectangle or a circle. The position and size is defined in normalized view-port coordinates.
-
Active/Inactive: Sets the magnifier to active or inactive.
-
Type: Selects a Rectangle or a Circle for the magnification area.
-
Tesselation: Sets the tessellation, if Circle is selected.
-
Transformation: Sets the parameters for the Position, Size, Scale and Ellipsis of the magnified area.
-
Color: Sets the alpha and the color of the magnified area.
-
Container: Selects a Container to control the position and, or, the size of the magnifier. Drag the Container to be tracked in the desired box.

-
-
Stage Show Mode: Defines how the STAGE*SHOWMODE Viz Engine command should be handled for the scene. The command takes a named stop point or tag as a parameter, and the show-mode defines how the scene is executed.

-
Selected: Sets the time-line of all selected directors to the first found tag location. This is the default setting.
-
First: Sets the time-line of the first found director, containing the searched tag, to the tag's position.
-
Separate: Positions the time-line for each director, containing the searched tag, to the tag's location.
-
-
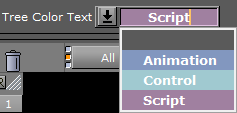
Tree Color Text: Defines custom text labels for the scene tree colors in the current scene. To define global labels or custom colors, go to Viz Configuration > User Interface > Colors (see the Viz Engine Administrator Guide).
Images as Background or Foreground
This section details procedures with images use as background, foreground and preview:
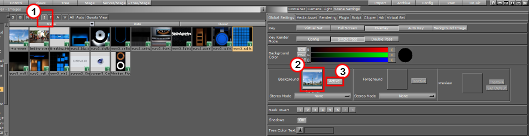
To Add an Image
-
Click Server.
-
Click the I tab for Images (1).
-
Drag the required image onto the drop zone (2). A thumbnail of the image is shown in the drop zone button. Dragging a new image onto the drop zone automatically replaces the old image.
To Remove an Image
Drag the image from the drop zone to the trash can.
To View an Image Source Project or Folder
Click the image on the drop zone. The project or folder it is placed in is visible. If the image is linked, the first project or folder is selected.
To Show/Hide an Image in the Scene Editor
Click the Active/Inactive button next to the drop zone (3). If the image has a different aspect ratio than the screen resolution, the image is stretched to fit.