
Viz Artist User Guide
Version 3.12 | Published October 17, 2019 ©
Expert

The Expert plug-in sets some special properties and adds some advanced functions to a Container.
Note: This plug-in is located in: Built Ins -> Container plug-ins -> Global
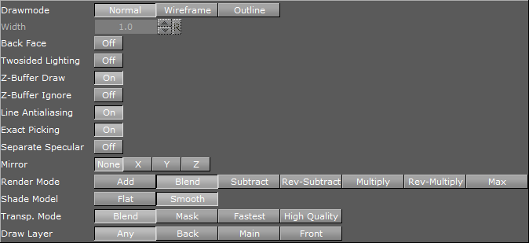
Expert Properties
-
Draw Mode: Selects how to have the container drawn:
-
Normal: Shows the rendered object with material and/or textures.
-
Wireframe: Shows the polygons that are drawn to create the object.
-
Outline: Shows the outline of the object.
-
-
Width: Sets the width of the wires if Wireframe or Outline draw mode is selected.
-
Back Face: Draws a backface for an image or a 2D font when enabled. This takes more performance to render.
-
Twosided Lighting: Enables two-sided lighting for a single container instead for a whole scene.
-
Z-Buffer Draw: Disables the OpenGL z-buffer draw when set to Off. This is in some cases the last possibility for solving some z-sort problems. The technical explanation for this is very complex and is not described here.
-
Z-Buffer Ignore: Ignores the OpenGL z-buffer draw option when set to Off, and draws the object no matter if it is in the back or not.
-
Line Anti aliasing: Renders an anti-aliased outline for 2D objects on machines that do not have anti-aliasing with multi-sampling. This extra outline can be removed by disabling this option.
-
Exact Picking: Enables or disables Exact picking for Events. If Exact Picking is disabled, the bounding box is used instead of a pixel readback.
-
Separate Specular: Enables specular highlights for textured geometry.
-
Mirror: Enables you to mirror an image/texture or a 2D font over the X-, Y- and Z-axis.
-
Render Mode:
-
Add: Symbolically: C*A + FC. The source color gets added to the target color. The amount of color that is added depends, as we see from the formula, on the alpha value. However, it is always an addition, so the end result is always a lighter color than the initial frame content. If the frame color has high values on all three color channels (RGB), you might experience that the addition of the new color takes all channels to values above 255 (saturation). The values are clamped at 255, which is white.
-
Blend: Symbolically: C*A+(1-A)*FC. The new color value gets created as a weighted average of the source and the target. The weight factor is the alpha value of the rendered color. That means that if the incoming color has a very low alpha value, its influence on the new color is small, and conversely, if the new color has a high alpha value, its influence on the new color is larger.
-
Subtract: Symbolically: FC-C*A. The new color is the result of the incoming color being subtracted from the color in the frame buffer and the result is written back into the frame buffer. The alpha value of the incoming color decides how much who gets subtracted. If the incoming color has high values on all three color channels (RGB), you might experience that the subtraction of the new color takes all channel values to 0, and the result is a black color.
-
Rev-Subtract: Symbolically: C*A-FC. This is a reversed version of subtractive. The color in the frame buffer gets subtracted from the incoming color and the result is written back into the frame buffer.
-
Multiply: Symbolically: CA*FC. The new color and alpha get multiplied with the existing values in the frame buffer. The formula presupposes that the colors and alpha re described as values between 0 and 1. A color rendered with multiply always results in a darker color than both the color being rendered and the color in the frame buffer.
-
Rev-Multiply: This is a reversed version of multiply.
-
Max: Higher color values overwrite lower color values (for example, white draws over black - independently from the Z-Sort).
-
-
Shade Model
-
Flat: Shows the single polygons the texture is made of.
-
Smooth: Calculates a smooth texture.
-
-
Transp. Mode
-
Blend: Is the standard option.
-
Mask: Uses a raster.
-
Fastest: Uses the transparency mode which takes the least time to render.
-
High Quality: Uses the transparency mode which delivers the best looking result.
-
-
Draw Layer: Defines if the objects are drawn in all layers or only if it shows in a certain layer:
-
Any: The object is always drawn.
-
Main: The object is drawn only if it is in a scene, located in the Main Layer.
-
Back: The object is drawn only if it sits in the Back Layer.
-
Front: The object is drawn only if it is in the Front Layer.
Note: The Draw Layer option can be used, for example, for a menu in a Scene which should be only visible if it is loaded in the front layer.
-