Viz Artist User Guide
Version 3.12 | Published October 17, 2019 ©
Spline Path
![]()
Use this plug-in to create complex paths with an arrow look.
Note: This plug-in is located in: Built Ins -> Geom plug-ins -> Default
This page contains the following topics and procedures:
Spline Path Properties

-
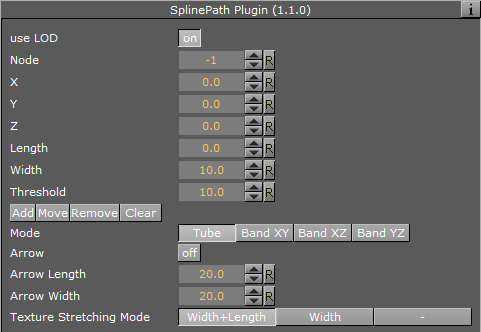
use LOD: Enables/disables dynamic level of detail.
-
Node: Defines the node index. For example, node 3 or node 25.
-
X, Y and Z: Sets the 3D point to define a node.
-
Length: Stretches the entire path in X-direction.
-
Width: Stretches the entire path in Y-direction.
-
Threshold: Increase this value if you do not need a high path accuracy but more performance.
-
Add, Move, Remove and Clear: Add adds a new node with an specific index. Move moves an existing node to another X, Y or Z-point. Remove removes an existing node. Clear clears all nodes.
-
Mode: The following options are available:
-
Tube: Renders the entire object.
-
Band XY: Renders only the front side.
-
Band XZ: Renders only the top side.
-
Band YZ: Renders only the left side.
-
-
Arrow: Creates an array look.
-
Arrow Length: Sets the arrow length (only when Arrow is set to On)
-
Arrow Width: Sets the arrow width (only when Arrow is set to On)
-
Texture Stretching Mode:
To Create a Spline Path

-
Create a new group container.
-
Add the Spline Path plug-in.
-
Add the Expert plug-in.
-
Open the Expert editor.
-
Set Back Face to On.
-
Add a Material and/or a Texture to the group.
-
Open the Spline Path editor.
-
Set Node to 0 / X to 50.0 / Y to 50.0.
-
Click Add.
-
Set Node to 1 / X to 150.0 / Y to 25.0.
-
Click Add.
-
Set Node to 2 / X to 250.0 / Y to 10.0.
-
Click Add.
-
Set Node to 3, X to 350.0, Y to 45.0.
-
Click Add.