
Viz Artist User Guide
Version 3.12 | Published October 17, 2019 ©
VertexBone and VertexSkin Plug-in
Introduction
VertexSkinning describes the technique of using rigs (consisting of auxiliary objects called bones) to animate meshes. Instead of animating each vertex (shape animation or morphing) bones are animated and deform the mesh accordingly. This saves time during animation and memory. The process of defining which vertices are deformed by a given bone is called weight painting. A vertex can be influenced by more than one bone to guaranty smoother animation around joints. As the mesh stretches around a joint like skin, this functionality is commonly called vertex skinning.
Quick Steps
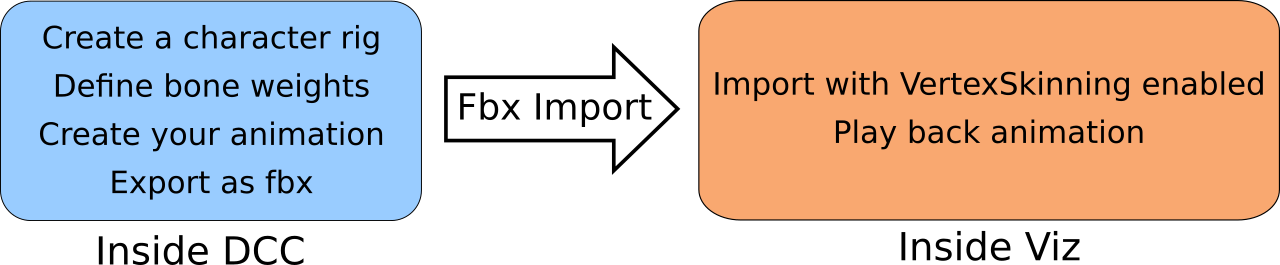
Step-by-step
Preparation
-
Load a character (or any other model) in the Digital Content Creator (DCC) of choice (Maya, Cinema4D, Blender, 3dsMax etc).
-
Create a skeleton (armature). Normally, this is a hierarchy of bones so when the spine rotates the whole upper body rotates with it. This should look something like the skeleton in Illustration 1. These bones later become containers in the imported Viz scene.
-
Apply the weight painting. Most DCC programs can this automatically with pretty goods results for most meshes (e.g. Maya). Other programs offer only a good starting point that needs further refinement. Illustration 1 shows a selected bone (outlined in cyan) and a mesh with weight paints (blue: weight = 0.0, red: weight = 1.0).
-
Animate the character using the bones created earlier.
-
Export the scene from the DCC. Remember to check that bones and animations are exported.
-
Switch to Viz Artist.
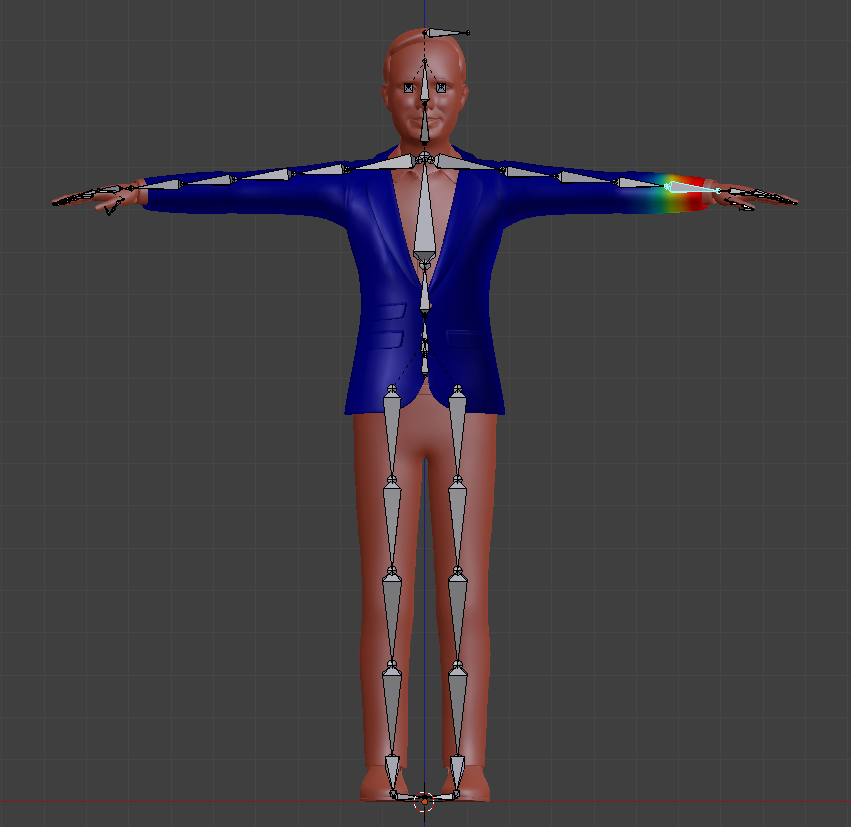
Illustration 1: Weight Painting
Viz Artist
-
Import the .fbx file of your scene in Viz Artist.
-
Enable the import skinned animations option (as shown in Illustration 2).
-
Play the scene using the default director after the scene is loaded.
Important: Do not change the hierarchy of the containers with VertexBone plug-ins! Containers can be added, but the parent-child relationship of bones should not be altered.
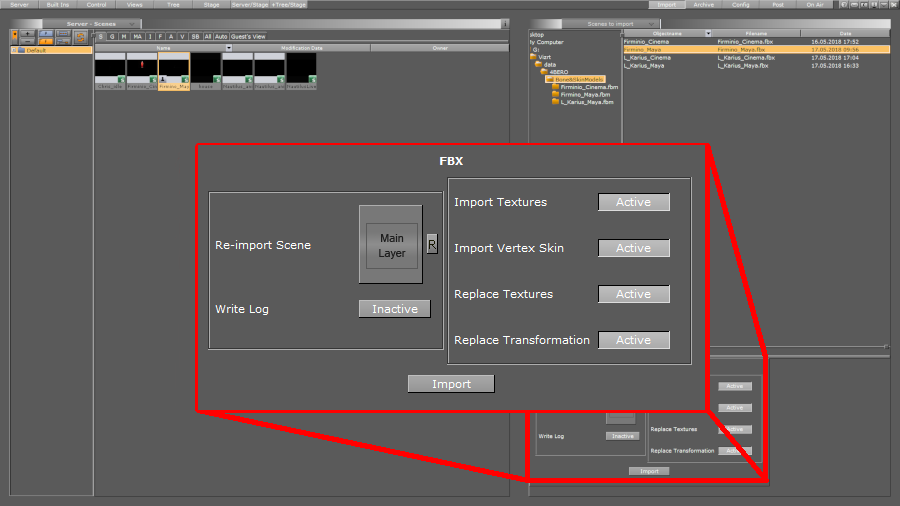
Illustration 2: Viz import screen
Capabilities of Viz Artist VertexSkinning
Viz Artist can:
-
Import skinned meshes via .fbx files.
-
Playback animations.
As the skeleton is represented via Containers marked by a VertexBone plug-in new animations could be created in VizEngine but for now there are is no functionality to properly support this (like inverse kinematic or movement constraints on bones).
Viz Artist cannot:
-
Perform inverse kinematics.
-
Perform rigging or skinning.
-
Handle multiple animations (currently only the first animation, called the Default Take in .fbx terms).
-
Allow VertexSkin and VertexBone plug-ins to be placed by hand. There are hidden parameters imported from the .fbx file that cannot be edited or generated inside Viz Artist.
-
Provide compatability with external shader packages (e.g. RTT shaders) with Vertex Skinning in Viz.
-
Support cubemaps in VertexSkinning.
Role of Plug-ins
VertexSkin
VertexSkin is the main plug-in that marks a mesh that uses Vertex Skinning.
Note: Do not remove this plug-in as this would need a clean, new import (not re-import) to get the scene running again.
If you want some additional skinning debug information, you can activate:
-
Show bones: Verifies the location of each bone visually.
-
Show the weight of a bone: Visualizes the influence of the selected bone container on the target mesh. Only useable with no other shader present.
Motion Capture Live Tracking
To apply live motion capturing data to a Viz geometry, the following steps are required:
-
Setup Viz Tracking Hub for Motion Analysis Motion Capturing (See the Motion Analysis Integration page in the Appendices section of the Tracking Hub User Guide).
Requires Tracking Hub 1.1.2. or newer
-
Load motion capture data in Motion Analysis Cortex control application.
-
Run Viz Artist with activated Tracking Hub usage.
-
Load the imported mesh and navigate to the first VertexSkin plug-in instance in your scene.
-
Activate Shared Mem Tracking with the key name set in Cortex. You should see all available tracking bones in the VertexSkin plug-in's textbox below. This indicates that the information flows correctly from Cortex to Tracking Hub to the Viz Engine.
-
Due to accuracy issues of the motion capture system, it could make sense to activate Position Root Bone only. This translates only the root bone and all related child bones are rotated.
VertexBone
VertexBone is used to tell Viz which containers act as bones.
Note: Do not remove this plug-in as this would need a clean, new import (not re-import) to get the scene running again.
Common Pitfalls
-
Watch out that containers hosting the meshes and the root container of the bone containers (which should be on the same level) have the same scaling (ideally 1.0/1.0/1.0).
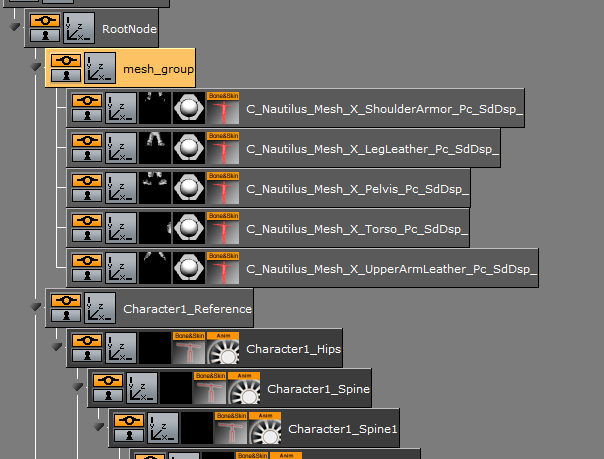
Illustration 3: Skeleton and meshes -
Transformations on the mesh parent container, and the mesh container are ignored. You can disable this via the VertexSkin plug-in (uncheck Ignore transformation on mesh container) although this is not advised. Transformation of the skinned mesh should only be done via the skeleton.
-
mesh_group is no longer the parent of the mesh containers (in Illustration 3) but Character1_Reference is. Therefore, mesh_group should be devoid of all transformations if VertexSkinning is to be used.
-
You cannot add the vertex skinning plug-ins to containers and generate a skinned mesh inside Viz. The plug-ins hold private data, that is extracted from the .fbx file during import.
-
To use the show weight of a bone, no shader plug-in can be present on the mesh (deactivating the plug-in is sufficient).
-
VertexSkinning only works properly if VBOs are used for drawing.
External References
Here you can find a small list of introduction videos for character rigging within multiple DCCs. As rigging is not a precise science with one correct way to do everything, it might be useful to watch as many videos on the topic (even the ones using software you might not be familiar with).
Glossary
-
Vertex Skinning: The process of using an armature to deform a mesh instead of using key frames for each vertex (Morphing).
-
Rigging: The act of defining a skeleton that is used to deform a mesh. This might include setting constraints on the rotation of bones or defining IK.
-
Bone: A node (container in Viz) that is part of a kinematic chain used for mesh deformation.
-
Weight Painting: The process of defining the amount by which each vertex is affected by a given bone. This can be done in a DCC via directly painting on a mesh.
-
DCC: Digital Content Creation (program). Software used to create digital media like 3D models, textures or the like.
-
Armature: A set of kinematic chains of nodes used to simulate a skeleton for mesh deformation.
-
Bind Pose: The deformation a model has when it is bound to its skeleton.
-
IK: Inverse kinematics are used to compute how a set of bones should be rotated so that the leaf ends up at a certain position. IKs are defined in chains (e.g. from foot to hip).