
Viz Artist User Guide
Version 3.12 | Published October 17, 2019 ©
Control List
![]()
The Control List plug-in allows creation of table controls. By following some design conventions when designing the table in Viz Artist, Viz Trio shows a table editor to the user. This editor supplies a more effective way for filling tables than having one tab field for each table cell.
Note: This plug-in is located in: Built Ins -> Container plug-ins -> Control
This page contains the following topics and procedures:
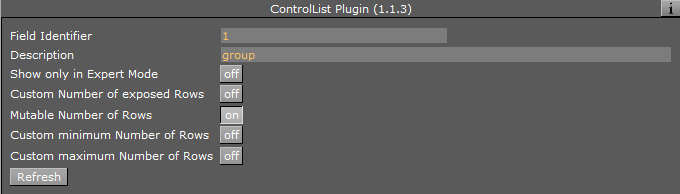
Control List Properties
-
Number of exposed rows: Sets the default number of exposed rows for the scene when the number of rows can be changed by the operator. If the number of rows cannot be changed the number of exposed rows is fixed.
-
Mutable Number of Rows: Allows the operator to add or delete rows when set to On.
-
Minimum and Maximum Number of Rows: Sets the minimum and maximum number of rows. To the operator, the number of fields can only be added or deleted when inside the range (for example greater than two and less than ten).
Tables and Preview Points
A table scene might be hard to read if you need to show a large table with many rows (e.g. 20) and/or columns. In such cases it is not uncommon to only show a subset of the information (e.g. five rows), and rather animate the scene to show the next five rows and so on.
However, in such a situation, while editing table data in Viz Trio, you cannot use a basic jump to Key Frame event for preview, as this only shows the Key Frame that relates to the table’s Field identifier (e.g. 3), and not the rows or columns of the table.
To enable operators to preview the data in the scene, it is therefore possible to add a preview point that extends to the next starting point (i.e. the next five rows of the table), using the table’s (Control List) Field identifier in addition to the row number.
So, if the identifier of Control List is 03, you have to define tags with names 03.0, 03.5, 03.10 and 03.15 (zero based row index) for Viz Trio to detect the tags and jump to them on focusing the according rows in Viz Trio’s Control List table editor.
-
Basic jump to Key Frame: When adding Key Frame events (stop points, tags,...) and giving them the name of a control plug-in identifier, Viz Trio jumps the time-line to that Key Frame event when selecting the tab field with that identifier.
-
Extended jump to Key Frame: If the Key Frame event name is e.g. 3_005 and there is a control list with identifier 3, then Viz Trio jumps the time-line to that Key Frame event. In this case when the sixth row of the table is focused.
To Design a Table Scene
To design a table scene that is correctly interpreted by the Control List plug-in there are some design conventions that need to be followed:
-
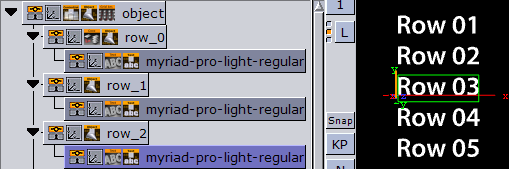
Add a group as the root container for the table. Give it a descriptive name such as table.
-
Add the Control List plug-in to the table group container.
-
Add a new group as a Sub-Container to the table container. This container is the design for the rows in the table. Give it a name such as row_1.
-
Add a Control Object plug-in to the newly added row container.
-
As Sub-Containers of the row container, add text containers with backgrounds to form the design for a single table row with the required number of columns.
-
Each of the text containers must get a Control Text plug-in and the field identifiers for each must be set from 1-n depending on how many columns the table should have.
-
The Description property in the ControlText plug-ins are picked up by the Control List plug-in and used as column headers.
-
-
When the single row looks as it should, duplicate it to make the needed total number of table rows.
-
The container plug-in Coco can be used to automate this task.
-
Add the Coco plug-in to the row container, and set the number of copies, for example 9 (1+9=10), and click Execute.
-
-
Arrange the rows
-
The arrange plug-in Grid Arrange can be used to automate this task.
-
Add the Grid Arrange plug-in to the table container, and set the number of rows to the same as above and press ENTER.
-
Set the row offset and press ENTER.
The table item of the scene is ready and when imported into Viz Trio and read, the table tab-field is shown with a special table editor. When imported into Viz Template Wizard, a template with a custom table editor is generated.
-
See Also