
Viz World Classic User Guide
Version 23.0 | Published December 12, 2023 ©
Applying Tracking
After creating one or more tracking paths you can apply these to any layer in your project. In addition, in a shape layer you can apply a tracking path to individual shapes in the layer.
To Stabilize a Movie
One application of tracking is to stabilize the movie that was used to generate the tracking path.
-
Select the movie layer in the Layers list, and click the Properties tab to display the Properties panel for the movie.

-
In the Automation section click the Apply Track Data button:
-
The Apply Track Data Wizard is displayed to lead you through the steps needed to apply the track data to the image layer.
-
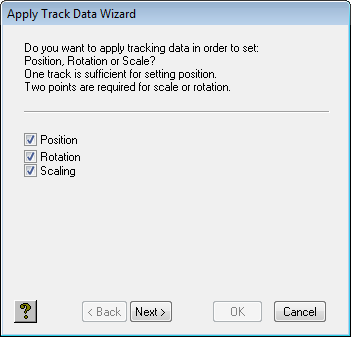
The first panel lets you specify the transformations you want to track:
-
-
Select Position, Rotation, and/or Scaling as required, and click the Next button to continue. If you have only recorded one track Rotation and Scaling are not available. The next panels let you select the tracks to use.
-
Select the first track and click the Next button to continue. If you are adjusting rotation and/or scaling you are prompted to select a second track.
-
Select the track and click the Next button to continue. The next panel lets you choose how the transformations are applied:
-
Absolute: Aligns the pin position of the object with the current track position.
-
Relative: Displaces the object by the track position.
-
Stabilize: Applies the recorded tracks to the layer to stabilize it:
-
-
Click the OK button to apply the track information to the current image layer.