
Viz World Classic User Guide
Version 23.0 | Published December 12, 2023 ©
Styles Panel
The Styles panel allows you to edit the styles in the currently selected style sheet.
This section contains information on the following sections:
Predefined Styles
Each style is identified by a name, such as Region, and specifies attributes such as fill color, border color, coastline color, marker color, text color, text typeface, and size. Applying a style to a map detail then sets its attributes to those defined by the style.
Viz World Classic provides a set of predefined styles for each of the different types of feature in the map database. These include: Sea, Unselected Land, Selected Region, Place, Latitude/Longitude, and a number of default styles for use with street data.
This section contains information on the following procedures:
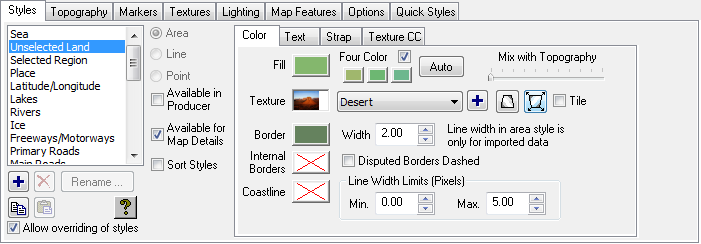
To Edit the Attributes of a Built-in or User-defined Style
-
Select the style you want to edit in the Styles list. The attributes of the style are shown on the Color, Text, Strap and Texture CC (color correction) panels:
-
Edit any attributes you want to change.
All objects in the selected style are updated to reflect the changes you have made.
Each predefined style is of type Area, Line, or Point as appropriate, and this determines the attributes displayed in the Color, Text, and Strap panels.
When you create a user-defined style you specify whether it is an Area, Line, or Point style, and this determines which features you can apply it to.
To Create a New Style
-
Select the style you want to base the new style on in the Styles list.
-
Click the + button. A new style is created with a default name; for example, Style1.
-
Select Area, Line, or Point to specify what the style applies to. This determines which options are available in the Color, Text, and Strap panels.
-
Edit the attributes of the style as required.
To Edit the Name of a Style
-
Select the style in the Styles list.
-
Click the Rename... button.
Note: You cannot edit the names of built-in styles.
To Delete a Style
-
Select the style in the Styles list.
-
Click the X button.
Note: You cannot delete the built-in styles.
Color Panel
The options available on the Color panel depend on the selected style.
This section contains information on the following topics and procedures:
Area Styles
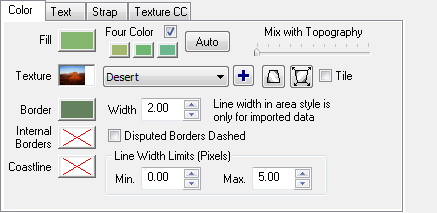
Provides some or all of the following options:
|
Attribute |
Description |
|
Fill |
The fill color for the object. |
|
Four Color |
Cycles between four different colors for the fill color so that adjacent regions can easily be distinguished. The Auto button automatically sets the alternative fill colors based on the current Fill color. |
|
Mix with Topography |
Moving the slider to the right adds a proportion of the style color to land colored with topography. |
|
Texture |
An optional texture for the object; see Using textures below. |
|
Border |
Specifies the border color. |
|
Width |
Sets the line width for the borders of imported map features. |
|
Internal Borders |
Displays the internal borders of the country in the specified color. |
|
Disputed Borders Dashed |
Displays disputed borders dashed. |
|
Coastline |
Specifies the coastline color. |
|
Line Width Limits |
Restricts the range of line widths when zooming. |
Line Styles
Provides the following options:
|
Attribute |
Description |
|
Inner color and Width |
Color and width of the body of the line feature. |
|
Outer color and Width |
Color and total width of the edges of the line feature. |
|
Line Width Limits |
Restricts the range of line widths when zooming. |
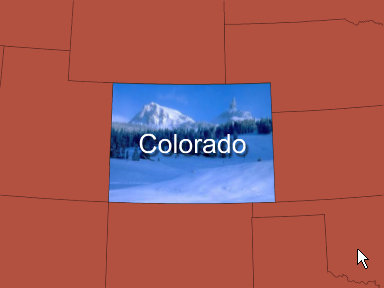
To Use a Texture
-
To fill the area with a texture select an existing texture from the drop-down menu, or use the + button to load a new texture from a file.
-
Any image can be used as a texture, including images in the CMR (Curious Multi-Res) format; this is ideal for using large files, such as satellite images, as textures. For more information see Working with Images and Movies.
-
The buttons to the right of the Texture drop-down menu can be used to determine how the texture is displayed:
Button
Name
Description

Add Texture
Displays the Open dialog box to allow you to add a texture from a file.

Position Texture
Click to position the texture on the map. You can then move or scale the texture in the same way as for images.

Position Texture (Arrows)
Allows you to move and scale the texture by specifying how two points on the texture should be aligned with the map; see below.

Tile
Specifies whether the texture should be tiled.
-
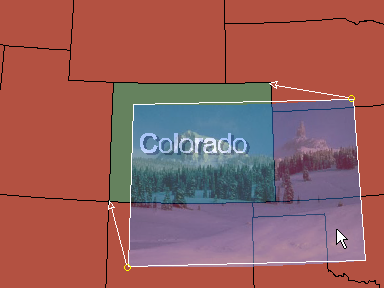
To Transform a Texture
-
Click the Position Texture (Arrows) button.
-
Drag the circles to indicate which points on the texture you want to use as the reference points.
-
Drag the arrow heads to indicate where those points should be positioned on the map:
-
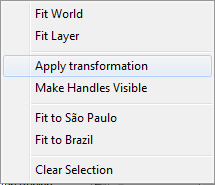
Click with the right mouse button and click Apply transformation on the context menu to transform the texture.
-
Click the Position Texture (Arrows) button again to see the transformed texture. The Make Handles Visible option on the pop-up menu is useful if the handles are outside your current view.
Text Panel
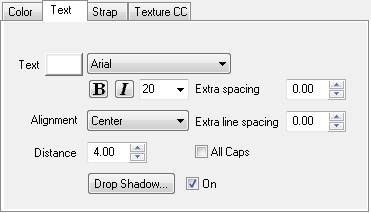
The text panel provides the following options:
|
Attribute |
Description |
|
Marker |
Point styles only: The image file used for the point. Select an existing marker from the drop-down menu, or click the + button to load a new marker. |
|
Text |
Specifies the text color, font, size, and style (bold, italic) for labels. |
|
Extra spacing |
Varies the character spacing to compress or expand the text. |
|
Extra line spacing |
Adds extra line spacing. |
|
Alignment |
Specifies the position of the label relative to the marker. |
|
Distance |
Sets the distance. |
|
All Caps |
All letters are written in upper case. |
|
On |
Adds a default drop shadow. |
|
Drop Shadow… |
Displays the Drop Shadow dialog box to allow you to define the characteristics of the drop shadow; see opposite. |
Drop Shadow
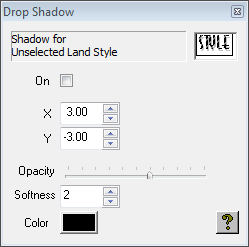
Provides the following options:
|
Attribute |
Description |
|
On |
Turns the drop shadow on. |
|
X,Y |
Defines the drop shadow displacement, in pixels. |
|
Opacity |
Specifies the drop shadow opacity. |
|
Softness |
Allows you to blur the drop shadow. |
|
Color |
Specifies the drop shadow color. |
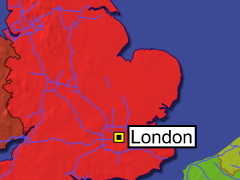
Strap Panel

The Strap panel allows you to add a background, frame, and/or connector to the label of a feature.
Provides the following options:
|
Attribute |
Description |
|
Marker |
The image file used for the marker. Select an existing marker from the drop-down list, or click the + button to load a new marker. |
|
Opacity |
The opacity of the body of the strap. |
|
Fill, Margin, Margin Height |
The fill color, margin and margin height of the strap. |
|
Frame |
The type, color, width, and opacity of the frame of the strap. |
|
Connector |
The type, color, width and gap (to the marker) of the connector. |
|
Drop Shadow |
Adds a drop shadow to the strap. |
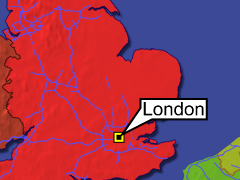
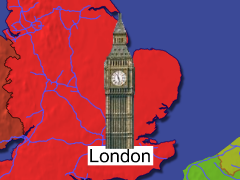
After defining a strap you can move the end of the pointer with the Text tool.
The following illustrations below show some examples of straps. Fill white and frame black, connector set to pointed border, and marker to image:
Texture CC Panel
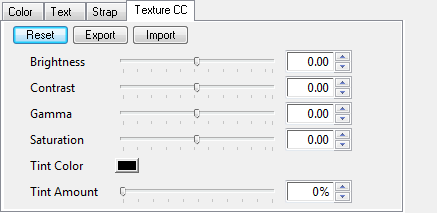
Allows you to color correct textures.
See Also
-
Texture CC panel when Working with Maps